Wednesday, October 18, 2023

October 19, 2023 - This Week's Box Contents Featuring Fresh Ginger


Cooking With This Week's Box

Fresh Baby Ginger:  
Golden Milk
Photo from www.teaforturmeric.com
Easy 5-Minute Carrot Miso Ginger Dressing (See Below)
Pear Ginger Walnut Muffins (See Below)

Orange Carrots: 

Orange Marmalade or Bon Bon Winter Squash:  

Starry Night Acorn Squash: 
Japanese Roasted Kabocha Squash
Photo from www.justonevookbook.com

Yellow Onions: 

Italian Garlic: 

Cauliflower or Broccoli Romanesco or Broccoli: 

Onion Tart
Photo from www.tasteofhome.com
Salad Mix: 

Purple Majesty Potatoes: 

Red Summercrisp or Green Boston Lettuce: 

Mibuna: 

Purple Daikon Radish:  

Garlicky Roasted Purple Potatoes
Photo from www.foodabovegold.com
This week is definitely feeling more like fall, complete with changing leaves on the trees, a cool, crisp air hanging in our valley in the morning, and a shift in cooking from tomatoes, peppers and summer vegetables to winter squash, root crops and very soon…sweet potatoes!  This week we’re featuring another one of our unique tropical vegetables, Fresh Baby Ginger!  I included a few recipes for you to consider, the first being Pear Ginger Walnut Muffins (See Below). This is the perfect muffin for a fall breakfast on the go. I also included a simple recipe for Easy 5-Minute Carrot Miso Ginger Dressing (See Below). This recipe will be a great accompaniment to a green salad topped with shredded daikon radish, carrots, and grilled steak! I also included a recipe for Homemade Pickled Ginger in case you want to give that a try.  Lastly, I love a hot cup of Golden Milk so thought you might enjoy it too!

I enjoy purple daikon radish because it’s beautiful, but I also like having a smaller radish to work with.  One of my favorite things to do with purple daikon is to make Soy-Pickled Daikon Radish.  This is a great condiment to have in the refrigerator. Enjoy a few slices alongside fried rice, grilled steak, ramen noodles, etc. If you want something that is a bit more of a complete meal, check out Andrea Bemis’ recipe for Daikon Radish & Soba Noodle with Chickpea Miso Ginger Sauce.

I hope you’re ready to make winter squash part of your weekly line up, and for starters try Roasted Acorn Squash with Sesame Seeds & Cumin or Sourdough Stuffing with Apples, Acorn Squash & Hazelnuts.  I seldom do anything with kabocha squash other than bake it, season with salt, and melt some butter on it. But if you do want to get a bit more adventurous, check out this recipe collection for 8 Kabocha Squash Recipes to Keep In Your Back Pocket.

Ok, there’s another load of carrots coming in from the field very soon so I’d better wrap up and head back to the packing shed!  Richard has been monitoring the sweet potato curing process and, hopefully, we’ll be able to start washing them next week for your boxes!  We’re also saving Brussels sprouts for next week.  Plenty to look forward to! 

Have a great week-----
Andrea 

Vegetable Feature: Fresh Baby Ginger

by Andrea Yoder

Newly planted Ginger
Along with this year’s lemongrass and jicama, baby ginger is another unique crop that is on our list of crops we grow periodically, but not every year. Our growing season is much different than Hawaii and other ginger-producing regions, however it is possible to grow ginger in this climate! Ginger is actually a rhizome, which is a stem that grows horizontally underground.   It produces roots to anchor it and sends up shoots to grow into foliage above ground as it grows and expands. In our northern climate, we have the best results growing ginger in a greenhouse as we just don’t have a long enough growing season to get any kind of appreciable yield when grown in the field.  The ginger we produce is actually referred to as baby ginger as we don’t have enough warm days, even when grown in the greenhouse, to produce fully mature ginger.  

Harvesting Ginger
Baby ginger is different than fully mature ginger, which is what you have likely purchased if you’ve bought ginger from the store.  Baby ginger has very thin skin with some pink coloring, especially at the points where the stems have grown from the main rhizome. This is very different from the thick, brown skin you are likely most accustomed to seeing in the store.  Due to its thin skin, baby ginger is more perishable and should be used within about a week for optimal quality. It is best to store it at room temperature as it can get rubbery in the refrigerator. When you cut into a piece of baby ginger, you will notice it is more tender, juicy and has a bright and perhaps a bit more mild flavor than some fully mature ginger that can be quite spicy.  In many ways, young ginger versus fully mature ginger is very similar to the differences you experience with using fresh garlic harvested in late June versus mature garlic that has been cured.  We also chose to leave some of the stem and a bit of leaf attached to the ginger. These stems are also edible, although the flavor is milder than the main rhizome. I like to add them to soup, stews, tea or broth and use them to infuse additional flavor into the liquid.

Freshly washed baby Ginger
Ginger is used as both medicine and food. As a medicine, it has anti-inflammatory properties, can sooth a whole host of gastrointestinal maladies, and helps to boost the immune system. When used in cooking, you will find it is a common, if not staple, ingredient in many Asian cultures. It is often paired with garlic and scallions in Chinese stir-fry or combine it with chiles, lemongrass and a variety of other ingredients to make Thai curry pastes. Ginger has a spicy, warm flavor which also makes it an excellent ingredient to pair with other warming spices and rich, comforting foods such as sweet potatoes, winter squash, mushrooms, broccoli, etc. It can be used extensively to make beverages, teas, baked goods, stir-fry, salad dressings, vegetable dishes, curries, and much, much more!

To use baby ginger, simply cut a piece from the main chunk and peel if necessary. The skin is so thin and tender that it usually comes off quite easily. As I mentioned above, it’s best to use baby ginger within about a week.  If you do not think you’ll be able to use all your ginger within a week, consider preserving it for later use.  There are several options for ways to preserve ginger. First, consider making a ginger syrup that you can keep in the refrigerator to use as a base to add to beverages or just eat a spoonful each day for an immune boost. You can also turn fresh ginger into pickled ginger. Traditional Japanese pickled ginger that is commonly served with sushi is made with baby ginger. The pink hue of pickled ginger comes from that pink color you see on the skin of baby ginger. This is also the preferred form of ginger to use as it’s more tender and delicate compared to fully mature ginger.  Pickled ginger is very easy to make and will keep for up to six months in the refrigerator.  Lastly, you can freeze fresh ginger. Just wash it well and cut it into smaller pieces, about the amount you may want to use at a time. Place the clean ginger pieces in a freezer bag and freeze it raw. When you have a recipe that calls for fresh ginger, pull a piece of the frozen ginger out and let it rest at room temperature for a few minutes. The ginger may be a little soft once fully thawed, but that doesn’t really matter.  Just chop it up and use it wherever you need “fresh” ginger! We’ve come to appreciate this crop over the years and hope you enjoy this little taste of the tropics!  


Pear Ginger Walnut Muffins

Yield:  12 medium sized muffins

Pear Ginger Sauce:
2 cups peeled, cored and diced ripe pears (Bartlett or similar)
1 Tbsp unsalted butter
¼ cup sugar
2 Tbsp grated fresh ginger

Muffins:
1 ½ cup all-purpose flour
1 ½ tsp baking powder
½ tsp baking soda
1 tsp ground ginger for batter plus ½ tsp for topping
¼ tsp salt
2 eggs
⅓ cup sugar for batter plus 2 Tbsp for topping
½ cup plus 3 Tbsp unsalted butter, melted
1 ½ cup walnuts, coarsely chopped
  1. First prepare the Pear Ginger Sauce. Heat 1 Tbsp butter in a large saucepan over medium-high heat. When butter is melted and frothy add pears, tossing with a wooden spoon to coat. 
  2. Add ¼ cup of sugar, stirring to combine. Bring to a boil, then reduce heat to low.
  3. Add grated ginger and cook over low heat for about 15 minutes, until pears are soft and most of the liquid has evaporated. Remove from the heat and allow to cool for at least 15-20 minutes while you assemble the muffin batter. 
  4. Put oven rack in middle position and preheat oven to 400°F. Grease muffin pan.
  5. In a medium mixing bowl, combine flour, baking powder, baking soda, 1 tsp ground ginger and salt.
  6. Whisk together eggs and ⅓ cup sugar in a large bowl until combined well, then add butter whisking or blending with electric mixer until creamy. Add 1 cup of the cooled pear ginger sauce and stir to combine.  Next, fold in flour mixture until the dry and wet ingredients are fully incorporated. Stir in 1 cup of walnuts and divide batter among muffin cups.
  7. In a small bowl, combine remaining 2 Tbsp sugar, ½ tsp ground ginger and ½ cup walnuts. Sprinkle topping evenly on top of muffins. Bake until muffins are golden, and toothpick inserted into the center comes out clean, about 20 minutes.  Cool in pan on a rack 5 minutes, then remove muffins from pan and cool slightly. Once cooled completely, the muffins can be stored in an airtight container at room temperature for 1 day, or in the refrigerator for about a week. 
Recipe borrowed from www.food52.com.

Easy 5-Minute Carrot Miso Ginger Dressing

Yield:  approximately 1.5 cups
½ cup white miso
¼ cup avocado or olive oil
½ cup grated carrots, packed
2 Tbsp fresh ginger, grated
2 Tbsp rice vinegar
2 Tbsp toasted sesame oil
2 tsp maple syrup or honey
¼ cup water
½ tsp salt
½ tsp freshly ground black pepper
3 Tbsp sesame seeds (optional)
  1. Start by adding all of the ingredients, except for the sesame seeds, to a high-speed blender.  Blend until smooth.
  2. Taste and adjust the salt and pepper as needed. If you are using sesame seeds, stir them in by hand.
  3. Once done, transfer your dressing to a jar and store in the fridge for up to one week. Put it on your favorite salads, eat it with veggies, or use it as a sauce for chicken or fish.
Recipe borrowed from www.kalejunkie.com.

Wednesday, October 11, 2023

October 12, 2023 - This Week's Box Contents Featuring Napa Cabbage


Cooking With This Week's Box

Orange Carrots:  
Butternut Squash Pasta Shells
Photo from www.juliasalbumn.com
20 Easy Carrot Recipes 

Butterscotch Butternut Squash:  

Red Onions:  

Porcelain Garlic:  
Ramen Noodle Stir-Fry
Photo from www.juliasalbum.com
Garlic Parmesan Carrot Fries 

Red/Orange Italian Frying Peppers:  

Broccoli:  

Baby Spinach:  

Adirondack Red Potatoes:  
Creamy Potato and Chard Gratin
Photo from www.thetasteedit.com
Fork-Crushed Potatoes

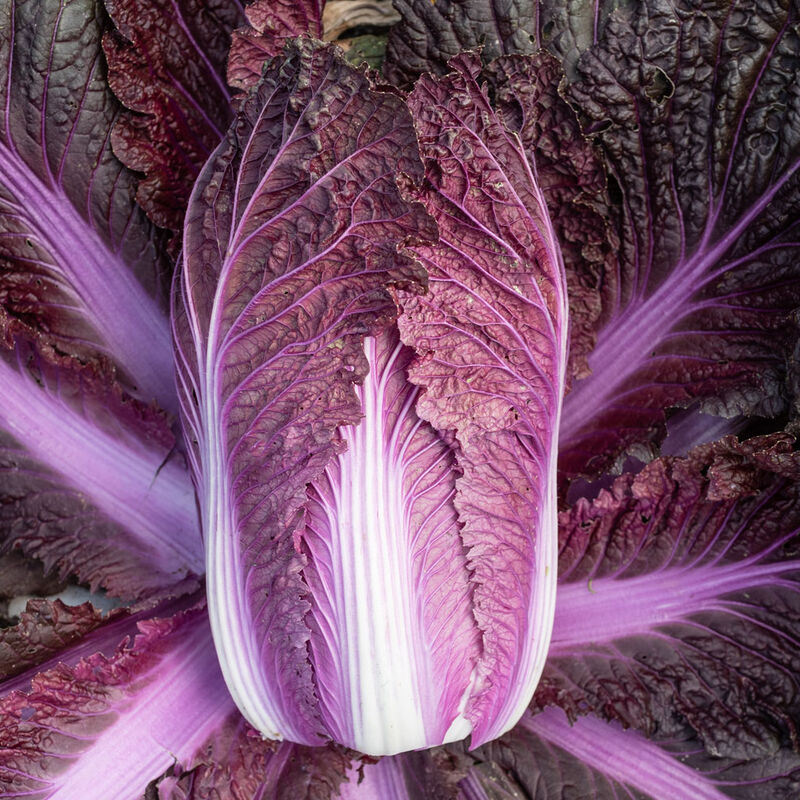
Red Napa Cabbage:  
Vietnamese Napa Cabbage Slaw (See Below)
Salt-Massaged Napa Cabbage with Citrus Slivers (See Below)

Rainbow Chard:  

Mini Sweet Peppers:  

Hello Everyone—

Napa Cabbage & Sweet Pepper Slaw
Photo from www.myrecipes.com
Fall is closing in on us and we did have our first frost this week. We’re preparing to plant garlic very soon, so we’ve spent a few frosty mornings cracking bulbs of garlic in preparation for planting.  We also started harvesting sweet potatoes! The reality is starting to come closer that we’re nearing the end of our harvest season.  But before we are officially done for the year, we still have more exciting vegetable selections to send your way, including this week’s gorgeous red napa cabbage! This is a stunning vegetable that may be eaten raw or cooked. If you’d like to enjoy it raw, consider trying this recipe for Vietnamese Napa Cabbage Slaw (See Below) or this Napa Cabbage & Sweet Pepper Slaw. 

Before long we’ll be pining for fresh greens, so let’s take advantage of every opportunity we can to consume these fresh, leafy greens before they are gone!  I included a few entrée type salads this week to utilize the bag of spinach. Check out this entrée salad recipe for Spinach Salad with Grilled Vegetables and Herb Chicken.  I also thought this recipe for Spinach Salad with Baked Pears looked tasty.  

Of course, if you prefer to cook your greens, check out these two recipes for Creamy Potato and Chard Gratin and Tuscan Chard and Cannellini Bean Soup.

I’m going to wrap it up for this week, but before I do I want to mention carrots.  I found several collections of carrot recipes and included them this week, so no excuses for not eating your carrots!

Have a great week!
Chef Andrea 

Vegetable Feature: Napa Cabbage

Photo credit:  Johnnyseeds.com


While it’s called “Red” napa cabbage, it really is more of a vibrant pinkish-purple color that is quite stunning against its pure white ribs.  We’ve grown these before, but this is by far the best crop we’ve seen of this vegetable!  Red napa cabbage is a relatively new vegetable, having been released onto the commercial market in 2016.  Its development may be credited to Kwonnong Seed company which is based in Korea. Given napa cabbage is the traditional cabbage used to make kimchi, a Korean fermented vegetable preparation, it makes sense that a Korean seed company would invest in diversifying this crop. This vegetable is also used in other countries throughout Asia where it is considered to be a staple vegetable.  According to cookbook author and chef, Fuchsia Dunlop, napa cabbage is referred to as “Chinese Leaf Cabbage” in China. She cites napa cabbage as one of the most important vegetables in northern regions of China where it is stir-fried, pickled, added to fillings for dumplings as well as using it in soups and stews. In Japan, napa cabbage is called hakusai and is something nearly every family that grows their own food will have in their garden. 

Napa cabbage is a little different than other varieties of cabbage. The heads grow upright and are more cylindrical in shape. The upper portion of the cabbage leaf is crinkly while the lower portion of the leaf has a wide, white rib. Fuchsia describes napa cabbage as having crinkly leaves like a head of savoyed cabbage, but with a crunchy bite more like head lettuce! Both the leaf and the ribs are edible and the combination of textures from the two may be described as crunchy, crisp, and juicy! Napa cabbage has a higher water content than some other cabbages. It is also more sensitive to the effects of salt, acidity from vinegar or citrus, and heat which all breakdown the cell structure of the cabbage and release water. When cooking napa cabbage, plan accordingly and know that it will only require a few minutes to cook if you want it to retain a little bit of crunch. If you are using napa cabbage in its raw form to make a salad or a slaw, I recommend mixing it with any vinaigrette, dressing or sauce shortly before serving. This will diminish the chance of the salad becoming soggy.

Napa cabbage pairs well with a wide variety of vegetables including sweet & hot peppers, onions, carrots, garlic, ginger, and herbs such as cilantro, basil, and mint. Napa cabbage is also often paired with citrus fruits including mandarins, oranges, limes, and yuzu (for which you may substitute a Meyer lemon). Other ingredients often used alongside napa cabbage include sesame seeds and oil, peanuts, cashews, soy sauce and fish sauce.

Store napa cabbage in the refrigerator, loosely wrapped in a plastic bag to prevent it from wilting or getting soft. For optimal results, use within 1-2 weeks of receiving it. As always, we invite you to share your red napa cabbage creations with us in our private Facebook Group! 


Salt-Massaged Napa Cabbage with Citrus Slivers

Yield:  6 servings

1 ½ pounds napa cabbage
1 ½ Tbsp sea salt
Slivered zest from 2 small Meyer Lemons, yuzu or mandarin oranges
½ small dried or fresh red-hot pepper, sliced finely (optional)
  1. Cut the napa cabbage in half lengthwise. Remove the core with a V cut and slice the cabbage crosswise into fine strands, using both the leaf portion as well as the white ribs. 
  2. Place the cabbage in a large mixing bowl and toss with the salt, citrus zest, and red pepper, if using. Massage the cabbage gently until its natural juices have run out but it is not completely fatigued (meaning the cabbage has started to soften, but it still has texture).
  3. Pack into a resealable plastic bag, squeeze out all the air, and roll tight. Chill in the fridge for about 15 minutes. Remove from the fridge, lift the cabbage from the accumulated liquid, and squeeze. Taste, add a touch more salt if needed and serve. 
Serve this salt-massaged cabbage as a fresh relish-type addition to a meal where it serves as an accompaniment instead of as a main item. For instance, it would go well with grilled fish, chicken or pork served with rice as a simple meal.

Recipe borrowed from Nancy Singleton Hachisu’s book, Japanese Farm Food.


Vietnamese Napa Cabbage Slaw

Yield:  4 servings

8 cups loosely packed napa cabbage, thinly sliced in ¼-inch wide strips
1 medium red onion, thinly sliced
1 cup shredded carrots
2 Tbsp Asian fish sauce
2 Tbsp freshly squeezed lime juice
¼ tsp red pepper flakes
½ cup tightly packed fresh mint and/or cilantro leaves
¼ cup chopped unsalted peanuts
  1. Put the cabbage, onions, and carrots in a serving bowl. 
  2. Just before serving, add the fish sauce, lime juice, red pepper flakes, and herbs and toss to combine. Sprinkle the peanuts over the top of the slaw and serve immediately. 
Recipe borrowed from Laura Russel’s book, Brassicas: Cooking the world’s healthiest vegetables.

Wednesday, October 4, 2023

October 5, 2023 - This Week's Box Contents Featuring Jicama


Cooking With This Week's Box

Jicama:  
Jicama & Orange Salad with Citrus-Cumin Vinaigrette (See below)

Baby White Turnips:  

Tropical Creamsicle Smoothie
Photo from realsimple.com
Orange Carrots:  

Yellow Onions:  

Italian Garlic:  

Red & Orange Italian Frying Peppers:  

Jalapeno Peppers:  

Variety of Tomatoes:  

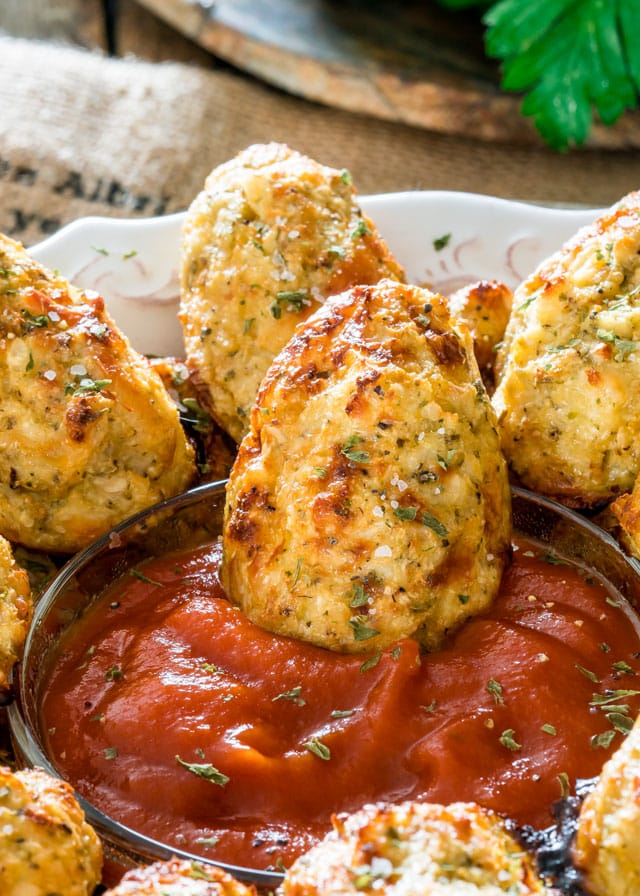
Cheesy Cauliflower Tots
Photo from jocooks.com
Cauliflower OR  Broccoli Romanesco:  

Broccoli:

Baby Spinach OR OR Salad Mix:  

Cilantro:  

Iceberg OR Green Boston Lettuce:  

Hello Everyone!

We are kicking off October with a very busy harvest schedule!  We’re facing our first frost pretty soon, so one of our priority harvests this week was to get all of the Jicama dug!  We were pleased with the results of this year’s harvest and we’re excited to share this unique vegetable with you this week.  Jicama is a simple vegetable, so it’s best to enjoy it in a simple preparation.  This week’s featured recipe is for Jicama & Orange Salad with Citrus-Cumin Vinaigrette (See below).  I also included links to several other recipes that utilize jicama along with some of the other vegetables in this week’s box.  I’m looking forward to trying this Jicama & Apple Spinach Salad with Honey Dijon Dressing.  I also want to try this Pineapple Jicama Salsa.
Pineapple Jicama Salsa
Photo from itsavegworldafterall.com

We are nearly finished with tomatoes and peppers for the season, so savor the final few meals where we can enjoy them in their fresh state.  This Spinach Salad with Tomatoes, Mozzarella & Pepperoni  has Richard’s name all over it!  In addition to fresh salads, I also included several tasty main entrees such as Creamy Roasted Red Pepper Pasta and  Curried Lentil, Tomato & Coconut Soup.

The last thing I want to mention are these unique carrot recipes.  I don’t often think to put carrots in beverages, but I want to try this Tropical Creamsicle Smoothie and this Carrot Ginger Soda looks fun!

We’re hoping to start harvesting sweet potatoes within the next week.  Wish us luck and know that they’ll likely  be in your box before the end of October!  We’re also going to take a sneak peak at this year’s baby ginger crop.  If it’s big enough, we may harvest within the next few weeks as we need to change the plastic on the greenhouse we use to grow the ginger.  Never a dull moment during fall harvest season!  

Have a great week—Chef Andrea 

Vegetable Feature: Jicama

by Andrea Yoder

Jicama in the field
Jicama is the odd-shaped vegetable with brown skin occupying one corner of this week’s CSA box. It is also known as yam bean, Mexican yam or Mexican turnip and is native to Mexico. The name of this vegetable is pronounced HICK-uh-mah or HEE-kuh-mah. It is a tropical plant that resembles a bean plant with bean-like vines and seed pods. The jicama grows underground and is a tuber that can produce multiple tubers off the one main stem. On the outside jicama is not the most attractive or flashy vegetable. Peel away the brown, leathery skin and you’ll find a solid white flesh inside that is mild in flavor, crunchy with a slight sweetness and slightly starchy.  

You can eat jicama both raw and cooked. One of the most basic ways to eat jicama, and a common street food, is to slice it into sticks and give it a squeeze of lime juice and a light sprinkling of chili powder and salt. Jicama also pairs well with fruit including citrus (oranges, grapefruit, limes), pineapple, mango, and apples. It is common to see jicama slaws, salads and salsas that also include fruit. It also pairs well with avocado, hot, and sweet peppers, cilantro, tomatoes, seafood, onions, and garlic to name just a few complementary ingredients. In Asian cuisine you may find jicama used in stir-fry type preparations. When stir-fried, jicama should be added towards the end of cooking to retain the crisp texture. If you let it get just slightly soft, it has almost a potato-like flavor and texture.  

2023 Jicama Harvest!
We don’t grow jicama every year, but it has a permanent spot on our list of unique vegetables we grow from time to time.  We grow jicama in the field on beds covered with green plastic mulch. We use a growing method similar to what we do for sweet potatoes, given they are both tropical plants.  About a week before harvest, we cut all of the vines off the plants in an effort to “cure” them.  The objective of this process is to set the skins, so they are less susceptible to injury when harvesting as well as to enhance the shelf life.  While jicama does have the ability to be stored for a while, we recommend you enjoy it within a week or so for optimal quality.                                                                                                                                                       Jicama is very sensitive to chill injury, so it is best to store it on your kitchen counter until you are ready to use it.  If you store it in the refrigerator, you’ll notice the quality will deteriorate quite quickly.  Once you cut into it, store any cut jicama in the refrigerator and eat it within a few days. We hope you enjoy trying something different this week! 

Jicama and Orange Salad with Citrus-Cumin Vinaigrette

Yield:  4 servings
Citrus-Cumin Vinaigrette:
1 tsp cumin seeds
½ cup freshly squeezed orange juice
2 Tbsp freshly squeezed lime juice
1 Tbsp extra-virgin olive oil
1 Tbsp honey
2 tsp Dijon mustard
Freshly ground black pepper, to taste
Salt, to taste

Salad:
2 oranges
1 ½ pounds jicama, peeled and julienned
3-4 ounces baby spinach
  1. First prepare the vinaigrette. Toast cumin seeds in a small skillet over medium-high heat until fragrant, about 2 minutes. Remove from heat; cool slightly.  Transfer to a spice grinder, and process until finely ground. (Alternatively, substitute with 1 tsp pre-ground cumin)
  2. Combine all vinaigrette ingredients in the jar of a blender, blend until smooth.  Set it aside until you are ready to dress the salad. If you have any extra vinaigrette, store in the refrigerator up to 3 days.
  3. Using a sharp knife, cut both ends off the oranges, and remove the peel and pith. Slice the peeled fruit crosswise into ¼-inch rounds and remove any seeds. Transfer slices to a large bowl and combine with jicama and spinach.  Toss with the vinaigrette and serve immediately.
Recipe borrowed from Martha Stewart Living Annual Recipes 2003.

Wednesday, September 27, 2023

September 28, 2023 - This Week's Box Contents Featuring Brassicas


Cooking With This Week's Box

Creamy Onion Dip
Photo from www.chocolatemoosey.com
Sedona Yellow Onions:  

Italian Garlic:  

Green Top Gold Beets:  

Orange Italian Frying Peppers:  
Broccoli & Pepper Stir-Fry
Photo from www.atcoblueflamekitchen.com


Mini Sweet Peppers:  

Jalapeño Peppers:  
Three Cheese Bacon & Jalapeño Pasta
Phot from www.thecreativebite.com

Poblano Peppers:  

Large Tomato Variety:

Creamy Cauliflower Potato Soup
Photo from www.simplyscratch.com
German Butterball or Carola Gold Potatoes:  

Broccoli and Broccoli Romanesco or Cauliflower:  
Deborah Madison’s Cheese & Broccoli Soup (See Below)
Roasted Cauliflower with Turmeric, Spice & Cilantro (See Below)

Baby Spinach:  

Salad Mix:  

Roasted Potatoes and Broccoli
Photo from www.pinchandswirl.com
Let’s kick off this week’s article with our featured vegetables—the Brassica family!  In your box this week you’ll find both broccoli and either cauliflower or broccoli Romanesco.  There are so many different ways to prepare these two selections, but this week I turned to Deborah Madison for some guidance.  Deborah Madison is known for simple, yet flavorful, vegetarian recipes. This week we’re featuring her recipe for Deborah Madison’s Cheese & Broccoli Soup (See Below).  While this recipe calls for broccoli, you could also substitute cauliflower and/or broccoli Romanesco with good results. The second recipe is for Roasted Cauliflower with Turmeric, Spice & Cilantro (See Below).  In my book, anything with roasted cauliflower is a winner!

We are blessed with plenty of salad greens this week, so it’s time to pull out some recipes to put simple salads on the table in no time flat!  If you have a few simple dressings or vinaigrettes on hand, you can build a salad quickly. This Sweet Onion Dressing sounds delicious as does this Fresh Tomato Vinaigrette.  I also came across this recipe for Jalapeño Ranch Dressing which would be tasty on a spinach salad.  This Ranch Dressing may also be good drizzled over roasted vegetables such as cauliflower or potatoes. 

Tomato Spinach Frittata
Photo from www.bake-eat-repeat.com
Tomato season is coming to a close very soon, but before it does it’s time to squeeze in a few more tomato dishes.  For starters, how about this Tomato Spinach Frittata.  I also included two of my favorite recipes from previous newsletters. This Garlic Scented Tomato Salad is so simple, but so very taste.  I also really like this recipe for Spice Braised Lentils & Tomatoes with Toasted Coconut.  The combination of tomatoes and coconut seemed a little weird to me at first, but it’s actually quite delicious!

I always like to give you something to look forward to, so I’ll let you know that we’ll likely start sending some of our early season winter squash varieties your way next week.  We are also planning to harvest the jicama for next week’s boxes! Sweet potatoes are not quite ready, but it won’t be long.  What other fall favorites are you anxiously awaiting?

Have a great week and we hope you’ll join us at the Harvest Party this weekend!
--Chef Andrea 


Vegetable Feature: Brassicas-Cauliflower, Broccoli & More!


by Andrea Yoder

“Brassicas” is a term we use to refer to a family of vegetables that includes cauliflower, broccoli, broccoli Romanesco, turnips, cabbage, radishes, Brussels sprouts and more! This week we thought it fitting to feature this crop group in a bit more detail with an emphasis on the broccoli, cauliflower and Romanesco crops we are currently harvesting. While we grow broccoli and cauliflower in the spring and fall, fall is the time of the year when these crops typically thrive and usually taste the best with a little touch of cold weather. As with other crops in this family, you’ll notice a bit of sweetness in the flavor of these vegetables once the plant has gone through a bit of a cold snap.  Over the past few years, we have had to adjust the planting dates for our fall cauliflower, broccoli, Romanesco, and cabbage plantings. With climate change, our fall plantings have been coming in too early while it’s still warm!  It’s a delicate balance in that the plants need enough warmth and growing days to produce a full-size vegetable, but the rate of growth typically slows as the temperatures taper off in the fall.  In some years we’ve had trouble with crops like cauliflower reaching full maturity before it gets so cold that the low temperatures damage the product.   While we have not had a frost yet (thankfully!), we have had some cool nights where the temperature dropped down into the 40’s.  How will this fall play out? It’s anyone’s guess!

Broccoli is one of the most commonly consumed vegetables, considered a staple by many households.  We won’t spend much time talking about broccoli other than a reminder to get the full value from broccoli by eating both the stem and the florets on top!  Shifting our attention to cauliflower, white is the traditional cauliflower color, however we also grow purple and yellow varieties in the fall. A common question we are often asked is if the colored varieties taste different. The basic answer is that they all do still taste like cauliflower, however, remember that different color pigments in vegetables indicate the presence of different nutrient compounds.  So, if you pay close attention, you may notice subtle flavor differences between the different colors. The yellow variety we used to grow was named “Cheddar.”  We’ve since switched to a different variety called “Flamestar,” however another common question we get is whether or not the yellow cauliflower tastes like cheese.  While that would be pretty cool to have a built-in cheese flavor, the answer to that question is “no.”  If you want your cauliflower to taste like cheese, you’ll have to put the cheese on it!

Broccoli Romanesco

So where does broccoli Romanesco fit into this conversation? Despite the word “broccoli” in its name, broccoli Romanesco bears more resemblance to cauliflower. It grows on a plant that is more similar to cauliflower and may be used interchangeably with cauliflower in recipes.  But take a moment to really take note of Romanesco’s unique appearance as that is the area where this variety really sets itself apart from the crowd! I’m not a mathematician, so I won’t even attempt to explain the fractal nature of this plant, but it’s a pretty remarkable representation of nature’s perfect design!

I think it’s also important to mention the health benefits of vegetables in this family of vegetables.  Basically, any vegetable in the brassica family is going to be packed with valuable nutrients.  Cauliflower in particular contains glucosinolates, which are plant compounds that help protect our bodies from cellular damage by free radicals and have anti-inflammatory, antibacterial and antiviral effects.  Broccoli contains a compound called sulforaphane which has anticancer properties. Mentioning just two compounds is a gross underrepresentation of the nutritional benefits you will glean from incorporating brassicas into your diet regularly but trust me—it’s worth it!

Broccoli, cauliflower, and Romanesco are very versatile in their uses. All three may be eaten raw or cooked. They may be roasted, grilled, baked, stir-fried, boiled, or sautéed.  They are delicious in soups, gratins, salads, pickled, and the list goes on! 


Deborah Madison's Cheese and Broccoli Soup

Yield: 6 Cups

1 ¼ pounds broccoli
Sea salt and freshly ground pepper, to taste
3 Tbsp butter or canola oil
1 onion, chopped
1 celery rib, celery diced and leaves chopped
½ pound gold potatoes, diced
1 plump garlic clove, chopped
⅛ tsp cayenne, or more to taste
1 tsp dried marjoram
1 bay leaf
1 pinch of dried thyme
1 Tbsp flour
½ cup light cream, milk, or reserved cooking water from the broccoli
2 tsp Dijon-style mustard, or to taste
2 cups grated sharp Cheddar cheese
Rye or whole wheat bread, toasted
  1. Separate the crowns from the broccoli stems, then separate the crowns into florets. You should have at least 4 cups or a little extra.  Peel the broccoli stems, quarter them, and chop them into small pieces, yielding a cup or so. Bring a quart of water to a boil and add 1 scant teaspoon salt and the broccoli florets.  Cook for about 3 minutes, then scoop out the florets, reserving the water. Rinse broccoli under cool water and set aside.
  2. Melt the butter in a soup pot and add the onion, celery, potato, broccoli stems, garlic, cayenne, and herbs. Cook over medium-high heat for about 5 minutes, stirring now and then. Add ½ teaspoon salt, stir in the flour, then pour in 3 cups of the reserved water from the broccoli, saving any remainder.  Bring to a boil, lower the heat, and simmer, covered, until the potato is tender, 10 to 12 minutes. Add the cream or additional broccoli water if needed to thin the soup. During the last few minutes, add the florets and allow them to heat through.
  3. Remove the bay leaf and carefully puree the soup using either an immersion blender or a regular blender. Once pureed, return the soup to the pot. Stir in the mustard then taste for salt and season with pepper. Just before serving, stir in the cheese, but don’t let the soup boil or the cheese will toughen.  Serve hot with the toast on the side or broken into the soup.
Three Variations:
  • Make this using cauliflower or substitute Broccoli Romanesco – the flavor will be about the same, but the color will be more lively. 
  • Try another kind of cheese. Gruyere and aged sharp Gouda are other possibilities. 
  • Add a teaspoon of curry powder as a seasoning.

Source: Vegetable Soups from Deborah Madison’s Kitchen


Roasted Cauliflower with Turmeric, Spice, and Cilantro

Yield: 3 or 4 servings

1 medium to large cauliflower or Broccoli Romanesco
½ tsp turmeric
½ tsp paprika, plus more to finish
1 tsp roasted, ground cumin
1 tsp ground coriander
½ tsp sea salt
3 Tbsp sunflower seed or coconut oil
Freshly milled pepper, to taste
Yogurt, to finish, optional
Handful cilantro leaves, for garnish
  1. Heat the oven to 425°F. Cut the cauliflower or Romanesco into small florets and slice or dice the stem. Toss with the spices, salt, and the oil until well coated, then turn onto a sheet pan in a single layer and roast until tender, about 30 minutes, possibly longer depending on the size of the florets.  Turn the cauliflower as it cooks so that it browns evenly.
  2. When done, turn the cauliflower out onto a platter. Taste a piece for salt and add more if needed.  Season with pepper, drizzle yogurt all over, add a final dash of paprika, and garnish with the cilantro leaves. Serve warm or at room temperature.
Source: The New Vegetarian Cooking for Everyone by Deborah Madison