Showing posts with label Celeriac Recipes. Show all posts

Wednesday, October 24, 2018

October 25, 2018 - This Week's Box Contents, Featuring Celeriac


Cooking With This Week's Box


Burgundy and/or Japanese Sweet Potatoes: Japanese Sweet Potato Oven Fries with Wasabi Aioli

Russet Potatoes: Carrot and Potato Mash

Baby Red Beets: Blueberry Beet Muffins

Spaghetti Squash: Spaghetti Squash Pad Thai


Celeriac: Wild Rice & Celeriac Gratin (see below); Celeriac Salad with Buttermilk Dressing (see below)

Green Top Red Radishes: Fried Fish Sandwiches with Radish Slaw

   
It’s time to transition to hearty fall and winter fare.  Braised vegetables and meats, casseroles, hearty stews and crispy root vegetable winter salads.  Lets dive into this week’s box and tackle celeriac first.  You may be surprised by how far even one medium celeriac will go, and it’s a pretty versatile vegetable to use.  I really enjoy the how the flavors of wild rice and celeriac go together as both are very hearty and slightly earthy.  You’ll enjoy this combination in this week’s featured recipe for Wild Rice & Celeriac Gratin (see below).  This dish can stand on its own as a main dish or you could serve it as a side dish along roast beef or braised pork.  The other recipe we’re featuring this week is for a simple raw Celeriac Salad with Buttermilk Dressing (See Below).  This recipe calls for celery, which I don’t have right now so I’m going to use shaved carrots instead.  If you don’t have fresh pomegranate seeds, you could also use fresh or dried cranberries in place of them.

Kohlrabi & Chickpea Curry
Photo from DishingUpTheDirt.com
Wait until you taste the kohlrabi in the box this week!  We don’t always grow kohlrabi in the fall, but thought we would include it this year so we have another crispy, crunchy option to enjoy in salads and just as a raw vegetable after all the other fresh vegetables are harvested.  If it seems too big for you, don’t think you have to use it all at one time.  Just cut off the portion you want to use and return the remainder (unpeeled) to the refrigerator, well wrapped to keep it from drying out.  Richard’s been asking for Kohlrabi slaw, so this week I want to make this Kohlrabi and Apple Slaw using some of the apples we got in our fruit share last week.  I’ve never used kohlrabi in any kind of a curry dish, so I’m intrigued by Andrea Bemis’s recipe for Kohlrabi & Chickpea Curry.
 
I have a big jar of red lentils on my shelf, so this week I’m going to make Red Lentils with Winter Squash & Greens.  We featured this recipe in a previous newsletter and recommended using mustard greens or spinach.  We’re done with both mustard greens and spinach so I’m going to use the green curly kale in this week’s box.

A few weeks ago I made this simple Carrot and Potato Mash and it was so delicious!  I usually put about 4-5 different roots in our root mash, but opted to keep it simple and the result was so good.  It’s light, fluffy and slightly sweet.  We’re going to have this for dinner this week with pot roast, with a little gravy of course.

Blueberry Beet Muffins
Photo from TheLeanGreenBean.com
I usually opt for simple steamed beets or a beet salad, but I have to try this recipe for Blueberry Beet Muffins!  I never would have paired beets and blueberries together, but think about all the antioxidants you’ll get in these pink muffins!  This was a recipe a member shared on our Facebook group.  Thanks for sharing this Greta!

I have really been enjoying trying new spaghetti squash recipes this year.  Thankfully these squash have been storing well despite the fact that this variety historically is one that we try to use sooner than later.  This week I’m going to try this recipe for Spaghetti Squash Pad Thai.

I hope you enjoy trying some of the Japanese sweet potatoes this week.  We don’t have many, but we’re going to include a little bit in as many boxes as we’re able to.  I want to try this recipe for Japanese Sweet Potato Oven Fries with Wasabi Aioli.  Of course this recipe will work with regular orange sweet potatoes as well so I’ll be using both, which will look really beautiful along with some white and black sesame seeds sprinkled on top.  These will go well with Fried Fish Sandwiches with Radish Slaw.  The recipe for the radish slaw calls for salad turnips, but I’m going to use kohlrabi instead.

We’ve reached the bottom of yet another CSA box and have quite a variety of recipes in the lineup for this week.  Just because we’re heading into the season of storage vegetables doesn’t mean our meals can’t still be diverse, flavorful and exciting to prepare and eat!  Have a great week and start thinking about Thanksgiving. It’s time to start planning the menu and getting the recipes lined up!—Chef Andrea 

Featured Vegetable: Celeriac

Celeriac, or celery root as it is also known, can be a bit intimidating if you’re encountering it for the first time.  However, as with all vegetables, there’s really no need to be intimidated…it’s just a vegetable!  Celeriac is in the same family as celery.  The difference is that celeriac is grown for its root and celery is grown for its stalks.  The stalks on celeriac resemble celery and have a lot of delicious flavor in them, however they are more tough and fibrous than celery and are not usually eaten as you would eat a celery stalk.  While this week’s celeriac do not have tops, we do sometimes deliver green top celeriac.  If you ever get celeriac with the tops still on, don’t throw them away!  Their flavor can add depth to a pot of stock or soup. 

Now for the root bulb.  First, scrub the exterior of the root the best you can.  Next, thinly slice away the top and bottom of the root so there is a flat side on the top and the bottom.  You’ll probably need to take a little more off the bottom to get past the majority of the roots and get into the more usable bulb portion of the root.  At this point, I usually cut the root in half or into quarters so it is easier to handle.  Using a paring knife, carefully trim away the outer skin.  Once you’ve removed the outer skin, rinse the remaining piece of celeriac and clean your cutting board if there’s any residual dirt.  The inner portion of the root is white, solid and entirely edible. 

Celeriac has a subtle celery flavor that provides a background to soups, stews, and root mashes.  It also makes a delicious soup or gratin on its own or combined with potatoes or other root vegetables.  It can also be eaten raw in salads and slaws paired with other fall fruits and vegetables and a simple creamy dressing.  There is a classic French preparation called Remoulade which is basically a creamy celeriac slaw.  I like to make a slaw based on this concept, but add apples and fresh, chopped cranberries as well as parsley when available.  I’ve noticed more “paleo” recipes are encouraging the use of celeriac as a substitute for starchy potatoes, noodles, etc. 

Celeriac stores quite well, thus it is an important part of our seasonal winter diets.  It can actually be stored for up to 6 months!  Keep it in your refrigerator loosely wrapped in plastic or in the crisper drawer until you are ready to use it.
  

Celeriac Salad with Buttermilk Dressing

Yield: 4 side salads

1 celeriac (about ¾ pound)
¾ cup Buttermilk Dressing (recipe follows)
1 cup pomegranate seeds
1 cup fresh flat-leaf parsley leaves
1 cup peeled and shaved celery
1 Tbsp extra-virgin olive oil
1 tsp freshly squeezed lemon juice
Kosher salt

  1. Use a vegetable peeler to peel the celeriac, and then finely julienne it.  In a bowl, dress the celeriac with ½ cup of the buttermilk dressing.
  2. In a small bowl, combine the pomegranate seeds, parsley, celery, olive oil, and lemon juice.  Season to taste with salt, and toss well.
  3. Spoon 1 Tbsp of the remaining buttermilk dressing on each plate, and spread it out with the back of your spoon.  Divide the dressed celeriac among the plates, and then spoon the pomegranate, parsley, and celeriac salad evenly over the top.
Recipes borrowed from The Broad Fork, Recipes for the wide world of vegetables and fruits by Hugh Acheson


Buttermilk Dressing

Yield: 1 cup

½ cup buttermilk
1 Tbsp Dijon mustard
1 Tbsp freshly squeezed lemon juice
¼ cup mayonnaise
2 Tbsp crème fraiche
½ tsp kosher salt
Freshly ground black pepper, to taste

Combine the buttermilk, mustard, lemon juice, mayonnaise, crème fraiche, salt, and pepper in a small bowl.  Whisk to combine, and serve.  The dressing will keep in the refrigerator for 5 days.

Recipes borrowed from The Broad Fork, Recipes for the wide world of vegetables and fruits by Hugh Acheson

Wild Rice and Celeriac Gratin


Yield: 4 to 6 servings


¼ cup minced shallot or onion
3 Tbsp butter or oil
2 Tbps flour
1 ½ cups milk, scalded (can be nondairy milk)
½ tsp sea salt
Freshly milled white pepper
½ tsp grated nutmeg
1 Tbsp butter
1 small celeriac, peeled and grated
Juice of 1 lemon
1 clove garlic, minced
2 Tbsp chopped parsley, plus extra for garnish
Sea salt and freshly milled pepper
3 cups wild rice, cooked
½ cup grated Gruyère
¼ cup freshly grated parmesan


  1. Cook the shallot in 3 Tbsp butter in a small saucepan over low heat for 3 minutes.  Stir in the flour and cook for 2 minutes more.  Whisk in the hot milk all at once, then cook for 20 minutes, stirring frequently, or for 30 minutes in the top of a double boiler.  Season with ½ tsp salt, a little white pepper, and the nutmeg. Set the sauce aside.
  2. Preheat the oven to 400°F.  Lightly butter or oil a baking dish.  Melt 1 Tbsp butter in a medium skillet over medium heat.  Add the celeriac with the lemon juice, garlic, and parsley and cook until tender, about 5 to 7 minutes.  Season with salt and pepper to taste.  Combine the wild rice, celeriac, and sauce and stir in the cheeses.  Turn into the dish and bake until firm, about 25 minutes.  Sprinkle with chopped parsley and serve.

Recipe adapted from The New Vegetarian Cooking for Everyone by Deborah Madison

Wednesday, September 20, 2017

September 21, 2017 - This Week's Box Contents, Featuring Celeriac


Cooking With This Week's Box


As we dive into this week’s box, we’ll start with our featured vegetable of the week which is green top celeriac!  This week’s newsletter features two different types of ways you can use your celeriac, one is raw and the other is cooked.  The Sesame Chicken Celeriac Salad (see below) is a main entrée salad that is very easy to make and will travel well for lunch the next day if you have leftovers.  If you’d prefer to make something warm, you might want to consider making the Celeriac, Potato and Apple Puree (see below).  This wasn’t my original plan for a recipe, however we had the opportunity to dine at Harvest Restaurant in Madison, WI last Sunday at their special 17th Anniversary Dinner. Chef Jon served a delicious celeriac and potato mash.  I had stumbled over this recipe over the weekend and once I sampled some of the apple from this week’s fruit box I decided the combination of celeriac, russet potatoes and apples was on the list for this week.  This puree will make a delicious accompaniment to any pork dish, grilled beef, duck or roasted chicken.

If you choose to make the Sesame Chicken Celeriac Salad, the recipe calls for chicken breasts.  If you are making the salad this week, you might as well use a whole chicken.  You can take the breasts off and cook them for the salad and then use the thighs and legs to make Jamie Oliver’s Tender and Crisp Chicken Legs with Sweet Tomatoes & Basil. The recipe calls for 4 chicken quarters to serve 4 people.  If you’re using just one chicken you’ll have to cut the recipe in half and your yield will be for just 2-3 servings.  This recipe can be made with some of the tomatoes in this week’s box as well as garlic and basil from your herb garden.  Serve this with cannellini beans, mashed potatoes or pasta.

At the dinner last Sunday, we had another delicious course that included halved grape tomatoes served with an herbed buerre blanc sauce.  While I’m not going to get that fancy this week, I was inspired to take make this recipe for Marinated Cherry Tomato Salad.  Of course we’ll use the grape tomatoes, cut them in half and marinate them in vinegar, herbs and oil.  This can be served as a salad on its own or use it as a condiment to top off seared salmon, grilled steak or serve it on top of a bowl of lentils or cannellini beans. 

Well, sweet corn season is coming to a close but we still have a few ears to enjoy!  This week I’m going to cut the kernels off the cob and use them, along with one of the tomatoes, to make this Tomato, Basil & Corn Pizza.   The recipe calls for baking it in the oven, but you could put this on the grill too for a little extra smoky flavor.  I always like peppers on my pizza, so I’ll thinly slice the green bell pepper and add it along with the corn.  The orange Italian Frying Peppers are going to go on a tossed salad made with either the red Boston or red Batavia lettuce.  I’m going to toss the salad with this Creamy Roasted Garlic Vinaigrette and garnish it with some thinly sliced onions, croutons and some canned water-packed tuna for an entrée salad to eat at lunch. Any extra orange Italian frying peppers left over this week are going straight into the freezer so I have some to use on pizzas during the winter.  If I have time I’ll slice the peppers before freezing, but if time is short they can go into the freezer whole and I’ll deal with cutting them in February!

The remainder of the potatoes as well as this week’s leeks are going to be used to make Potato Leek Soup with Poblanos and Crispy Bacon.  I tried this recipe last fall and it is delicious!  I never would’ve thought to pair the gentle leek with a hot pepper, but the combination works and this combination is actually very good.  The recipe calls for Yukon Gold potatoes, but this week’s russet potatoes will work just fine. 

For some reason I have Mac & Cheese on my mind this week, so some of the broccoli is going towards making Macaroni & Cheese with Broccoli.  The remainder of the broccoli will end up in a frittata for Sunday brunch.

The gorgeous red chard in this week’s box is going to be used to make vegetarian Tacos with Black Beans and ChardI’ll serve this with Green Rice with Jalapeño, Garlic and Lime.  We have limes in this week’s CSA fruit share, so that’s one less thing I’ll have to pick up at the grocery store!

Well, that brings us to the bottom of another CSA Box.  Next week we’re hoping the Jicama is ready to go in boxes.  So, pull out those jicama slaw recipes and get ready!  If you’ve never had jicama, you have something new to look forward to!  
—Chef Andrea


Featured Vegetable:  Celeriac


Celeriac, or celery root as it is also known, can be a bit intimidating if you’re encountering it for the first time.  However, as with all vegetables, there’s really no need to be intimidated…it’s just a vegetable!  Celeriac is in the same family as celery.  The difference is that celeriac is grown for its root and celery is grown for its stalks.  The stalks on celeriac resemble celery and have a lot of delicious flavor in them, however they are more tough and fibrous than celery and are not usually eaten as you would eat a celery stalk.  Don’t throw them away though!  Their flavor can add depth to a pot of stock or soup.  If you aren’t going to use them all now, put them in the freezer and use them later this fall or winter.

Now for the root bulb.  First, scrub the exterior of the root the best you can.  Next, thinly slice away the top and bottom of the root so there is a flat side on the top and the bottom.  You’ll probably need to take a little more off the bottom to get past the majority of the roots and get into the more usable bulb portion of the root.  At this point, I usually cut the root in half or into quarters so it is easier to handle.  Using a paring knife, carefully trim away the outer skin.  Once you’ve removed the outer skin, rinse the remaining piece of celeriac and clean your cutting board if there’s any residual dirt.  The inner portion of the root is white, solid and entirely edible. 

Celeriac has a subtle celery flavor that provides a background to soups, stews, and root mashes.  It also makes a delicious soup or gratin on its own or combined with potatoes or other root vegetables.  It can also be eaten raw in salads and slaws paired with other fall fruits and vegetables and s simple creamy dressing.  I’ve noticed more “paleo” recipes are encouraging the use of celeriac as a substitute for starchy potatoes, noodles, etc.  If you have a spiralizer, you can even make celeriac noodles (do we call them celoodles?)


Celeriac stores quite well, thus it is an important part of our seasonal winter diets.  It can actually be stored for up to 6 months!  Keep it in your refrigerator loosely wrapped in plastic or in the crisper drawer until you are ready to use it.  


Sesame Chicken Celeriac Root Salad

Photo credit from thekitchen.com
Serves 4

2 large carrots, peeled
1 large celeriac, peeled
3 cups shredded cooked chicken breast (see Recipe Note)
½  cup chopped fresh basil, or cilantro
1 small clove garlic, peeled and grated with a microplane, or finely minced
2 Tbsp white vinegar
2 Tbsp toasted sesame oil
1 Tbsp dark pure maple syrup
1 Tbsp reduced-sodium tamari or soy sauce
2 tsp sesame seeds
1 ½ tsp grated fresh ginger root
½ tsp salt

¼ tsp black pepper
  1. Shred carrots and celeriac on a box grater or with the grating attachment of a food processor.
  2. Combine the carrots, celeroac, chicken, and basil (or cilantro) in a large salad bowl.
  3. Combine garlic, vinegar, sesame oil, maple syrup, tamari, sesame seeds, ginger, salt, and pepper in a jar and shake to combine. Pour the dressing over the salad and toss to combine.
  4. Divide among 4 large plates to serve.

Recipe Notes: 
To cook chicken: Bring 6 cups of water to a boil in a large saucepan. Add ½ tsp salt and stir to dissolve. Add 2 boneless skinless chicken breasts and return to a simmer over high heat. Reduce heat to medium-low to maintain a gentle simmer and cook, turning occasionally to make sure it cooks evenly, until the chicken is cooked through, 15 to 17 minutes. Transfer the chicken to a cutting board to cool, at least 20 minutes before shredding.

This recipe was adapted from thekitchn.com.


Celeriac, Potato and Apple Puree


Yield:  3-4 servings

1/2  pound potatoes, peeled and cut in half*
1 large celeriac, peeled and cut into large pieces
1 small to medium tart apple, such as a Granny Smith, peeled, cored and quartered
¼ cup, approximately, warm milk or broth from the celeriac.
1 Tbsp butter or walnut oil, plus more to taste
Salt, to taste
Freshly ground black pepper, to taste

  1. Place the potatoes in one saucepan and the celeriac and apples in another.  Barely cover each pan with water and add salt to each pan as well, about ¼- ½ tsp per pan.  Bring to a boil, reduce the heat and simmer until tender, 15 to 20 minutes.
  2. Turn off the burner that the potatoes are on and remove the pan.  Drain the potatoes, and return the pot to the burner (do not turn the burner back on).  Leave the lid off and allow the potatoes to set for 5-10 minutes to steam and dry out. 
  3. Drain the celeriac and apples through a strainer set over a bowl to catch the cooking liquid. 
  4. Puree all of the celeriac and apple mixture as well as the potatoes in a food mill or a potato ricer.  (If you don’t have either of these tools, you can also use a food processor and process the potatoes separate from the celeriac/apple mixture.  The other option is to just mash the vegetables by hand with a potato masher.  The end result will be more chunky, but will taste just fine). 
  5. Combine the potato puree along with the celeriac and apple puree in a bowl.  Whisk in the milk or broth until the mixture is fluffy.  Add the butter or walnut oil to the hot puree, stir until the butter melts, and season to taste with salt and pepper.

*Chef Andrea Note:  The original recipe calls for Yukon gold potatoes.  I would recommend using our russet potatoes for this recipe as it will yield a lighter, fluffier mash.
Recipe adapted from Martha Rose Shulman’s recipe featured on cooking.nytimes.com.

Thursday, September 22, 2016

Vegetable Feature: Celeriac

By Chef Andrea

     Celeriac, or celery root as it is also known, can be a bit intimidating if you’re encountering it for the first time. However, as with all vegetables, there’s really no need to be intimidated…it’s just a vegetable and it can be conquered and embraced. Celeriac is in the same family as celery. The difference is that celeriac is grown for its root and celery is grown for its stalks. The stalks on celeriac resemble celery and have a lot of delicious flavor in them. You will find they are more tough and fibrous than celery, thus they are not eaten like celery. Don’t throw them away though! Their flavor can add depth to a pot of stock or soup. If you aren’t going to use them all now, put them in the freezer and use them later this fall or winter.
     Now for the root bulb. First, scrub the exterior of the root the best you can. Next, thinly slice away the top and bottom of the root so there is a flat side on the top and the bottom. You’ll probably need to take a little more off the bottom to get past the majority of the roots and get into the more usable bulb portion of the root. At this point I usually cut the root in half or into quarters so it is easier to handle. Using a paring knife, carefully trim away the outer skin. Once you’ve removed the outer skin, rinse the remaining pieces of celeriac and clean your cutting board if there’s any residual dirt. Now you’re ready to use this gem!
     Celeriac has a subtle celery flavor that provides a background to soups, stews and root mashes. It also makes a delicious soup or gratin on its own or combined with potatoes or other root vegetables. It can also be eaten raw in salads and slaws paired with other fall fruits and vegetables and a simple creamy dressing.
     Celeriac stores quite well. Keep it in your refrigerator loosely wrapped in plastic or in the crisper drawer until you’re ready to use it. Enjoy!

Maple-Bacon Roasted Apples & Celeriac


Yield: 4 Servings

1 large celeriac, peeled and cut into 1-inch pieces
2 tsp extra-virgin olive oil
½ tsp freshly ground pepper
¼ tsp salt
2 apples, cut into 1-inch pieces
2 slices bacon, chopped
¼ cup pure maple syrup
1 tsp chopped fresh thyme or rosemary or ¼ tsp dried

1. Preheat oven to 450 °F.
2. Toss celeriac with oil, pepper and salt and spread on a rimmed baking sheet. Roast until starting to brown, 10 to 12 minutes. Add apples, toss gently and continue roasting until the apples and celeriac are tender, 6 to 10 minutes more.
3. Meanwhile, cook bacon in a medium skillet over medium heat, stirring occasionally, until just crispy. Remove to a paper-towel-lined plate with a slotted spoon; discard all but 2 tsp of the bacon fat. Add maple syrup to the fat in the pan and bring to a boil, scraping up the browned bits. Add the cooked bacon and thyme (or rosemary). When the celeriac and apples are tender, gently toss them with the maple-bacon glaze and roast for about 5 minutes more. 

Recipe borrowed from EatingWell.com.

Thursday, September 18, 2014

Vegetable Feature: Celeriac

by Sarah Janes Ugoretz


This week’s vegetable feature was highlighted in a 2006 National Public Radio (NPR) article entitled: “The vegetable world’s ugly duckling: Celeriac.” We admit it—celeriac is certainly not the most visually pleasing vegetable out there, but what it may lack in terms of aesthetics, it more than makes up for in taste with its subtle parsley-celery flavor profile. A member of the Umbelliferae family and a cousin to anise, carrots, parsley and parsnips, you may also hear celeriac referred to as celery root, turnip-rooted celery or knob celery. Historically speaking, it is believed that celeriac had medicinal and religious uses in many early civilizations, including those of Italy, Egypt and Greece. While it was not recorded as a food plant until 1623 in France, celeriac did make an appearance—not as celeriac or celery, but as selinon—in Homer’s Odyssey all the way back in 800 B.C. Today, celeriac is most widely used in France and is famous for its role in the traditional Céleri Rémoulade salad (check out David Lebovitz’s take on this dish on his website). Celeriac is much more resistant to disease in comparison to celery. It also can be stored for up to 6 months making it a great substitute for celery as part of a local Midwestern diet.

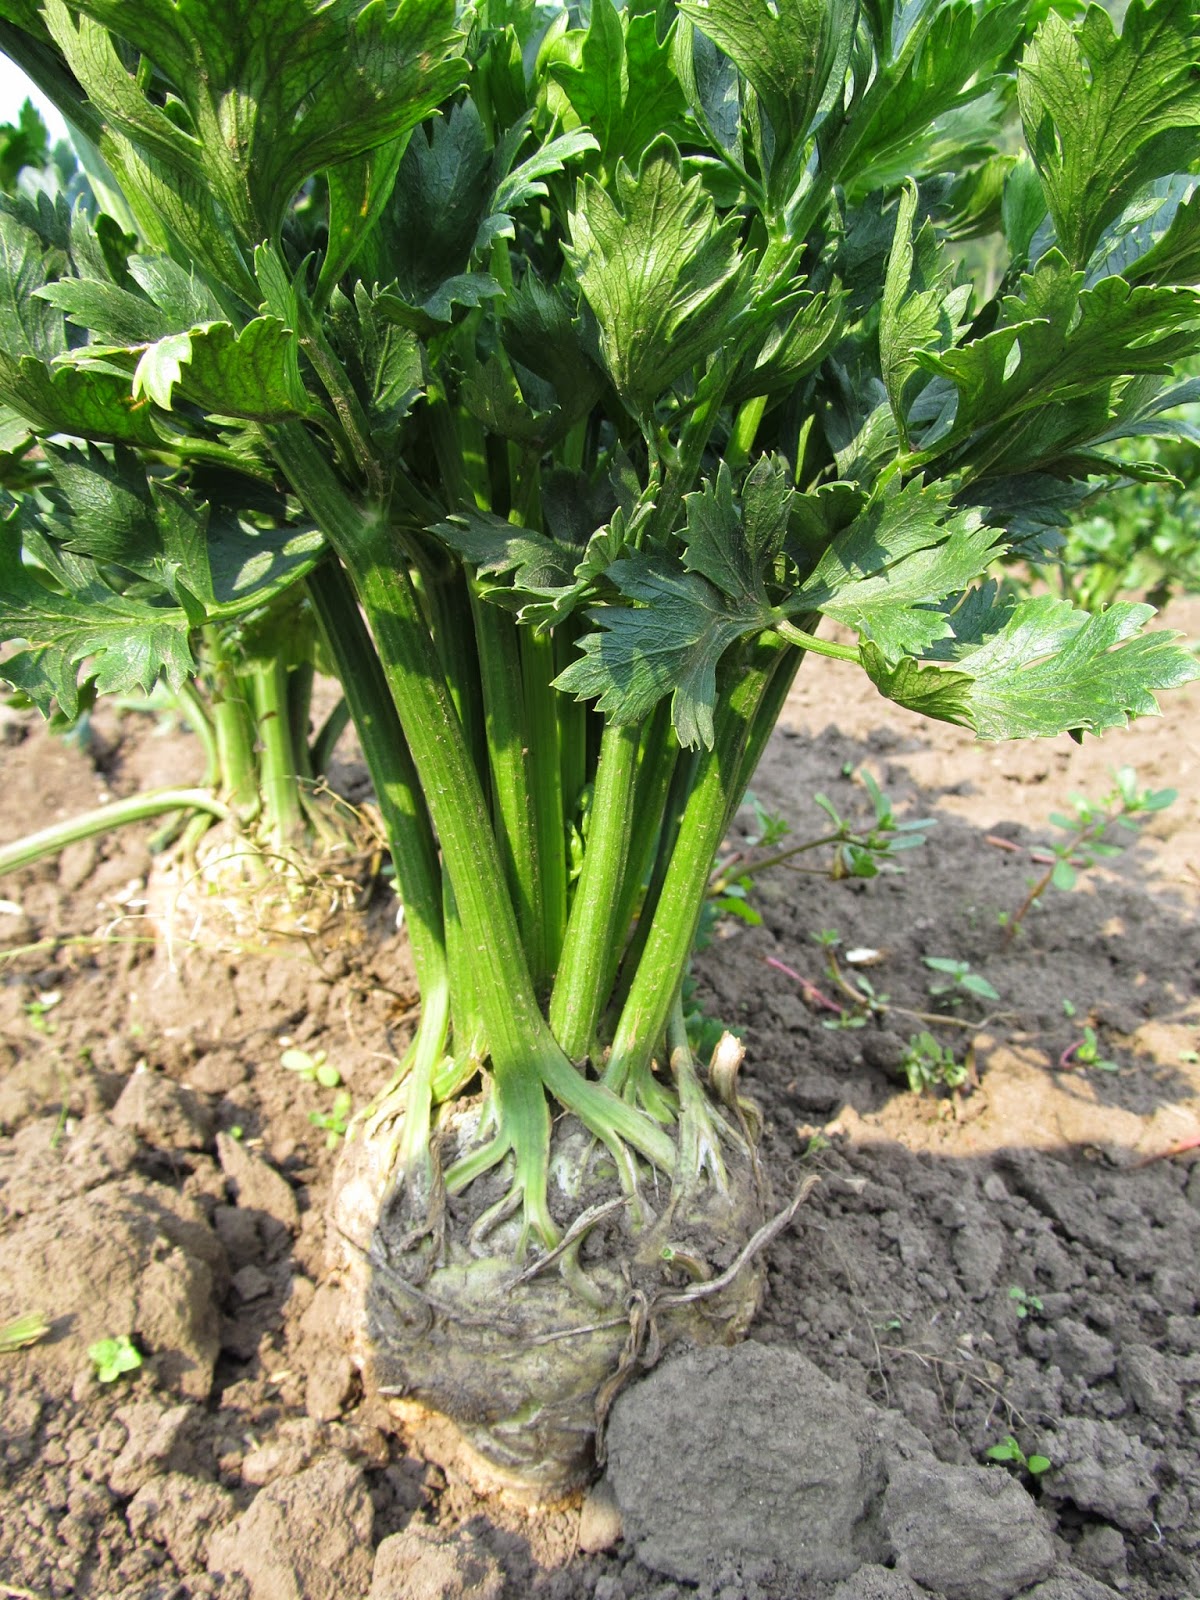
Celeriac in field
Having been developed from the same wild species as stalk celery, celeriac differs in that it is grown
not for its stalk but instead for its developed root. Although part of the celeriac plant does indeed consist of deep green, upward-reaching stalks and leaves, celeriac gets it somewhat unfortunate reputation from what grows beneath the soil—a gnarly knob which, according to NPR, looks like “a troll’s orb of warts and roots.” Now, don’t be intimidated and remember that celeriac is a truly underrated vegetable! To get to the crisp ivory flesh underneath, just cut a slice off of the top and bottom. Then, use a paring or even a chef’s knife (a peeler won’t work as well) slice down from the top, removing the roots and skin as you go. From here, you can boil, braise, steam, shred or roast your celeriac. You can even eat it raw. One cautionary word of advice—celeriac is quick to discolor, so as you dice or shred it, promptly place it into acidulated water (water with a splash of lemon juice or white wine vinegar). Finally, don’t toss those stalks and leaves! They will lend their rich flavor to soup stocks, while the leaves on their own may be finely chopped and thrown in with any dish in need of a little extra flavor. Nutritionally, celeriac is an excellent source of vitamins B and C, as well as potassium, manganese and phosphorous. Being low in carbs, you may be urged to substitute celeriac for potatoes. If you ask us, we say use them both! There’s nothing quite like a winter mash of celeriac, potatoes, garlic and cream.

Sources: Vegetable Literacy; National Public Radio

Curried Celeriac Slaw with Dried Cherries
Recipe borrowed from Cooking Light Annual Recipes from 2003

Yield: 4 servings

½ cup dried tart cherries
½ cup finely chopped red onion
3 Tbsp plain yogurt
3 Tbsp sour cream
1 Tbsp Dijon mustard
1 tsp curry powder
1 tsp olive oil
½ tsp sugar
½ tsp salt
3 cups shredded, peeled celeriac

Combine all ingredients except for the celeriac in a large bowl, stirring well to combine.
Add the celeriac; toss well to coat. Cover and chill for 2 hours before serving

Celery Root and Mushroom Latkes 
with Onion Applesauce
Recipe borrowed from Bon Appetit magazine in December 2011.

Yield: 16 latkes

Onion Applesauce
1—8 oz Granny Smith apple 
1 medium onion, unpeeled
2 tsp kosher salt plus more for seasoning
½ cup chopped fresh cilantro
Latkes
1 pound celery root (celeriac), peeled, coarsely grated
1 pound russet potatoes, peeled, coarsely grated
1 Tbsp kosher salt
1 pound fresh mushrooms, washed 
2 large eggs, beaten to blend
3 Tbsp all-purpose flour
1 Tbsp ground cumin
1 Tbsp ground turmeric
1½ tsp freshly ground black pepper
Vegetable oil (for frying)

First prepare the onion applesauce. Preheat the oven to 350°F. Line a small rimmed baking sheet with foil. Wrap the apple in another piece of foil. Place the unpeeled onion and apple on the prepared sheet. Bake until tender, about 1 hour. Let cool completely, keeping the apple in the foil.
Unwrap the apple, core, peel and place with juices in a food processor. Peel onion; add to processor. Add 2 tsp salt. Puree until very smooth. Transfer to a medium bowl. Season applesauce with salt. Cover, chill. Stir in cilantro just before serving.

Meanwhile, mix celery root, potatoes, and salt in a large colander set over a large bowl to draw out moisture. Chill; let drain for 1½ hours. Mix in mushrooms; let drain in refrigerator for 30 minutes longer.

Using your hands, squeeze excess moisture from the potato mixture. Transfer to another large bowl. Stir in the eggs and the next 4 ingredients; blend thoroughly. Cover the surface with plastic wrap and chill for at least 1 hour and up to 3 hours. (This will help bind the latkes).

Preheat oven to 300°F. Line a baking sheet with paper towels. Divide latke mixture into 16 equal portions on another baking sheet. Form each into a ½-inch thick patty. Pour oil into a large nonstick skillet to a depth of ¼ inch; heat over medium heat. Working in batches, fry latkes until cooked through and golden brown, about 5 minutes per side. Transfer to prepared sheet; keep warm in oven while frying remaining latkes.

Serve warm latkes with onion applesauce.