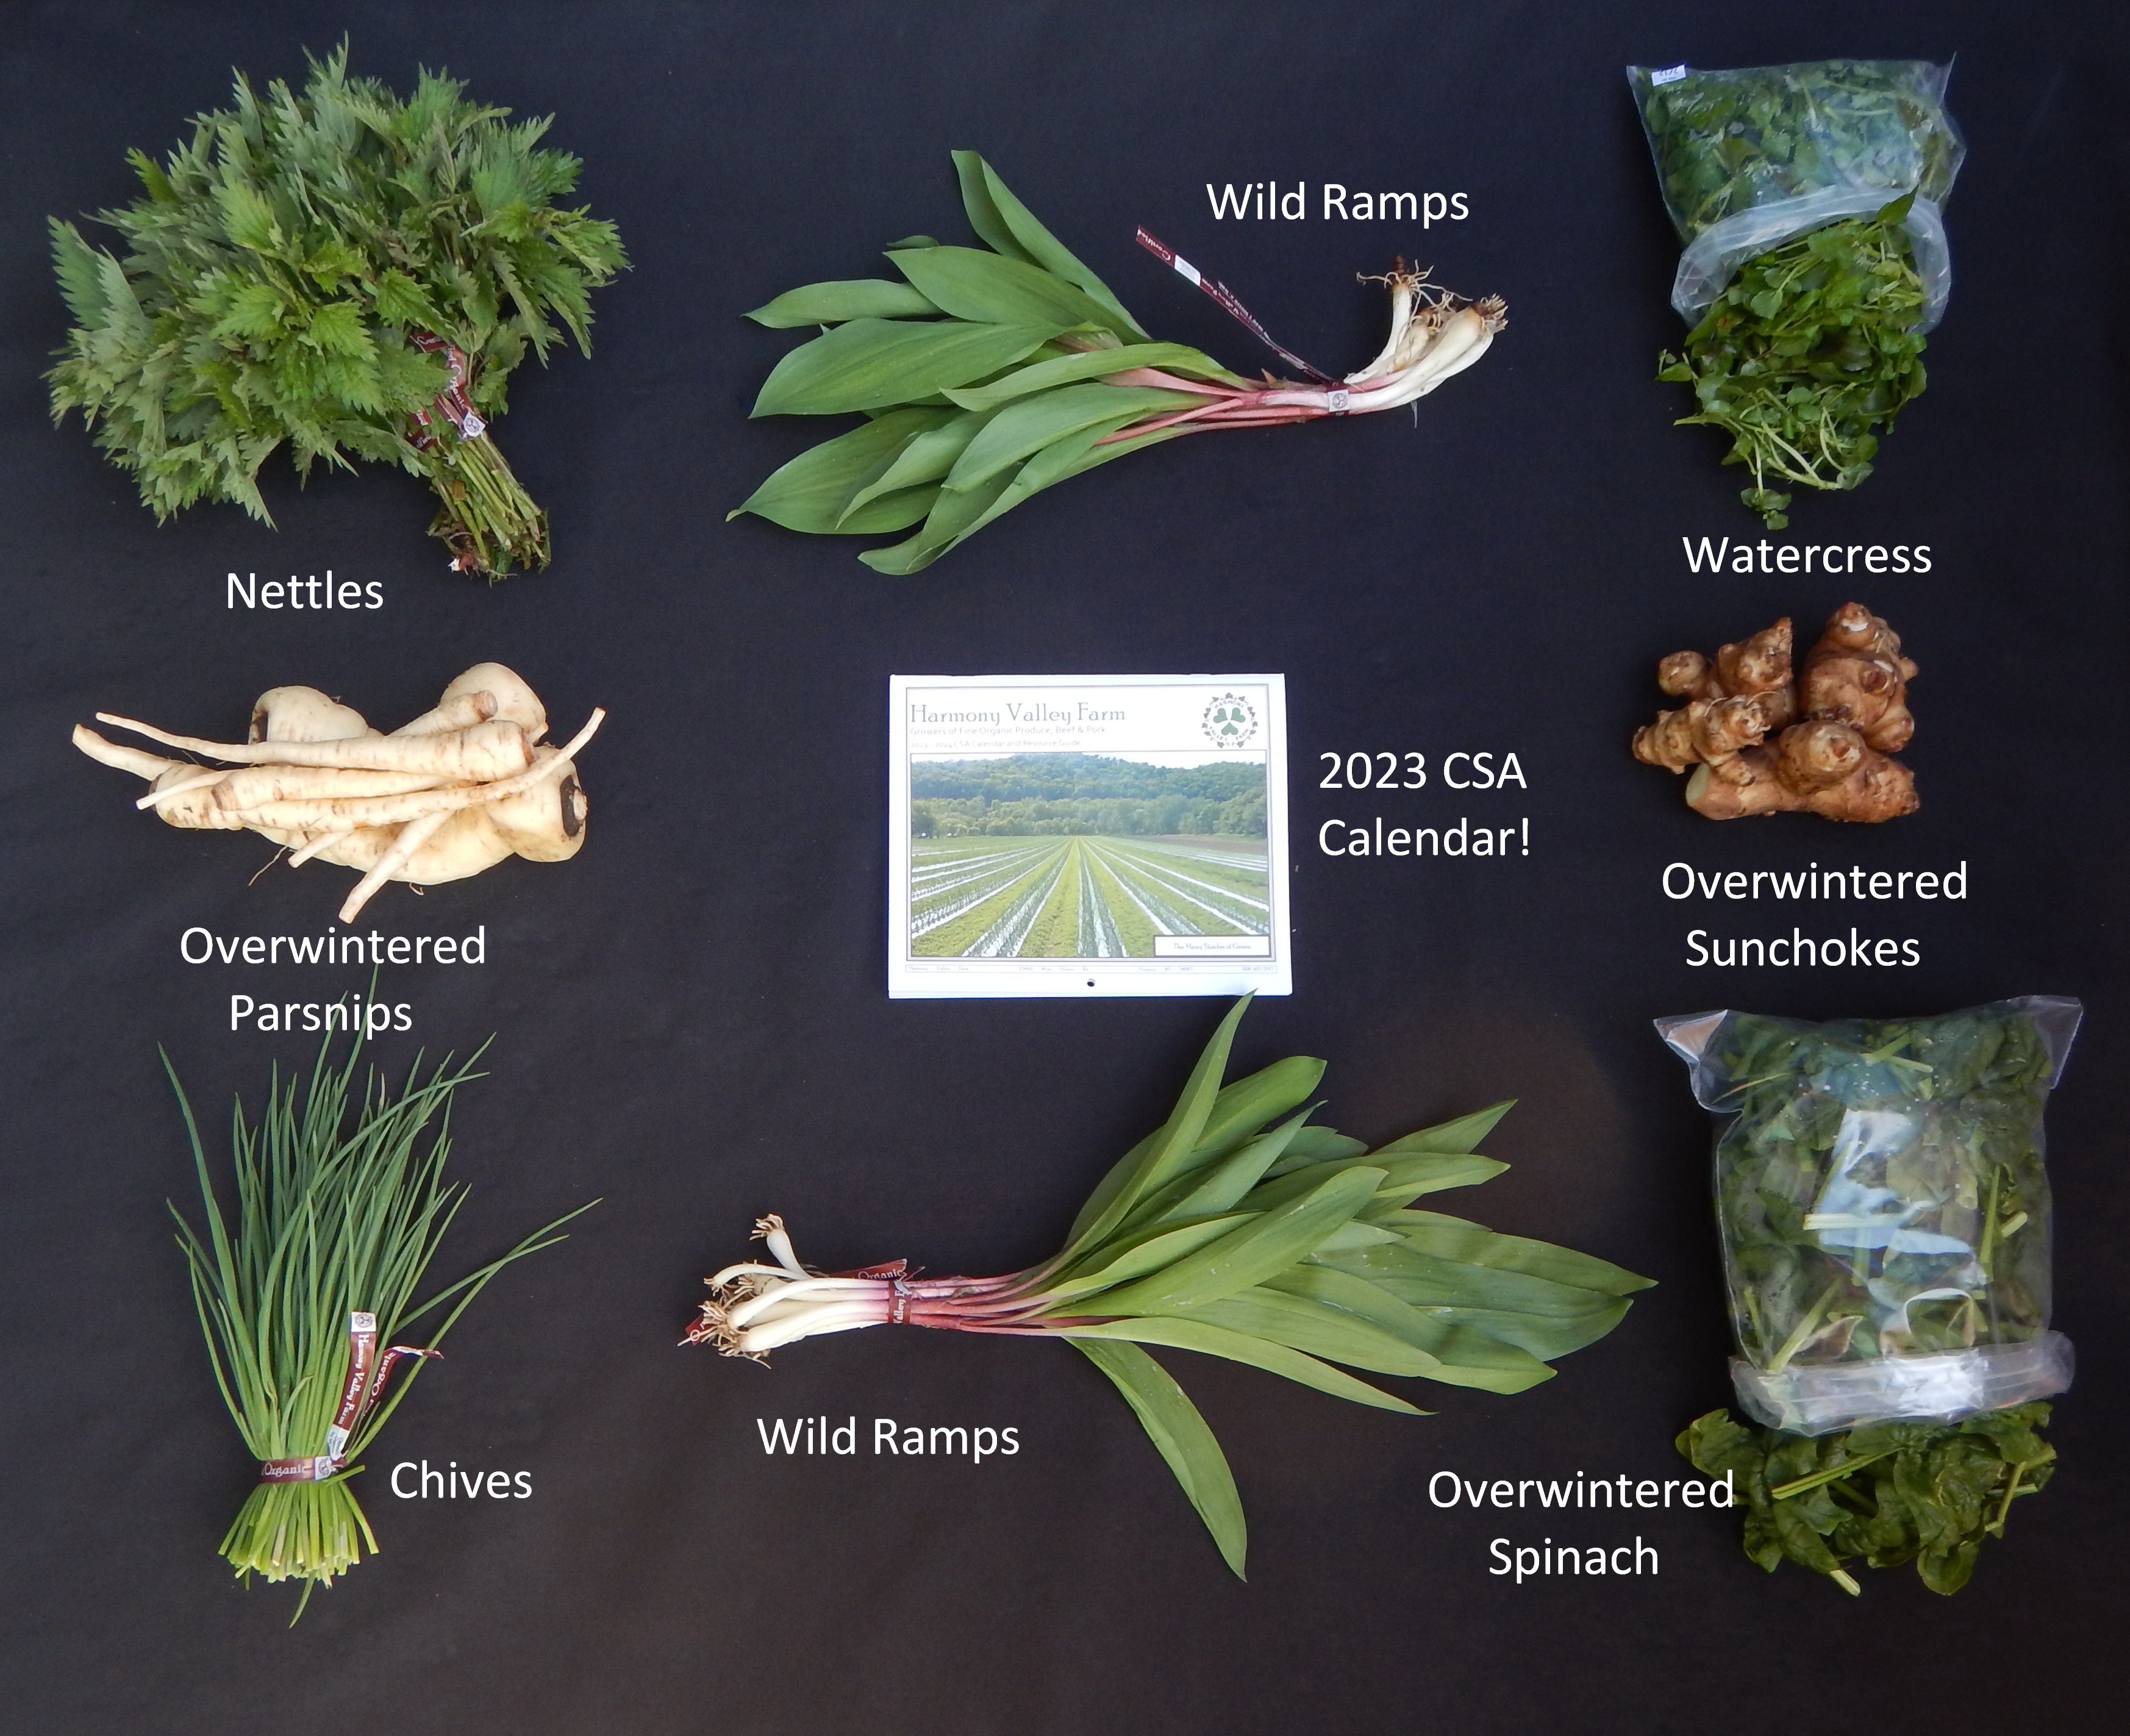
Wednesday, May 17, 2023

Put On Your Gardening Gloves--Culinary Garden Herb Packs Coming Your Way!


By Chef Andrea

Back in our early days of CSA, we used to include more herbs in the CSA shares. We wanted to give members fresh herbs to cook with, however we heard frequently that they were not using all of the herbs in a bunch before they went bad.  We brought this issue up at a meeting with our members and one member suggested we send the herbs as plants that they can grow themselves. What a great idea and an even better way to accomplish the overall goal of making fresh herbs available for CSA members to incorporate in their meals! When you need a fresh herb, you simply cut it from your plant—it doesn’t get any fresher than that!  

Every year in mid-late May we deliver these special culinary garden herb packs that we start for you in our greenhouse. You can plant these herbs in a garden space or in pots to keep on your patio, porch or kitchen windowsill if you have limited space.  Choose good, loose garden soil mixed with lots of compost (up to 1” mixed into the soil if you’re planting into a garden space).  The plants will do best in well-drained soil with full sun. If you don’t have a space with full sun exposure, partial sun will be ok too.  If you have rabbits or other little herb-loving critters in your yard, you might need to fence your herbs to protect them. While we usually don’t see frost after the 15th of May, it is still possible that we could see some chilly nights over the next few weeks.  While most of the contents of these herb packs can tolerate a little frost, there are a few herbs including basil, chervil and zaatar that will be damaged by the frost. If you see a cold night coming, we recommend you either bring your plants inside (if in pots) or cover them with a sheet or other protective covering to protect them from frost or low temperatures.


To help you identify the contents of your herb pack, we've provided both the labeled picture at the top of this post as well as the grid pictured above.  Use these tools as a road map to identify your different plants.

There are four perennial herbs in your pack:  Greek Oregano, Sage, German Winter Thyme, and Rosemary. Oregano, sage and thyme are more cold hardy and have a pretty good chance of surviving our cold winters.  Consider where you would like to establish these herbs in your garden as they will likely come back year after year.  Sage and oregano will get quite large, so it is best to give them about 2 square feet of space in the area you plant them in.  Thyme is a bit smaller and only needs about 1 square foot of space.  While rosemary is a perennial herb, it is not quite as cold hardy.  To ensure it survives into the next year, it is best to bring it indoors in the fall. If you have planted it in the ground, you can dig it up and put it in a pot to keep inside over the winter. 

Greek Oregano

Sage

German Winter Thyme

Rosemary

The remaining plants in your pack are annuals and include Italian Basil, Chervil, Italian Parsley, Curly Parsley and Zaatar, a new addition to this year’s packs.  Annuals will only produce for this season and will not survive the winter outdoors. Italian basil and chervil need to be cut back regularly to delay flower and seed formation, so they continue to produce usable leaves.  If you see even the earliest sign of flowering in either of these plants, cut them back to keep them vegetative. Parsley will continue to produce throughout the season, so don’t be afraid to cut these plants back too.  If you can’t use your herbs as fast as they are growing, cut the extra herbs anyway and preserve them.  There is more information about that to follow. When harvesting your herbs, use a sharp knife or scissors so you can make a clean cut.

Italian Basil

Chervil

Italian Parsley

Curly Parsley

Zaatar

Fresh herbs should be cut as close to using them as possible and with a sharp knife so you don’t bruise the leaves.  The flavor and aroma from herbs comes from the oils in the herb and will lessen over time once they are cut.  This is also why you usually add fresh herbs to a dish at the end of cooking or shortly before serving. In contrast, dried herbs need more time to develop the flavors that have been preserved in the process of drying. Dried herbs are added earlier in the cooking process to give them time to develop and come together with the other ingredients in the dish. Many times, recipes will direct you to strip the leaves from the stems of fresh herbs.  If the stem is tough or more like a stick, you will want to do this. However, some herb stems are tender, flavorful, juicy, and totally usable! I often chop both the leaf and the stem when I’m using fresh thyme, parsley, chervil and sometimes young basil stems.  Sage, rosemary, and oregano stems are sometimes a bit more coarse and not usable.

The herbs in our garden herb pack are intended to be used primarily as culinary herbs, adding flavor and vitality to the foods you are enjoying at your meals. I do want to mention though that herbs also have nutrients and compounds in them that impart health benefits and may be used medicinally. For instance, the Latin name for common sage means “healing plant.”  Over the course of history sage has been used medicinally in many applications including as a central nervous system tonic and a circulatory stimulant. There is an ancient proverb that says, “How can a man die who has sage in his garden?” 
 
Thyme is another example of an herb that is used for both its culinary applications, but also imparts health benefits to our bodies. The same essential oils contained in the plant that give it its signature aroma and flavor are also responsible for its medicinal benefits including being antiseptic and antispasmodic. It can help to soothe congestion and calm tense muscles and nerves. 

Rosemary has an interesting history as it relates to health benefits. Back in ancient Greece, philosophers and students wore rosemary garlands on their heads to stimulate the brain and improve their memory. Rosemary contains a compound called borneol that is thought to increase blood flow and generally stimulate the circulatory system thereby increasing blood flow to the heart and brain.  If this is true, it makes sense that one may have better brain function with enhanced blood flow and oxygenation to the brain! 

While the contents of our Garden Herb Packs have remained consistent over the years, we have made a few changes. Several years ago we introduced Chervil as a new addition to our herb packs and this year we’re trying Zaatar.   Zaatar is an interesting herb that is in the same family as mint and oregano and is officially known as Oreganum Syriacum.  This herb is very similar to the Greek Oregano in your pack, but they do have several differences.  First, Zaatar is not as winter hardy, so it is treated like an annual in Wisconsin. If you plant Zaatar indoors or have it in a pot that you can move inside for the winter, it will likely survive. Greek Oregano and Zaatar are also very similar in appearance.  The way you can tell the difference between them is Zaatar has more pointed leaves with more distinct markings on the leaves in comparison to Greek Oregano which has more soft, rounded leaves. Zaatar is both the name of the plant as well as the name of a popular spice mix used in the Middle East. While everyone has their own version of Zaatar, the basic components of Zaatar spice mix include dried zaatar herb, toasted sesame seeds, dried sumac, and salt. It is often combined with olive oil and used as a dip for bread. It may also be used to roast a chicken or incorporated into other Middle Eastern recipes such as Baba Ghanoush, falafel, etc. If you’re interested in learning more about zaatar and/or would like to make your own zaatar spice mix with the herbs you grow, check out this easy recipe link!

If you do have more herbs than you can use fresh, cut them back and preserve them. Some herbs, such as basil and parsley, can be pureed with a little oil and frozen in ice cube trays or muffin tins. Other herbs such as parsley, sage, oregano, thyme, and savory are good as dried herbs. After you harvest them, give them a quick rinse, and then dry them in a low-heat oven or in a food dehydrator. The other option is to bundle the herbs in small bundles and hang them in a dry place with good air flow and let them air dry. If you do this, make sure the herbs are more on the dry side when you bundle them and don’t put too many stems in a bundle, or they may mold or take longer to dry.  Once your herbs are dried, strip them off the stem and put them in a glass jar with a lid.

Cooking flavorful food does not have to be complicated or time-consuming, and neither does raising your own herb garden! Anyone, of any level of culinary or gardening skill, can learn to feed themselves healthy delicious food if they approach cooking and basic gardening with an open mind and a willingness to learn. You do have to invest a little time and effort, but it doesn’t have to be terribly complicated and it’s definitely nothing to be afraid of!  

We hope you enjoy growing your own herbs and find interesting and delicious ways to make use of them throughout the year. They really are a simple way to brighten up your landscape as well as your meals and the benefits they offer go beyond the flavor.  

May 18, 2023 - This Week's Box Contents Featuring Asparagus


Cooking With This Week's Box

Asparagus:  
Asparagus and Potato Frittata (See Below)

Wild Ramps:  

Carola Gold Potatoes:  
Chives:  

Nettles:  

Watercress:  

Green Garlic:  

Baby Arugula:  

Green Top Red Radishes:  

Sorrel:
  

Rhubarb:  

Welcome to our third week of Cooking With the Box!  We are excited to be featuring one of our favorite spring vegetables this week, Asparagus! While I seldom ever get past just simply roasting or sautéing asparagus, there really are many ways you can enjoy this vegetable. If you are looking for a few new recipes, I have two recipe collections to share with you. Surely you’ll find at least one appealing recipe in this article for 30 Minute Dinners for People Who Love Asparagus or 50 Asparagus Recipes That Celebrate Spring.  I also have a simple recipe for Asparagus and Potato Frittata (See Below)  Frittatas are a great carrier for vegetables that are in season and may serve as any meal of the day!

We’re happy to finally have sorrel to share with you this week!  If you’ve been around for awhile you can probably guess which two recipes I’m going to mention for using sorrel as they are my two all-time favorites!  You just can’t beat this Frosty Sorrel & Banana Smoothie.  It’s a great way to supercharge your day!  I also really enjoy this Sorrel Hummus recipe and like to use it as a spread on a wrap stuffed with other spring vegetables like handfuls of fresh greens, sliced radishes, grilled asparagus, etc.
Rhubarb is also making its annual spring appearance! If pie is typically your first stop on the rhubarb circuit, consider trying this recipe for Rhubarb Juniper Pie.  Personally, I like to make Rhubarb Almond Baked Oatmeal every spring.  It reheats well for a quick breakfast option, which is always a bonus!

Chives won’t be around much longer as we have some spring onions that are nearly ready to harvest.  But before we’re finished with chives, try this recipe for Vegan “Sour Cream” and Chive Popcorn, or if you’re more into cheese, check out this recipe for Cheddar Cheese & Chives Popovers.  This may also be our last week for Nettles. If you have never tried nettles in baked goods, maybe this is the week to try this recipe for Nettle & Lemon Cupcakes with Lavender Icing!

I hope you’re having fun creating tasty meals with all of these spring vegetables.  Next week we’re planning to harvest Hon Tsai Tai.  If you don’t know what that is, don’t worry!  I’ll tell you all about it next week!  We’re also hoping to start harvesting cilantro, baby bok choi and baby white turnips very shortly.  And…..we have a nice little crop of mini head lettuces that I’ve got my eye on for sending your way in the next 1-2 weeks.  Plus, more salad greens will be ready very soon. Despite a late start to spring, we’re feeling very blessed and getting back on schedule a little more every day/week!

Have a great week!
Chef Andrea 
 

Vegetable Feature: Asparagus

by Andrea Yoder

Asparagus is a perennial crop that we rely on in the spring before other spring planted vegetables are ready. It is very weather dependent and it’s hard to predict when asparagus season will start. Once it does start producing, it responds dramatically to temperature. On a hot day, yields may double or triple compared to a colder day.  We usually harvest three times a week, however sometimes we pick five to six days a week when it is in peak production. Typically, we see a harvest window of about 5 weeks, so pace yourself and plan out all the recipes you want to make!

As a perennial crop, it takes a three-year investment to establish a field. During the first few years after asparagus crowns are planted, the goal is to build a large root system through the capture of solar energy that is stored in the roots. We also focus on weed control, which is especially important in a field that will be home to the same crop for multiple growing seasons. Conventional asparagus fields are often bare because they are sprayed with herbicide to keep weeds under control. Our asparagus fields are actually green because we employ a method of cover crops and hand weeding to control weeds instead of using chemicals.  We sometimes also use mechanical cultivation, but the risk of damaging the root system is pretty great so we’re limited with this technique.  While cover crops help to build soil fertility and help to decrease weed pressure, they also compete to a certain extent with the asparagus crowns. We do also walk the fields and pull weeds by hand. As you can see, asparagus can be a labor-intensive and challenging crop to maintain! Our cost of production is greater than conventional production, so if you ever wonder why our price might be higher than other growers, this is why. 

Asparagus may be eaten raw, although it’s most often cooked. It may be steamed, boiled, sautéed, grilled, or roasted. The lower portion of the stem may be a little tough. If this is the case, simply snap or cut that portion off. You can save these pieces and use them to flavor vegetable stock. Be careful not to overcook asparagus or it will become soft, mushy and a dull olive-green color. Cook it just until it is bright green and tender. If you are boiling or steaming it, either serve it immediately or put it in cold iced water to stop the cooking process. 

Asparagus pairs well with other spring vegetables including ramps, mushrooms, green garlic and green onions and peas. It is also often served with lemon, cheese, cream, eggs, mint, parsley, chives, dill, bacon, pancetta. Many times, I never get past simply roasting asparagus as it is good when just eaten in this simple form. It is also delicious in a quiche, frittata, scrambled eggs, risotto, or savory tarts. 

We hope you enjoy the bounty of this year’s asparagus harvest and eat it to your heart’s content. Remember, we will only have it for a few more weeks!


Asparagus & Potato Frittata

Yield:  8-10 servings

¾ pound asparagus
3-4 Tbsp olive oil
2 green onions or green garlic, including green tops
6-8 small red or gold potatoes, unpeeled
Salt and ground black pepper, to taste
½ tsp chopped fresh tarragon or parsley
2 Tbsp snipped fresh chives
3 Tbsp unsalted butter
11 eggs
⅓ cup grated Parmesan cheese
½ cup shredded Swiss cheese

  1. Preheat the oven to 375° F.
  2. Trim the tough ends off the asparagus spears. Place the asparagus on a steamer rack over boiling water, cover, and steam just until tender, but still a little crisp, about 2 minutes. Remove from the steamer and cut into 1-inch lengths. Set it aside.
  3. Cut the potatoes into ⅛-inch-thick slices and set aside.
  4. In a large sauté pan over medium heat, warm 3 tablespoons of olive oil.  Add the onions or green garlic and sauté until soft and translucent, about 4 minutes. Add the potatoes, 1 tsp salt, the tarragon/parsley, and a few grinds of pepper and then sauté until the potatoes glisten, about 3 minutes, adding the remaining 1 Tbsp oil if needed to prevent sticking. Cover and cook until the potatoes are nearly tender, 6-8 minutes.  Uncover, raise the heat to high, and cook, stirring constantly, until the potatoes are browned, 7-8 minutes. Stir in the chives and asparagus and remove from the heat.
  5. In a large cast iron frying pan or ovenproof sauté pan over medium-high heat, melt the butter. Meanwhile, in a bowl, whisk the eggs until blended. Stir in the Parmesan cheese and season with a pinch of salt and a few grinds of pepper. Pour the eggs into the hot pan. Stir gently in the center and, as the eggs begin to set along the edges, use a spatula to push the edges toward the center, tilting the pan to let the uncooked egg flow to the edges. Cook until thickened but still moist, 3-4 minutes. Spread the onion-potato mixture evenly over the eggs.
  6. Sprinkle the Swiss cheese on top, transfer to the oven, and bake the eggs until they have set, and the cheese has melted, 10-15 minutes. Remove from the oven and let stand for a few minutes, then cut into wedges and serve.
Recipe adapted slightly from Williams-Sonoma: Cooking at Home by Chuck Williams 

Wednesday, May 10, 2023

May 11, 2023 - This Week's Box Contents Featuring Parsnips


Cooking With This Week's Box

Overwintered Parsnips:  
Gluten-Free Spiced Oat Flour Pancakes with Parsnips (See Below)
Photo from www.food52.com
Parsnip, Potato & Horseradish Gratin (See Below)

Carola Gold Potatoes:  

Chives:  

Wild Ramps:  

Nettles:  

Watercress:  

Photo from www.appetizeraddiction.com
Asparagus:  

Horseradish Whips:  

Green Garlic:  

Overwintered Spinach:  

Welcome to the second week of our 2023 CSA delivery season and this week’s Cooking With the Box article!  If you are joining us for the first time, welcome! Every week I will use this space to provide you with recipe suggestions and ideas for how to use every single vegetable in your box as well as 1-2 featured recipes! This week we’re going to start with our featured vegetable, overwintered parsnips, and this week’s featured recipes.  The first recipe is for Gluten-Free Spiced Oat Flour Pancakes with Parsnips (See Below). Whether you choose to eat a gluten-free diet or not, these pancakes are quite tasty and an excellent way to start the day! They have a nice texture, and the combination of spices complements the unique flavor of the parsnips.  They also reheat well, so leftovers are a bonus! The second recipe is for Parsnip, Potato & Horseradish Gratin (See Below). This is a hearty, comfort food type of recipe, but well-suited for spring given it is infused with the flavor of horseradish and uses chives in the breadcrumb topping. I used 3 Tbsp of freshly grated horseradish whips to yield a mild horseradish essence. If you like a stronger horseradish flavor, you may wish to use more like 4-5 Tbsp of fresh horseradish.

Photo from www.dishingupthefirst.com
We are nearing the end of overwintered spinach and ramp season. This week’s spinach is full of flavor, but the leaves are a little less tender than our earlier harvests. As such, I recommend you cook the spinach which will make it nice and silky, perhaps in this recipe for Creamed Ramps & Spinach!  Before ramp season closes, may I suggest a few of our longtime farm and member favorites? In our private Facebook Group several members have already shared that they made Ramp Pesto and Ramp Butter! These are two simple recipes to capture the full essence of ramps and may be used in a variety of ways plus you can freeze them for later use! The other recipe I want to mention is this delicious recipe for Nettle & Mushroom Pizza with Ramp Cream.  You will not be disappointed, trust me!

It’s our first week for asparagus!  If you’re looking to try some new recipes, check out this collection of 25 Delicious Asparagus Recipes which includes this recipe for Parmesan Asparagus Pastry Twists.  I bet even your picky eaters might try these!  We also just started harvesting green garlic. Green garlic has a bright, vibrant flavor that is excellent in either of these two simple preparations for Alice Water’s Spaghetti with Green Garlic and Green Garlic Risotto. Sometimes keeping it simple is the best approach.

As we look ahead to next week, we have more delicious spring vegetables to add to the mix.  Our first little red radishes will be ready along with our first crop of baby arugula! Our sorrel crop took a bit of a hit with the repeated frosts we had this spring, but I took a peek at it this week and it’s coming.  Hopefully, we’ll be able to send some your way within the next few weeks.  Rest assured, there’s always something delicious to look forward to!  Have a great week—

Chef Andrea 
 

Vegetable Feature: Parsnips

by Andrea Yoder

Overwintered Parsnip Harvest
Parsnips fill an important place in our seasonal Wisconsin diets.  We harvest parsnips both in the fall to sustain us through the winter months, but we also harvest them in the spring as “Overwintered Parsnips!” Earlier this spring, we dug these parsnips from the field where we left them from last fall. It’s a little risky to do this as you never know what may happen over the winter, but it’s well worth it to have these unique, sweet and delicious spring-dug, overwintered parsnips!  Over the course of their winter in the ground, they develop more sugars to act as an antifreeze.  The side effect is that overwintered parsnips are even more sweet and delicious than they are in the fall.  Parsnips are often described as being a white carrot and, while they do resemble carrots, they are not just a white carrot! They have a distinct flavor that is much different from a carrot. 

Parsnips are a versatile vegetable that can be prepared in a variety of ways. Their sweetness really comes out when they are roasted, which is one of my favorite ways to prepare parsnips. They also make a nice addition to a root mash or mix them with other vegetables in hearty soups and stews. You can also use them in baked goods such as cakes, cookies, and bread, similar to how you might use carrots.  

Parsnips all washed up and ready to go!
Parsnips pair very well with other root vegetables, wine, shallots, apples, walnuts, and a variety of spices including cinnamon, nutmeg, cardamom, and ginger as well as dairy products, toasted nuts and maple syrup.  Some people really like the distinct flavor of parsnips, while others may still be learning to like them. If you’re in the latter group, I’d recommend that you start by using parsnips in a baked good or in this week’s recipe for Gluten-Free Spiced Oat Flour Pancakes with Parsnips.  

Store parsnips in the coldest part of your refrigerator in a plastic bag. They will store for several weeks under these conditions, so don’t feel like you need to eat them all right now.  When you are ready to use them, Scrub the outer skin with a vegetable brush and trim off the top and bottom. Peeling is optional and totally up to you.   


Gluten-Free Spiced Oat Flour Pancakes with Parsnips

Photo from healthynibblesandbits.com
Yield:  4 servings

1 ¼ cups oat flour*
1 ¼ tsp ground cinnamon
1 tsp ground ginger
¼ tsp ground nutmeg
½ tsp ground cardamom
1 tsp baking powder
½ tsp baking soda
Pinch of salt
1 cup milk
2 large eggs, beaten
3 Tbsp maple syrup, plus more for serving
1 cup grated parsnips**
3-4 Tbsp vegetable oil
  1. Preheat oven to 180-200°F. In a large bowl, mix the oat flour, cinnamon, ginger, nutmeg, cardamom, baking powder, baking soda and salt together.
  2. In a separate bowl, combine the milk, eggs, and maple syrup. Stir well to combine, then add to the dry ingredients. Stir until all the ingredients are well combined into a batter. Let the batter rest for 10 minutes. 
  3. While the batter is resting, grate the parsnips. Gently fold the grated parsnips into the batter.
  4. Heat a large non-stick skillet or a griddle over medium heat. Add enough oil to the skillet or griddle to just coat the surface with a shimmer of oil. When the oil is hot, add the pancake batter, about ¼ cup at a time, and use a spatula to smooth out the batter into a circle. This batter is a little thick, so you may need to use a spatula to smooth out the batter into a circle and spread it to a thickness of about ¼- ½ inch. 
  5. Cook each pancake for 2 to 3 minutes, until the edges of the pancake are puffed up and bubbles have formed on the top surface of the pancake. Flip and cook for another 2 minutes or so. Put the cooked pancakes on a rack on a sheet tray and hold them in the warm oven while you finish cooking the remainder of the batter. This will serve to finish cooking the interior of the pancake while also keeping them warm until you are ready to serve them.
  6. Serve the pancakes warm with butter and warm maple syrup. You may also wish to serve them with fresh berries, baked apples, or baked pears as a fruit topping.
*Oat Flour:  You can either buy oat flour, or make your own by blending rolled oats in a blender or food processor.  Check out this article for details: How To Make Oat Flour.

**Recipe adapted slightly from Lisa Lin’s recipe found at www.healthynibblesandbits.com. Lisa’s original recipe used half parsnip and half carrot. These two vegetables may be used interchangeably in this recipe. When I (Andrea) made this recipe, I did so using parsnips only.

Parsnip, Potato & Horseradish Gratin

Yield:  6 servings
2 cups whole or 2% milk
1 cup heavy cream
2 Tbsp finely chopped green garlic or ramp bulbs
½ tsp dried thyme
¼ tsp ground or grated nutmeg
3 Tbsp freshly grated or finely chopped horseradish root
6 cups diced potatoes (approximately 2 pounds)
1 ¾ cup diced parsnips (approximately 1-1.25 pounds)
2-3 tsp salt
Freshly ground black pepper, to taste
3 Tbsp melted butter
¾ cup dry breadcrumbs
½ cup chopped chives
  1. Preheat oven to 350°F. Grease a 2 to 2.5 quart baking dish with about 1 Tbsp of melted butter and set the dish aside.
  2. In a medium saucepan over medium heat, combine the milk, heavy cream, green garlic/ramps, thyme, nutmeg, freshly grated horseradish, 2 tsp salt and freshly ground black pepper. Bring to a simmer, then remove from heat and set aside to infuse the flavors for about 10 minutes.
  3. While the milk and cream mixture is infusing, cut the potatoes and parsnips into medium dice. Add the vegetables to the cream mixture and return to the stovetop. Heat the mixture over medium to medium-high heat just until the liquid starts to simmer.
  4. Pour the vegetables and the liquid into the prepared baking dish. Cover with foil and bake in the oven for 25-30 minutes, or until the vegetables are tender. You may wish to put a sheet tray under the baking dish in case the liquid bubbles over the edge of the dish.
  5. While the vegetables are baking, prepare the breadcrumb topping. In a small bowl, combine 2 Tbsp melted butter with dry breadcrumbs, ½ tsp salt and freshly ground black pepper.  Stir well to combine. Fold in fresh chives and set aside.
  6. Once the vegetables are tender, remove the foil. Spread the breadcrumb topping evenly over the surface and return the baking dish to the oven. Bake for an additional 10-15 minutes or until the breadcrumbs are golden.  Remove from the oven and let rest for 10 minutes before serving.
Recipe adapted from www.bbcgoodfood.com.

Wednesday, May 3, 2023

May 4, 2023 - This Week's Box Contents Featuring Nettles and Ramps


Cooking With This Week's Box

Wild Ramps:  
Photo from: www.growforagecookferment.com
Italian Nettle & Ramp Soup (See Below)

Nettles:  
Italian Nettle & Ramp Soup (See Below)

Watercress:  


Overwintered Spinach:  

Overwintered Parsnips:  

Overwintered Sunchokes (aka Jerusalem Artichokes):  

Chives:  

Welcome to the 2023 “Cooking With the Box!”  My name is Andrea and I am a trained professional chef and have 16 years of experience in seasonal cooking and eating!  While I enjoy an afternoon of leisurely cooking, I also understand the need at times to be able to put a healthy, vegetable-centric meal on the table with limited time. So I try to keep the “chef-y,” complicated recipes to a minimum and focus more on recipes of easy to moderate skill and time investment that incorporate multiple vegetables from your CSA box.  Each week I will share a recipe or two that incorporates our featured vegetable(s) for the week along with this collection of “Cooking With the Box” recipes.  The purpose of this article is to give you a starting point for planning how you are going to use every single item in your CSA box. Some weeks you may find a recipe you want to make, while in other weeks you may find inspiration that will lead you to your own recipe idea or an adaptation. Either way, I hope this is helpful and I hope you have fun creating some delicious food this year! If you are not already a member of our private Facebook Group, I encourage you to join. It’s another great resource for sharing recipes & ideas as well as asking questions.

Ok, with that introduction laid out, lets get into this week’s Cooking With the Box!  First of all, I’d like to share this week’s featured recipe for Italian Nettle & Ramp Soup (See Below).  Feel free to adapt this recipe to your liking. Leave out the beans and add some pork sausage for one variation, or make a batch of ramp pesto and use it to garnish the soup.  While this recipe incorporates both of this week’s featured vegetables, I also gave you a list of other recipes using these ingredients. Additionally, I provided links to several really good recipe collections where you’ll find many different ideas for how to use both ramps and nettles.

Overwintered parsnips are naturally sweet, so I often like to incorporate them into baked goods where I can take advantage of their sweetness as an opportunity to reduce the amount of sugar in the recipe! This week you’ll find a recipe for Parsnip & Orange Spiced Cake  and Hearty One-Bowl Parsnip Muffins.  As for overwintered sunchokes, consider Heidi Swanson’s recipe for Sunchoke and Cashew Stir-Fry or try these Smashed Sunchokes with Thyme Butter.  

Overwintered spinach leaves are generally more thick, yet tender and flavorful.  Use it to incorporate some greens into your dinner plan for the family with either of these main dish recipes for Creamy Spinach Chicken Casserole and Mushroom and Spinach Lasagna.  Pizza is one of those concepts that you can bend and adapt however you want to in any season of the year! If you’re up for a piece of the pie, consider making this Asparagus and Watercress Pizza or this Spring Onion and Chive Pizza with Genius Cream Sauce!

I hope you have a great week and enjoy cooking with fresh, green vegetables again!  Hopefully, we’ll have some asparagus to share with you next week.  Green garlic and red radishes will be here soon along with sorrel! Start gathering your recipes, it’s going to be a fun ride!

---Chef Andrea 
 

Vegetable Feature: Nettles & Ramps

by Andrea Yoder

This week we’re featuring two of our favorite wild-harvested spring vegetables.  The first is Stinging Nettles, which we both wild harvest and plant in the field. They need to be handled carefully, especially before they are washed and cooked.  They have little fibers on the stems that contain several compounds including formic acid, which will give you a “stinging” sensation if you touch them with your bare skin. “Why are you giving me a vegetable that will sting me?!  Are you trying to kill me?!”  No, quite the contrary!

Nettles are very nutrient dense and help our bodies wake up after a long winter through their ability to purify blood and cleanse our bodies. They have anti-inflammatory and antihistamine properties. They are high in protein, carotenoids, chlorophyll, iron, calcium, magnesium, zinc, potassium, selenium and vitamins B, C, D and K. Wow—that’s a lot of nutritional goodness!  Nettles give us that jump start we need in the spring and, they also taste great! Cooking destroys the stingers so you can safely handle them with bare hands.  They have a rich flavor similar to spinach, but even better!  

As for handling nettles, many of the stingers are removed with vigorous washing, which we’ve already done for you.  Even though we’ve washed them, I would still recommend you handle them carefully and avoid touching them with bare hands prior to cooking.  Some people are more sensitive to their sting than others, which is why we put them in a plastic bag to make it easier to get them home without touching them. You can use the bag as your “glove” to hold the bottom of the bunch while you remove the twist tie prior to washing them in a sink of water. While you are washing them, bring a pot of water to a boil. Transfer the nettles from the sink to boiling water using a pair of tongs. Boil for 2-3 minutes, then transfer to a bowl of ice water to cool them. Now you can handle them with your bare hands.  

The lower portion of the stems may be tough, so only use the leaves and tender upper stem portions. You can pluck or cut these off the main stem after they are cooked. Alternatively, you can hold each stem (with your gloved/bagged hand) and use a pair of scissors to snip the tender leaves off the main stem before you cook them. Check out this blog post we did on May 10, 2018, which demonstrates these processes and includes pictures. 

Nettle leaves are perishable, so it is best to cook them shortly after you receive them. The cooking water makes a beautiful tea, so don’t discard it.  You can drink the tea either hot or cold and mixed with honey and lemon. The water can also be used to cook pasta, rice, etc. Nettles grow in other areas of the world with similar climates to ours, such as areas of Scandinavia, the United Kingdom, Italy, and other parts of Europe as well as Turkey, Russia, and parts of Asia. Thus, you will find nettles incorporated into a wide variety of preparations from different cultures. Nettle soup is a widely popular way to use nettles, as well as dishes that incorporate eggs, grains and pasta.  They pair well with eggs, dairy, mushrooms, beans, asparagus, and other spring greens.

The second part of our feature is Wild Ramps! We forage for ramps in wooded areas where they grow on north-facing hillsides. They have a very short season lasting, at most, 3-4 weeks.  Their flavor is kind of oniony-garlicky, but honestly the best way to describe it is simply rampy.  They resemble a green onion, except they have tender, delicate lily-like leaves. Ramps grow in the woods and, while they can be replanted to establish new patches, it takes a long time for them to multiply. Many, us included, are concerned about the sustainability of ramps. Thus, it’s important to be mindful when harvesting them.  Ramps grow in clumps and we’re careful to only take about half the clump while leaving the other half undisturbed.  We also replant thousands of bulbs every year in an effort to ensure healthy ramp populations for many years to come!  If you’d like to learn more about our harvest practices, please read our blog post from April 20, 2017. 

Ramps may be eaten raw or cooked and both the leaves and lower bulb are edible. Eaten raw they can be quite pungent, but the flavor mellows with cooking. Ramps are often used in pasta and egg dishes, but can also be made into pesto, ramp butter and even added to baked goods. Ramps pair well with cream, cheese, bacon, and other spring vegetables including mushrooms, asparagus, nettles, and spinach. The leaves are the most perishable part and should be used within a few days. To store ramps, wrap the bunch in a damp paper or linen towel and keep them in the refrigerator. 


Italian Nettle & Ramp Soup

Yield:  4 Servings

1 bunch ramps
¼ cup olive oil
Pinch of dried crushed red pepper
1 can (15.5 oz) chopped & peeled tomatoes
1 bunch fresh nettles
Salt and freshly ground black pepper, to taste
6 cups chicken or vegetable stock
1 Tbsp balsamic vinegar
1 can (15 oz) chickpeas or cannellini beans
2 cups cooked short grain rice or small pasta

Serving Suggestions:
Extra-virgin olive oil
Lemon wedges
Grated Parmesan cheese

  1. Clean the ramps and separate the leaves from the white lower portion.  Finely chop the white bulb and set the leaves aside.  Prepare the nettles by using kitchen shears to snip the leaves off the main stem.  Discard the thick stem and set the nettle leaves aside until needed.
  2. In a medium stock pot, heat ¼ cup olive oil over low heat.  Add the finely chopped ramp and sweat just until softened.
  3. Add the crushed red peppers, tomatoes, nettles, 1 tsp salt, freshly ground black pepper, 6 cups stock and balsamic vinegar.  Bring to a simmer and cook for 15-20 minutes or until nettles are softened, stirring periodically.  
  4. While the soup is simmering, finely slice the ramp leaves.  After the soup has simmered for 15-20 minutes, remove from heat and stir in the ramp leaves.  
  5. Carefully blend the soup at this time using either an immersion blender or transfer the soup to a blender.  Return the blended soup to the pot and heat over low heat.  
  6. Stir in the chickpeas or cannellini beans and cooked rice.  Simmer briefly, then taste.  Adjust the seasonings to your liking by adding additional salt, pepper and/or balsamic vinegar as needed.  Serve hot with a drizzle of olive oil, lemon wedges and parmesan cheese if desired.  
If you happen to have some ramp or nettle pesto on hand, that is a great garnish as well!
Recipe adapted from an original recipe featured at www.foragerchef.com.

Spring—The First Stop On Our Seasonal Eating Adventure!

By Andrea Yoder

Richard de Wilde, Our Founding Farmer

Welcome to the start of the 31st Harmony Valley Farm CSA season! My name is Andrea, and I am one of the owners of Harmony Valley Farm along with Richard de Wilde and Rafael Morales Peralta. For those of you who may be new to our farm, let’s start with a brief introduction.  Richard is our founding farmer and is often described as a “pioneer in organic farming.”  He has been farming since the early 70’s, even before organic certification was an option!  Over the years he has continued to push the envelope of possibility and continues to implement new strategies and systems to adapt, grow and respond to changes in the marketplace and climate changes while continuing to evolve our farm to become stronger and more resilient. He envisions the continuation of Harmony Valley Farm well into the future, hence his decision to create a path to ownership for others. And that’s where Rafael and I come into the picture!

Andrea Yoder, Co-Owner
This will be my 17th growing season at Harmony Valley Farm. I originally came to the farm as the seasonal farm chef shortly after graduating from The Culinary Institute of America. Prior to pursuing a career in culinary arts, I trained and worked as a dietitian at the University of Virginia. I am fortunate to be able to blend my interests in nutrition and culinary arts here at the farm as we strive to grow vegetables that are nutrient dense and taste great! Every week my mission is to provide you with resources to guide you along the way and help you to find success with every box! I create and share recipes and cooking ideas with the intention that you will find the inspiration you need to create delicious, nourishing meals! Rafael has been working with us for over ten years.  He loves operating tractors and machines, figuring out ways to kill pests and weeds, and is innovative in coming up with ways to upgrade our farming systems for greater efficiency, productivity and resilience.  He is quickly downloading Richard's
Rafael Morales Peralta, Co-Owner
forty-plus years of farming expertise, which is no small task! Introductions would not be complete without mentioning our talented farm crew of nearly fifty individuals.  Each person at Harmony Valley Farm brings their own unique skills and talents to the table and contributes in their own way toward our collective success. Most of our crew members have been working with us for 10-20 years and we could not do what we do without them! 

We often describe the experience of eating out of a CSA box as “A Seasonal Eating Adventure,” which is exactly what it is! It’s a different way of eating in which we let nature guide us, partaking of the gifts each season brings forth.  Spring can be a challenging time of year to eat a seasonal midwestern diet, especially in some years such as we’re experiencing right now!  Over the past month, we’ve had nice, warm, sunny days along with cold, blustery days with snow and rain, including 10 inches of heavy, wet snow just a few weeks ago!  Overall, we’re running about two weeks or so behind where we’d like to be, and yet we know that Mother Nature will continue to provide for us.  Spring is a season of creativity where we have to think outside the box.  It’s too early for carrots, tomatoes, sweet corn, green beans and broccoli, so what are we going to eat?  Thankfully, we have perennial spring crops such as chives, sorrel, asparagus, and rhubarb. We also rely on wild-harvested vegetables such as ramps, nettles, and watercress. Over the years Richard has learned some useful strategies for how to overwinter some crops in the field including overwintered spinach, sunchokes and parsnips. We plant them in the fall, store them in the field over the winter and harvest them in the spring. So while these may be less common vegetables, if you’re willing to commit to eating seasonally I guarantee you’re going to be fueling your body with just what it needs for this time of the year in our climate. 

Green Garlic
While we are getting creative with the crop line-up, you have an opportunity to get creative in the kitchen as well! This may be a good time to remind you, “Never Be Intimidated by a Vegetable!”  If you encounter a vegetable along the way that is new or less familiar to you, don’t worry.  Use the resources we provide you each week to guide you and apply knowledge you have about other vegetables that may be similar. Some vegetables may require a little more preparation than others, but you may be surprised by how many vegetables actually qualify as nature’s fast food and require very little preparation.

Asparagus just starting to poke through!

Once the season starts and the vegetables start coming in, the offerings will change week to week. Asparagus spears are already starting to emerge in our current fields as we invest in planting a new field that we hope to start harvesting in 2-3 years. Richard just brought a few pieces of green garlic in from the field and it’s clear they’ll be ready for boxes very soon as well!  Rhubarb, sorrel, radishes, baby arugula are all very near on the horizon.  When you take a moment to list everything coming our way, it’s clear that spring is bountiful in its own right!

We are sincerely grateful that you’ve committed to supporting our farm through your membership in our CSA program this year and we will do our best to reciprocate the support back to you in each box we pack.  Together we will make this journey through the seasons, and I know we will both be stronger, more connected, and more deeply nourished in body, mind, and soul at the end of the season. Enjoy the ride!