Wednesday, June 6, 2018

June Farm Update


By:  Farmer Richard

It’s been 7 weeks since the last farm update we shared with you on April 19, written with a foot of snow on the ground!  In that update we reported that this year sets the record for the coldest and wettest spring in the forty plus years since I started farming!  Despite that crazy, wet, snowfall in late April, we were able to do our first spring planting on April 24 which is one full week later than any other year I’ve had farming.  The late start to the season would suggest that all of the crops would be later and heat loving crops like tomatoes, sweet corn and peppers would be equally late and have a short season, barely making it before the first fall frost!  Well folks, keep reading as I have some good news!!

Onions in the greenhouse
We had to plan our greenhouse transplants for a “normal” year.  We started planting in late February and actually had some really nice, sunny days in March.  We have new plastic on all the houses, so our early seeded crops took off nicely and even when the days became more cloudy, the crops continued to grow and were ready pretty much on schedule.  As soon as the skies cleared (and the snow melted away), we seized the few dry days we had to prepare ground, lay plastic (for some of our transplants like onions and tomatoes) and tried to keep our field plantings on schedule.  When greenhouse transplants are ready, they really need to get to the field!  However, just because you get a plant to the field it doesn’t mean it’s going to take off and grow, especially when it’s cold as it has been this spring.  


Antonio, Jose Luis & Carlos laying out hoops to cover zucchini
We decided to invest the time and energy into covering some crops with row covers to help trap heat and accelerate plant growth.  We cover some crops every year, but this year we had so many fields to cover that we had to fill an extra 1,000 sandbags and cut 1,000 new wire hoops to put over the beds to keep the covers from damaging the transplants under them.  Without the hoops we risk giving the plants cover abrasion and we need the sandbags to hold all the covers in place!  We couldn’t have covered all of these crops without our amazing crew!  When we had only a few dry days to plant and cover, they were asking “can we work late to finish?”  They repeatedly tell me, “if we don’t plant it and take care of it, we don’t have a crop to harvest!”  It’s important to get the big picture! 

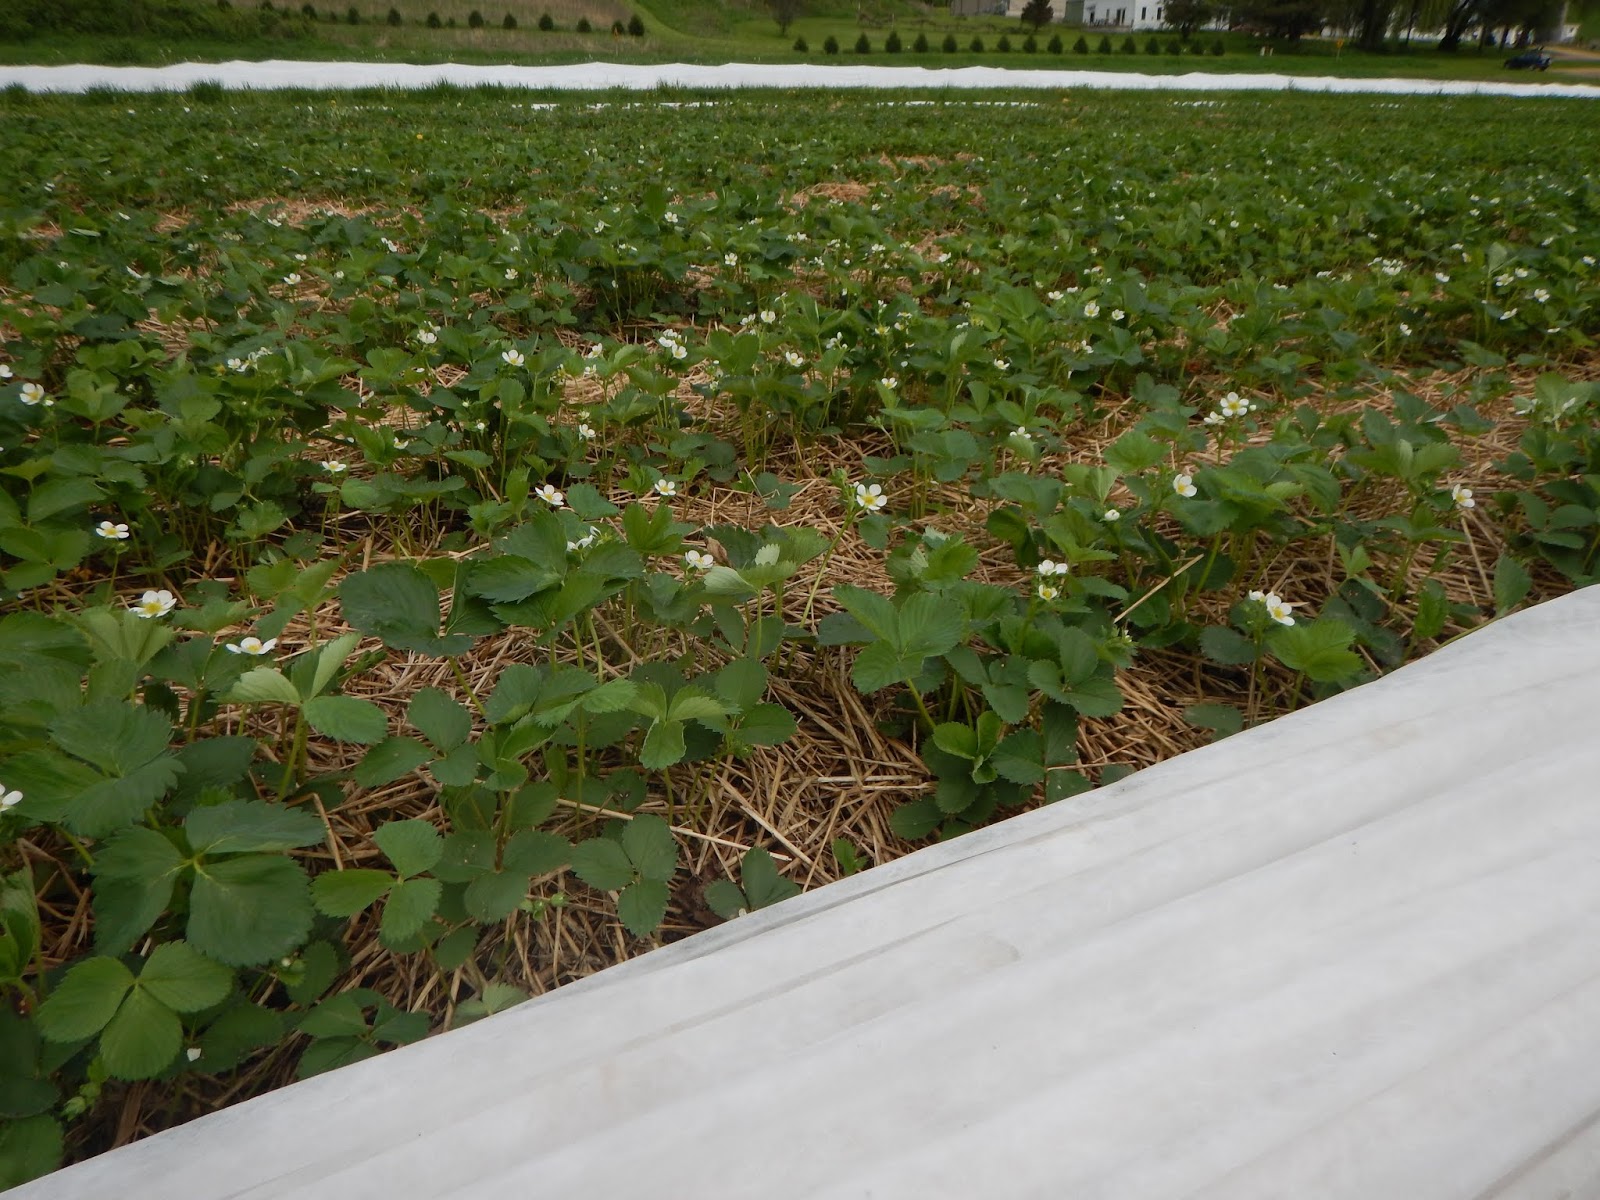
Strawberries right after the covers were taken off.
We are well aware that it is our crew’s dedication to getting the crops planted on time, covered for protection from cold and storms and willingness to work late some nights that has changed the picture from coldest/latest spring to bring us pretty much back on schedule!  Does anyone remember that heat wave we had at the end of May?  We went from cool growing weather to blazing hot!  Those covers we had on everything…..most of them had to come off because now we ran the risk of the crop getting too hot!  We had to uncover the zucchini, cucumbers, tomatoes, peppers and eggplant.  When we did, we were really happy to see beautiful plants that now appear to be growing at a normal rate!

Zucchini plants thriving after being uncovered!
Vicente and the irrigation crew members receive some acknowledgement here as well.  They have worked diligently to set up all the drip irrigation making it possible to give many of our new transplants a small drink of water mixed with fish and kelp fertilizer shortly after they were planted.  The combination of water and nutrients followed by a week of unseasonable, warm temperatures and we really saw some growth under those covers!  We are now ahead of schedule for zucchini, cucumber, melons, tomatoes, eggplants and peppers!! 

We have two crops of sweet corn and beans up and growing and one planting of edamame.  We lost about 25% of the first planting of corn to the Red Wing Black Birds.  Unfortunately they found that they could dig up the corn seed that was planted shallow because the soil was cold and we wanted the seeds closer to the surface so they would receive heat from the sun.  These were pretty determined birds that didn’t seem to mind the “scare eye” balloons and shiny streamers we put in the field to try to deter them.  They ignored our tactics and continued to dig up the seeds.  So our solution was to feed them organic corn on the edge of the field.  That actually did work as a decoy and and we still have 75% of the crop!  It’s hard to get upset with these birds, after all they have babies to feed and we’re always encouraging parents to feed their young ones more organic vegetables! 

Luis and Felix G mastering the new cultivator
If the weather cooperates we can still have a great year!  Right now we’re working really hard to battle the weeds.  Rafael has done a superb job of flaming crops to kill weeds just before a crop comes up.  Our local Cenex crew has been super cooperative in keeping our flamer filled and repaired.  A few gallons of propane used on the precise day saves hours and hours of weeding later!  The result of being diligent and staying on top of flaming is the main reason we have two beautiful crops of early carrots and five acres of parsnips, cilantro & dill!  Rafael has also done a lot of mechanical cultivating and has been instrumental in directing other cultivating crews.  Luis and Felix G have become masters at operating our new Kult/Cress German cultivator.  They’ve learned how to work together to use this machine to mechanically kill a lot of weeds! 

HVF crew hand weeding parsnips.
Andrea gets huge credit for keeping ahead of our frantic spring planting schedule.  Simon has also been a key player in helping us keep the greenhouse plantings on track and has helped with our “hot water” seed treatment for some seeds and biological seed treatments for others.  Andrea has also worked hard to maintain our seed inventory and provides planting plans for each crew every time they go out to plant.  Gwen is now learning the ropes of managing our records once a planting is done.  It’s super important that we have good, complete records both for our own use as well as for maintaining our ability to trace crops back. 

Our Strawberry Day event is coming up on June 17, and yes it looks like we’ll have strawberries!  We hope to see you at the party, or join us for the weekend and do some camping!  We have had a few CSA member visitors this spring and we welcome more.  If you’re interested in camping, we’d love to offer you a spot in one of our two campgrounds or reserve our cabins for your stay. 

Bee pollinating the strawberries
As I write this article on my back porch, I have marveled at the dozens of hummingbirds and the many bumblebees that I see coming to visit the columbine flowers in our yard.  Our strawberries are being pollinated by small bees I collectively call “sweat bees.” As the light dims and the day turns to night, I am in awe of the whippoorwills singing to me.  After a five year absence when we didn’t hear them in our valley, we’re very thankful that they’ve returned!  Every night we listen as they sing us to sleep and every morning they wake us up like an alarm clock, right outside our window.  Despite a challenging spring, life is good!

Wednesday, May 30, 2018

May 31, 2018 - This Week's Box Contents, Featuring Hon Tsai Tai & Pea Vine


Cooking With This Week’s Box: 

This Week’s Summary of Recipes & The Vegetables They Utilize:

Mini Romaine Lettuce:  Romaine & Cheese Roll Ups (See explanation below)
Egyptian Walking Onions or Potato Onions:  Pea Vine & Asparagus Soup with Buttermilk and Mint (See Below); Sesame-Soy and Hon Tsai Tai Chicken Salad; Radish & Scallion Salsa; Spicy Lentil Tacos with Radish & Scallion Salsa
Green Garlic:  Skillet Chicken with Rhubarb and Green Garlic; Pea Vine & Asparagus Soup with Buttermilk and Mint (See Below); Sesame-Soy and Hon Tsai Tai Chicken Salad
Pea Vine:  Pea Vine & Asparagus Soup with Buttermilk and Mint (See Below) 

Welcome back for another week of spring cooking!  This week we’ll make the transition into the month of June which means strawberries and summer vegetables are just around the corner!  Mark your calendars for June 17 and join us at the farm for our annual Strawberry Day event! 

The theme of this week’s newsletter and box is “Greens.”  This week I used the pea vine to create a new recipe for Pea Vine & Asparagus Soup with Buttermilk and Mint.  (See BELOW)  This is a simple, brothy, light soup to prepare.  The thing that’s so striking about it though is the bright pea flavor and aroma you experience when it’s freshly made.   You can taste the vitality in this soup!

I enjoy the flavor of hon tsai tai most when it’s raw.  So this week I’m going to make this Sesame-Soy and Hon Tsai Tai Chicken Salad that we featured in a 2014 newsletter.  The recipe calls for baby white turnips, which aren’t quite ready.  In their place, you can substitute roasted asparagus.

This week I’m going to make Melissa Clark’s recipe for Skillet Chicken with Rhubarb and Green Garlic.  There’s even a video you can watch where Melissa shows you how to make this dish!

The remaining asparagus can be used to make this simple Fettucine with Asparagus.  This will make a simple, light dinner.

I seldom get past red radishes with butter and salt…before I know it the whole bunch is gone.  But this week I want to try this recipe for Radish & Scallion Salsa that can be used to make these Spicy Lentil Tacos with Radish & Scallion Salsa.  You can serve these with either saute mix or salad mix as the recipe calls for “baby greens.”  Any remaining greens will make a simple salad to serve with any leftover Skillet Chicken with Rhubarb and Green Garlic.

We’re down to a little head of romaine lettuce and some spicy radish tops.  This week I’ve been eating the romaine lettuce as a snack.  I take a leaf of the lettuce and spread a little bit of mayonnaise on the leaf and top it off with a slice of cheese.  Wrap it up like a burrito and it makes a great afternoon snack!  The radish tops have been making their way into Richard’s breakfast burritos this week.  This week’s breakfast burrito has been bacon, scallion, radish tops scrambled with eggs and Parmesan.  I spread a little sour cream on a warm flour tortilla and then wrap up the scrambled eggs in the tortilla.  Simple, delicious, and a great way to use the tops of the radishes!

That’s a wrap...I’ll see you back next week to talk cooking and share more recipes!—Chef Andrea 

Featured Vegetable: Hon Tsai Tai & Pea Vine

Hon Tsai Tai in the field
Hon tsai tai and pea vine hold an important place in our spring vegetable line-up.  We rely on them to bridge the gap between the long winter and greater availability of other crops coming in from the fields.  Hon tsai tai is in a group of plants referred to as “flowering brassicas.”  While it is related to such vegetables as mustard greens and bok choi, what sets it apart is that it has beautiful purple stems that produce a sweet, delicate, edible yellow flower.  The sweetness of the buds and flowers is the part we love the most!  While other vegetables in the brassica family also produce flowers, they do so towards the end of their life cycle and at that point there are often undesirable flavor changes in the edible portion of the plant.  Hon tsai tai is unique in that it produces the flower early in its life when all the parts of the plant still taste good.

Hon tsai tai has a mild mustard flavor.  The entire plant is edible and may be eaten raw or cooked.  The thin purple stems are more tender when the plant is young.  While still flavorful, they may become more coarse as the plant matures, so should be cut very finely at this stage.  Hon tsai tai is delicious in stir-fries or lightly steamed or sauteed, but also makes a stunning and flavorful addition to raw salads.  A common preparation in Chinese cuisine is to quickly stir-fry hon tsai tai with garlic, onions, and ginger, then add oyster sauce.  Store hon tsai tai loosely wrapped in a plastic bag in the crisper drawer of your refrigerator until ready for use. 

Pea Vine is actually an immature heirloom snow pea plant that is harvested before the vine starts to develop blossoms.  It has a mild, sweet pea flavor and may be eaten raw or lightly cooked.  While the tendrils and leaves are tender, the main stem can sometimes get tough depending on how mature the plant is at harvest.  This week’s pea vine may be a bit more mature and you may find some of the lower stem is a bit more coarse.  If you find this to be the case, pick the leaves, tendrils and thin, tender stems off the main stem.  I must admit that I don’t like to spend a lot of time sorting through a bunch of pea vine and I prefer to use as much of the bunch as I can...plus there is a lot of flavor and nutrition in the stem!  Thus, when the pea vine is more mature and some of the stems are a bit more coarse, I tend to use pea vine in ways that allow me to blend it in a blender or food processor to make things such as pea vine pesto or pea vine cream cheese. 


The other way I like to use pea vine is in sauces, soups or broth.  I generally chop the pea vine into smaller pieces and add it to hot broth or a sauce base.  Let the pea vine simmer briefly to extract the flavor, but don’t overcook it or you’ll lose the bright pea flavor.  Once you’ve infused the flavor of the pea vine into the sauce or broth, you can strain it out to remove it.  If you’d like to extract just a little more flavor, blend the mixture before straining it.  Store pea vine loosely wrapped in a plastic bag in the crisper drawer of your refrigerator until ready for use.  

Pea Vine & Asparagus Soup with Buttermilk & Mint 


Yield:  3-4 servings


¾ cup buttermilk
2 Tbsp olive oil or butter
1-2 pieces green garlic
2-4 green onions
½ pound asparagus, cut into 1 inch pieces
1 quart chicken or vegetable broth
1 bunch pea vine
Salt and black pepper, to taste
Fresh mint, to garnish (optional)

  1.  First, measure out the buttermilk and set it aside.  You want to allow it to come to room temperature while you prepare the soup.
  2. Heat olive oil or butter in a medium saucepot over medium heat.  Separate the green tops from the lower white base of both the green garlic and green onions.  Finely chop the white part of both the garlic and onions.  You will need about ¾ cup total.  Thinly slice the green tops and set aside. 
  3.  Add the chopped garlic and onions to the pan and saute them briefly, just until softened. 
  4. Next, add the asparagus and broth to the pan along with freshly ground black pepper and a bit of salt.  Bring the soup to a simmer.  Cook, uncovered, for about 10 minutes or until the asparagus is bright green and tender.  Be careful not to overcook the asparagus!
  5. While the soup is simmering, prepare the pea vine.  Remove the lower 1-2 inches of stem from the bunch and then roughly chop the remainder. 
  6. Once the asparagus is tender, transfer the soup to a blender and add the chopped pea vine. If you have a large enough blender container you can puree the soup in one batch, otherwise you may need to puree it in two batches.  Be careful when blending the hot soup.
  7. Blend the soup until all of the vegetables are incorporated and you have a smooth soup.  You can choose to either strain the soup or leave it as is.  If you like a silky, smooth soup, strain it through a fine mesh strainer.  If you don’t mind a thicker soup, just move on to the next step and skip the step of straining.
  8. Once the soup is blended (and strained if you choose to do so), return the soup to the pan and reheat it just enough to bring it to the temperature you’d like to serve it at.  Please note this soup is good when eaten hot, room temperature or as a chilled soup.  The soup should be a bright green color at this point.  You want to minimize any further cooking time so you can keep the bright green color and the perky pea flavor of the broth.
  9. Just before serving, stir in the buttermilk.  Portion the soup into bowls and garnish with the sliced green onion and green garlic tops as well as fresh mint.


We enjoyed this soup served very simply with crackers, sliced radishes and a hard-boiled egg.  As mentioned in the method, this soup is delicious eaten at any temperature. 

Recipe created by Chef Andrea Yoder

Vitality... Eat Your Greens Every Day!

By Chef Andrea Yoder

Rainbow Chard
Farmer Richard says “Eat your greens every day!”  Yes, this is a direct quote and a message we try to follow in our own lives for our own health and well-being.  “Greens” is a general term we use to refer to a wide category of vegetables that includes leafy vegetables such as kale, collards and Swiss chard.   This group also includes “salad” type greens such as lettuce, arugula, baby kale mix, and spinach.  Of course, we can’t forget the Asian greens including bok choi, tat soi, hon tsai tai, mizuna, komatsuna, and the list goes on!  I’ve already listed twelve different vegetables and I didn’t even mention some of the unique greens we grow such as the pea vine in this week’s box, sorrel, amaranth greens, Egyptian spinach, nettles and Portuguese kale.  Of course we can’t forget the bonus greens we get when we harvest root crops with their green tops still attached.  This would include things such as turnip greens, radish tops, carrot tops and beet greens.  In this short paragraph alone I’ve listed over twenty different vegetables that could be loosely categorized as “greens.”  Oh man, I totally forgot to mention sweetheart cabbage, kohlrabi leaves, mustard, mibuna, broccoli raab, escarole, radicchio, and endive!  If you’re eating out of a CSA box, you can see that it’s actually very easy to follow Farmer Richard’s advice to eat greens every day!  I’ve listed thirty different greens and this list still isn’t all-inclusive!

Amaranth thriving in the summer heat
Greens are not just something we grow as a “box filler.”  We believe they are an important part of a seasonal diet and we try to provide a minimum of a salad green and a cooking green in most boxes over the course of the season.  Of course there are some challenging times of the year when we are more limited in what’s available.  For example, spinach and lettuce are challenging crops to grow in the heat of the summer.  The seeds are difficult to germinate in hot soil and the product often looks tough and doesn’t taste very good when grown in this season.  These crops are much happier when grown in the cool of spring and fall and actually taste much better!  During these times of the season, there are other greens we can rely on, such as amaranth which actually thrives in the heat of summer, tastes good and is more nutritious than even spinach!  Later in the season as winter approaches, we look for different greens that will be able to survive a frost and actually thrive when grown in colder conditions.  This is why we grow vegetables such as escarole and radicchio.  So, from a growing perspective, there is some strategy involved in selecting different greens for different parts of the season. 

Red Curly Kale
The other reason we grow greens is because they are so nutritious and they are good for us!  Food provides us with nourishment and vitality.  What is vitality?  Vitality refers to a feeling or state of aliveness when you are full of life and energy.  The food we choose to eat is a big part of building vitality.  When you choose fresh vegetables eaten as close to the point of harvest as possible, you are feeding your body living foods brimming with vitality.  The nutrients and plant compounds that we ingest become part of our bodies and give us energy, nourishment, strength and health.  Who doesn’t want to feel better!  Greens in particular are powerhouses of vitality and nutrition.  When we make an effort to include a variety of greens in our diet and commit to eating some kind of “green” every day, we provide our body with a diverse profile of nutrients to work with.  Of course every green does not have the same nutritional profile.  Iceberg lettuce does not contain the same nutrients as amaranth or kale.  Nonetheless, greens contribute a whole host of vitamins, minerals, antioxidants and other beneficial phytochemicals to our diet that impact our health and well-being in many positive ways.  Greens contribute nutrients to our diets that are important to many body systems including our skin, immunity, detoxification pathways, skeletal health and our circulatory system. 
CSA Box contents from June 15, 2017

Do you realize how fortunate you are to be a CSA member and have the opportunity to eat
such a wide variety of foods, greens included?  Greens have not always been a big part of my personal diet.  My exposure to greens as a kid included a little bit of spinach, lettuce and cabbage.  I remember seeing collard and turnip greens in the grocery store on occasion, but we never bought them.  We didn’t know what to do with them!  I admit, I’m envious of CSA kids and families who have the opportunity to be exposed to these greens and they just become part of the “normal” diet.  It wasn’t until I became an adult, went to culinary school, ventured out of the Midwest and then landed on a vegetable farm that I even knew many of these green leafy vegetables even existed! 

Have I convinced you yet that you should eat your greens every day?  If you’re still teetering on the fence, here are a few more points to consider.  We all like convenience and there are days when we just don’t have a lot of time to cook and prepare food.  When you find yourself in this position, remember that many greens are actually nature’s version of “fast food!”  Most greens don’t take long to cook or can be eaten raw.  I like to fill my kitchen sink with water, get my salad spinner out and wash all of my greens for the week at one time.  I put them in bags or containers in the refrigerator so they are ready for me to use.  Then, throughout the week I can very easily incorporate greens into our meals with minimal prep time.  Add some greens to your smoothie or scrambled eggs in the morning.  Make a quick salad for lunch or make a quick wrap with a tortilla spread with cream cheese and packed with some greens.  One of my go-to quick dinners is a seared pork chop or piece of salmon with sautéed greens.  Salmon and pork chops are pretty fast cooking and you can add the greens to the same pan just before they are finished.  You can have dinner on the table in less than 15 minutes!

Baby White Turnip and Yogurt Dressing Salad
Do you have bad memories of overcooked, boring, tasteless or bad tasting greens from prior experiences or your childhood?  I understand.  I can still smell that disgusting, overcooked spinach they tried to serve us as part of our elementary school lunch.  Please understand, it doesn’t have to be that way!  There are so many delicious ways to enjoy greens.  Sometimes I like to keep it simple and just season greens with salt, pepper and maybe a splash of vinegar or lemon juice.  You could also do something as easy as adding some sautéed garlic, onion or ginger to the pan and then drizzle a little bit of toasted sesame oil on the greens once they are cooked.  Soy sauce, mushrooms, dried fruit, nuts, olives, pepper flakes, cream, cheese…these are all simple, complementary ways to dress up some simple greens. 
Red treviso radicchio

I want to mention that some greens have a stronger flavor or sometimes bitterness (as in the case of escarole and radicchio) when eaten raw.  If you taste a little piece of green and find the flavor to be too strong or pungent, don’t automatically eliminate it as a possibility of something you might like.  Other ingredients help to balance the flavors of greens, making them more enjoyable.  For example, I do not care to just eat a handful of arugula leaves on their own.  I do, however, enjoy eating an arugula salad that has a light citrus vinaigrette, some shredded Parmesan, a few slices of sweet apple and some toasted almonds.  The acidity from the vinaigrette, fat from the cheese and nuts and the sweetness of the apple all come together to create a harmonious flavor along with the arugula.  Cooking also mellows out the flavors of greens.  For example, mustard greens are pretty pungent when they are raw, but are very palatable and enjoyable when wilted into dishes along with beans, rice, etc.

Curried Nettle Stew with Chickpeas & Chicken
Intimidated by cooking greens?  Don’t be...in fact, let me just say you should never feel intimidated by a vegetable.  It’s just a vegetable!  Plus, we’re here to help you learn how to enjoy the vegetables in your box, greens included.  Cooking greens is actually pretty simple when you consider a few basic things.  Some greens are more delicate and tender, such as spinach, arugula, tat soi, saute greens, hon tsai tai, etc.  These greens generally may be eaten either raw or cooked.  If you’re cooking them, they are going to wilt down very quickly so you just need a quick-cooking method such as pan-steaming, stir-frying or sauteeing.  These greens can usually be cooked in 5-10 minutes at most.  Some greens, such as green curly kale, lacinato kale and collards, have a thicker leaf and will require a little longer cooking time to soften and tenderize the leaves.  These greens are also often cooked with liquid, either braised on their own or incorporated into a soup, stew or other braised dish.  It may take 15-20 minutes or more to cook these greens, depending on your preferences.  If it’s your first time cooking a green that is new to you, just take a minute to consider its characteristics and that can help you decide the best way to prepare it.  Don’t be afraid to experiment with different ways of cooking greens and figure out your preferred methods.

Farmer Richard eating a Nettle Cupcake
Historically our CSA members have been somewhat divided regarding greens.  Half of the membership loves greens and wants more and the other half says “too many greens” and in some cases, “no more greens!”  We try to strike a healthy balance and encourage everyone to approach these vegetables with an open mind and a willingness to at least try them.  I truly hope you enjoy or learn to enjoy eating your greens and exploring ways to incorporate them into your meals each week.  We do our best to grow nutritious food for you and hope you experience health, well-being and a greater sense of vitality when you eat vegetables from your farm.  So, let's all make Farmer Richard proud…eat your greens today!


Wednesday, May 23, 2018

How to Grow, Care for & Use Your Herb Packs!


By Chef Andrea


Fresh herbs bring a fragrant vitality to your kitchen as well as adding beauty to your landscape or patio if your garden space is limited to potted plants.  Back in our early days of CSA, we used to include more herbs in the CSA shares.  We wanted to give members fresh herbs to cook with, however we heard frequently from members that they were not using all of the herbs in a bunch before they went bad.  We brought this issue up at a meeting with our members and one member suggested we send the herbs as plants that they can plant themselves.  What a great idea and an even better way to accomplish the overall goal of making fresh herbs available for CSA members to incorporate in their meals!  When you need a fresh herb, you simply cut it from your plant—it doesn’t get any fresher than that! 

This is our second week of deliveries for herb packs, so hopefully by the end of this week everyone will have a pack!  You can plant your herbs in a garden space or in pots to keep on your patio, porch or kitchen window sill if you’re limited on space.  Choose good, loose garden soil mixed with lots of compost (up to 1” mixed into the soil if you’re planting into a garden space).  The plants will do best in well-drained soil with full sun.  If you don’t have a space with full sun exposure, partial sun will be ok too.  If you have rabbits or other little herb-loving critters in your yard, you might need to fence your herbs to protect them. 

If you need help identifying the herbs in your pack, please refer to this diagram as well as the pictures that follow. 
  
Oregano
Sage


There are four perennial herbs in your pack:  Sage, Oregano, Savory, and Thyme.  These herbs can survive the winter and will consistently come back year after year, so consider where you’d like to establish these herbs in your garden.  Sage and oregano will get quite large, so it is best to give them about 2 square feet of space in the area you plant them in.  Each year we cut off all the old wood from our sage plant to make room for the new growth.  Thyme and savory are a bit smaller and only need about 1 square foot of space. 
Savory
Thyme


Italian Basil
Chervil


The remaining plants in your pack are annuals and include Italian Basil, Chervil, Italian Parsley and Curly Parsley.  Annuals will only produce for this season and will not survive the winter outdoors.  Italian basil and chervil need to be cut back regularly to delay flower and seed formation so they continue to produce usable leaves.  If you see even the earliest sign of flowering in either of these plants, cut them back to keep them vegetative.  Parsley will continue to produce throughout the season, so don’t be afraid to cut these plants back too.  If you can’t use your herbs as fast as they are growing, cut the extra herbs anyway and preserve them.  There is more information about that below.  When harvesting your herbs, use a sharp knife or scissors so you can make a clean cut.

Curly Parsley
Italian Parsley
Herbs are a great way to add flavor and nutrition to your cooking.  Sometimes herbs are used to provide a background flavor, such as when you add herbs to the pot when making stock, broth or braised dishes.  Often the herbs are put in as whole stems or bundles, are left to impart flavor and then are removed before using or serving.  Other times herbs are used as a garnish, added just before serving with the purpose of complementing the dish.  Examples of this include adding a little fresh parsley to a bowl of chicken soup or a plate of pasta or perhaps you add a little fresh basil to a pizza after it comes out of the oven.  Fresh herbs should be cut as close to serving as possible and with a sharp knife so you don’t bruise the leaves.  The flavor and aroma from herbs comes from the oils in the herb and will lessen over time.  This is also why you usually add fresh herbs to a dish at the end of cooking or shortly before serving.  In contrast, dried herbs need more time to develop the flavors that have been preserved in the process of drying.  Dried herbs are added earlier in the cooking process to give them time to develop and come together with the other ingredients in the dish.  In culinary school, we were taught to strip the leaves from the stems on fresh herbs and either discard the stem or use it in stock.  If the stem is tough or more like a stick, you will want to do this.  However, some herb stems are tender, flavorful, juicy and totally usable!  I often chop the leaf and the stem when I’m using fresh thyme, parsley, chervil and sometimes young basil stems.  Sage, savory and oregano stems are sometimes a bit more coarse and not as usable.

Halibut with Chimichurri
There are some classic preparations from around the world that feature herbs not as a garnish, but rather as the main ingredient.  When your plants are really producing and you have a lot of fresh herbs available, consider using them more as a main ingredient in some of these preparations.  Pesto is a great example of this and is traditionally made with fresh basil.  Gremolata is an Italian condiment made from fresh parsley, lemon and garlic.  It is traditionally served with osso bucco, an Italian dish of braised veal shank, but can also be served with lamb, beef, chicken or bean dishes.  Chermoula is a Morroccan herb condiment made with fresh herbs including parsley and cilantro.  It is often served with fish and seafood dishes.  Chimichurri is another parsley based condiment originating in Argentina.  It also includes garlic and parsley as the main ingredients, but also often includes fresh oregano, red pepper flakes and red wine vinegar.  Salsa Verde is another fresh herb sauce, different from the salsa verde made from tomatillos.  The herbal version of Salsa Verde is a simple herb sauce, similar in some ways to a coarse pesto.  It’s often made with parsley, but you could make it with any fresh herbs. 

There are also some traditional salads that feature fresh herbs.  Tabbouleh, a Lebanese salad, is a combination of bulgur, tomatoes and lots of fresh parsley and mint.  The Italian Caprese salad is another delicious salad built on simple ingredients of fresh tomatoes, fresh basil, fresh mozzarella and a little olive oil.  You can also make your own simple vegetable and herb dishes with a few simple ingredients.  In the middle of the summer I like to make a salad with whatever fresh vegetables are available.  It could be something as simple as chopped peppers, shredded carrots, cucumbers and or tomatoes.  Put them in a bowl and toss them with salt, pepper, olive oil and handfuls of whatever fresh herbs are available!  These types of fresh vegetable salads make a delicious, fresh accompaniment to simple summer dinners which may be nothing more than a simple piece of grilled fish, a plate of fresh pasta or some good bread and cheese. 

If you do have more herbs than you can use fresh, cut them back and preserve them.  Some herbs, such as basil and parsley, can be pureed with a little oil and frozen in ice cube trays or muffin tins.  Other herbs such as parsley, sage, oregano, thyme and savory are good as dried herbs.  After you harvest them, give them a quick rinse and then dry them in a low-heat oven or in a food dehydrator.  The other option is to bundle the herbs in small bundles and hang them in a dry place with good air flow and let them air dry. If you do this, make sure the herbs are more on the dry side when you bundle them and don’t put too many stems in a bundle or they may mold or take longer to dry.  I hung bundles of herbs in my kitchen last year and they dried beautifully.  Once your herbs are dried, strip them off the stem and put them in a glass jar.
Herb Infused Honey
Some herbs also have medicinal uses and can be preserved for use throughout the winter to keep your immune system strong and help treat colds, etc.  Jean Schneider, Madison CSA member and an herbalist, shared some ideas for medicinal uses of some of the herbs in our herb packs in an article last September.  You can read her full article on our blog and learn how to make sage honey and how to use thyme as a tea. 
We hope you enjoy growing your own herbs and find interesting and delicious ways to make use of them throughout the year.  They really are a simple way to brighten up your landscape as well as your meals and the benefits they offer go beyond the flavor.