Thursday, November 19, 2015

Vegetable Feature: Sweet Potatoes

by Lisa Garvalia
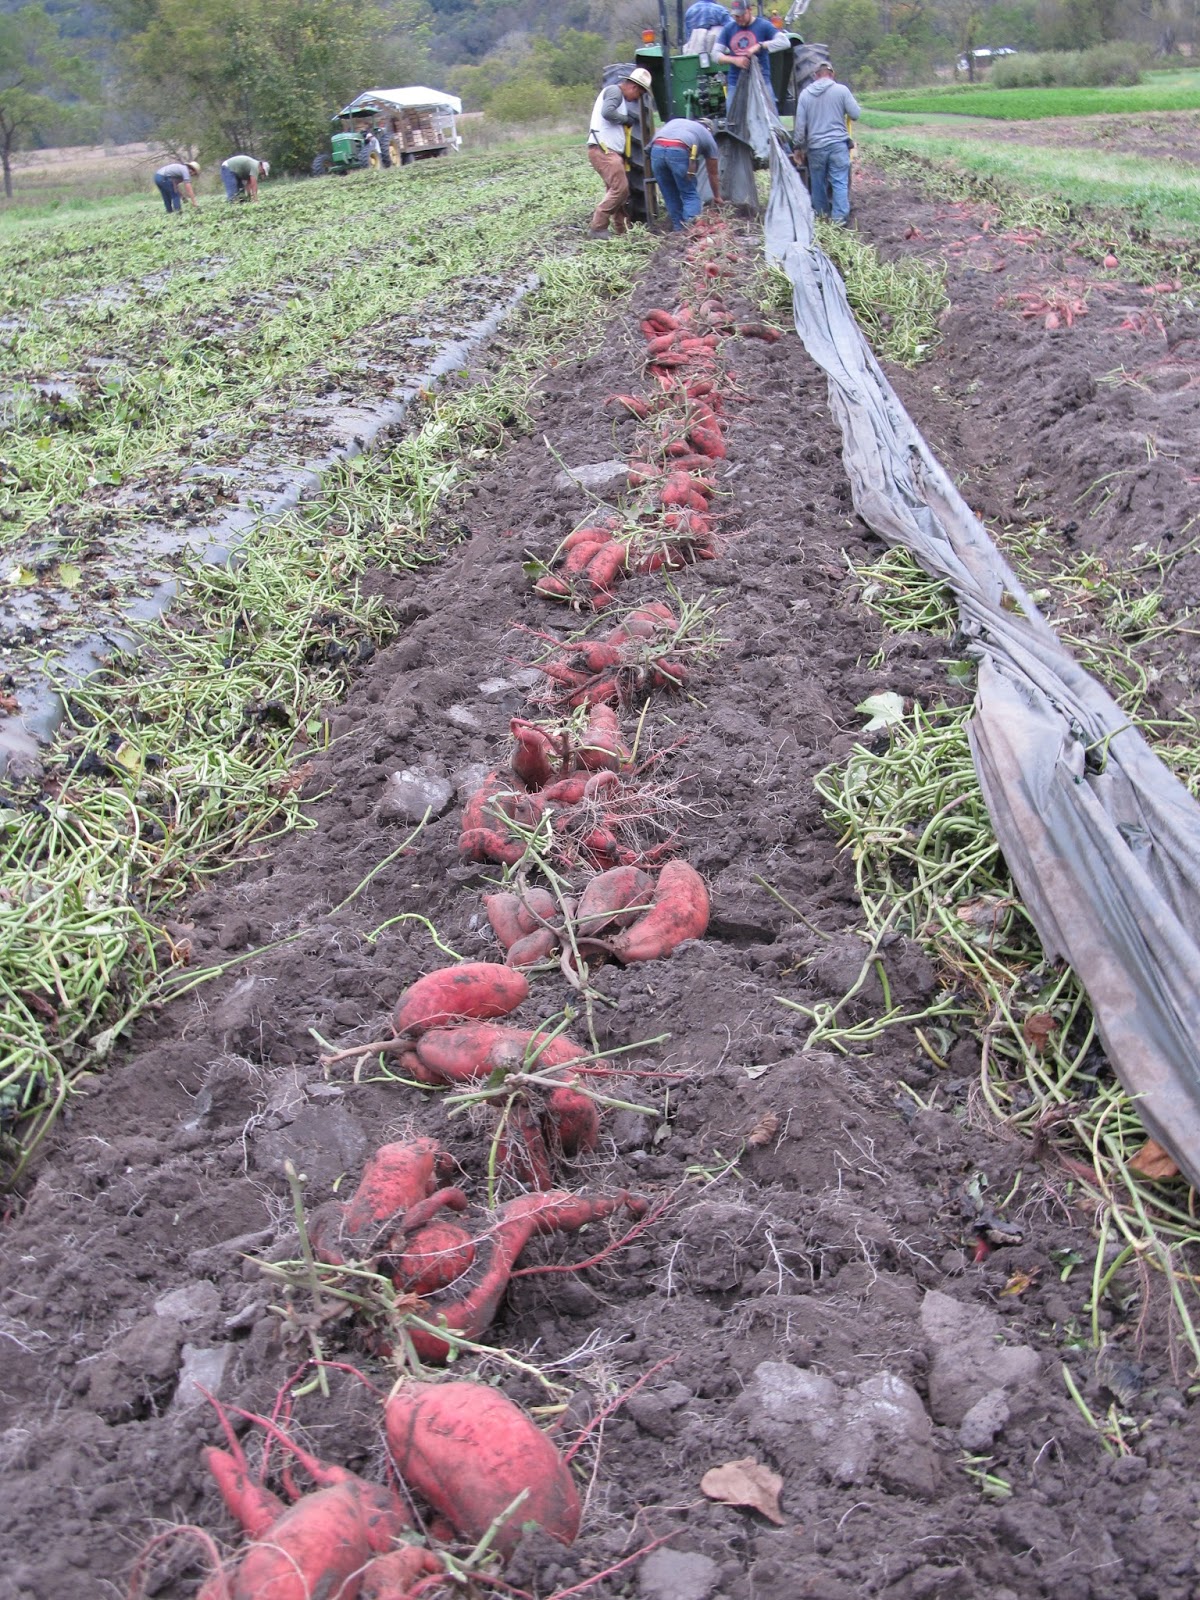
Sweet Potato Harvest
Sweet potatoes, the sweet vegetable that you don’t have to feel guilty eating! Sweet potatoes are a great source for our daily nutritional needs. They are packed full of beta-carotene, calcium, potassium, iron, Vitamin A and Vitamin C. They are cholesterol free, have no saturated fats and are full of antioxidants. Oh, and did I mention they are sweet and delicious as well?


So, how does the sweet potato get that delicious sweet flavor?  Choosing the right variety of sweet potato, good soil, adequate watering and close monitoring during the growing season are all necessary to get the best tasting sweet potato. After the sweet potatoes are dug and brought in from the field, they are immediately put in the greenhouse and left to cure. The curing process is what changes the starch in the sweet potato to sugar and also ‘toughens’ up the skin so they can be easily handled and have a longer storage potential. The greenhouse is kept at a constant temperature of 85-90 degrees with the humidity level being the same and the process takes up to 7-10 days.


Sweet Potatoes Curing in the Greenhouse
Sweet potatoes do store well and they get better with age. The ideal storage for sweet potatoes, because of the high sugar content, is 55-60 degrees. Keep them in a dry, dark, well ventilated area. Sweet potatoes are sensitive to colder temperatures so keeping them at or above the suggested temperatures is best. If you do find spots on your sweet potatoes during storage it is a good idea to cook and freeze them if you are unable to eat them right away.

Sweet potatoes are very versatile when choosing how to cook them. They pair well with a variety of ingredients including apples, oranges, coconut, cranberries and limes. Common spices used with sweet potatoes include cumin, coriander, chilies, thyme, rosemary, chili powder, curry powder and more. If you want to keep it basic you can simply place a sweet potato in the oven and bake until tender. Cut it open and add butter, salt and pepper, or keep it in the fridge for a simple left-over, just warm and serve.

Best Whipped Sweet Potatoes with Caramelized Apples

Yield:  6 servings
3 pounds sweet potatoes
3 Tbsp unsalted butter, divided
2 Tbsp heavy cream
½ cup applesauce
2 tsp grated fresh ginger
Coarse salt and freshly ground pepper
2 apples, peeled & cored
3 Tbsp sugar
  1. Preheat oven to 375°F.  Place sweet potatoes on a parchment-lined baking sheet;  pierce each several times with a fork.  Bake until very tender when pierced with a knife, about 50 minutes.  Remove from oven;  let cool slightly.
  2. Cut open potatoes;  scoop flesh into the bowl of an electric mixer fitted with the paddle attachment (may also use a food processor).  Add 2 Tbsp butter and the cream, and beat until smooth.  Add applesauce and ginger;  beat to combine.  Season with salt and pepper.
  3. Transfer sweet potato mixture to an ovenproof serving dish.  Place in oven until heated through, 10 minutes.
  4. Meanwhile, cut the apples into 1-inch pieces.  Melt remaining butter in a nonstick skillet over medium-high heat.  Add apples and sugar;  saute until golden and nicely caramelized, about 8 minutes.  Remove from the heat.  
  5. Remove serving dish from oven and top with caramelized apples.  Serve immediately.

Recipe sourced from Martha Stewart Living Annual Recipes 2003.

Sweet Potato Rolls

Yield:  20 rolls
¼ cup warm water
1 envelope active dry yeast (1 scant Tbsp)
1 cup milk
⅓ cup unsalted butter
½ cup sugar
1 ½ Tbsp coarse salt
1 tsp ground cardamom
2 cups cooked sweet potatoes (about 2 medium)
1 tsp freshly squeezed lemon juice
1 large egg, lightly beaten
7 cups sifted all-purpose flour
Vegetable oil, for bowl
Melted butter, for brushing
  1. Place the warm water in a small bowl and sprinkle with yeast. Let stand until yeast is dissolved and mixture is foamy.
  2. In a small saucepan, heat milk over medium heat just until it begins to steam and bubble around the sides. Remove from heat; add the butter, and stir until melted and combined. Stir in sugar, salt and cardamom. Let cool slightly.
  3. Combine sweet potatoes and lemon juice in the bowl of an electric mixer fitted with the paddle attachment; beat until smooth, 2 to 3 minutes. Beat in egg, and the milk and yeast mixtures until smooth.
  4. Switch to the dough-hook attachment. Add flour, 1 cup at a time, beating until dough forms. Continue kneading dough on medium speed until smooth, about 8 minutes. The dough will be slightly sticky.
  5. Transfer dough to large oiled bowl. Cover with a clean kitchen towel, and let rise in a warm place until doubled in bulk, about 1 hour.
  6. Preheat oven to 400 degrees. Line a baking sheet with parchment paper; set aside. Punch down dough and turn onto a clean work surface. Knead again with your hands, just until smooth. Using a bench scraper or sharp knife, cut dough into 20 equal pieces, and shape into round rolls.
  7. Place rolls on prepared baking sheet, about 2 inches apart; cover with a clean kitchen towel, and let rise again in a warm place until double in bulk, about 40 minutes.
  8. Using kitchen scissors or a sharp paring knife, snip an X in the top of each roll. Brush tops with melted butter. Bake until tops of rolls are golden, about 20 minutes, rotating pan halfway through. Transfer to a wire rack to cool slightly.
Note:  Excellent served with the Cranberry Maple Butter recipe featured in our fruit newsletter on November 22, 2014.

Recipe sourced from Martha Stewart Living Annual Recipes 2003.

Thanksgiving Dinner...Time to Plan the Menu!

by Andrea Yoder
Apple Cranberry Pie-recipe in this week's fruit newsletter
I’ve always enjoyed Thanksgiving, even going back to my childhood.  We used to spend Thanksgiving day at home and then celebrated with my mother’s family the weekend after Thanksgiving.  I liked this arrangement as it meant we got to enjoy not one but two Thanksgiving dinners!  As soon as I was able to start cooking on my own, I wanted to contribute to the meal.  By the time I reached junior high I was making the whole meal by myself.  I’d line up my recipes a week in advance in anticipation of the big day.  We enjoyed some traditional favorites—turkey, mashed potatoes & gravy, molded cranberry jelly, etc.  Like many families, we had a few specialty dishes that our family always had on the table.  My mother was known for her delicious yeast rolls as well as her runny blueberry pie and Grandma B always had to have at least one Jello salad and prune dressing (trust me…it’s actually really good).  Grandma Yoder always made her famous squash pie and turkey & noodles.  There were some formative years as I was learning to cook when I decided to experiment with my skills a bit….and not every dish turned out to be what I imagined it might be.  There was the year I decided I would try a new recipe for a pumpkin pie…all by myself.  Needless to say I hadn’t yet mastered the art of pie crust.  I made a pie crust that was so hard we had to cut it with a chisel….literally!  The filling was delicious, so the pie wasn’t a total loss and we all got a good laugh.

Beauty Heart Radish
As I grew up and left home, the holidays changed and there were years when I had to work on Thanksgiving or was too far from home.  I often spent the holiday celebrating with friends and was exposed to others’ traditions, family dishes, etc.  This was a whole new perspective for me and reminded me that it’s not so much the dishes on the table, but the people you spend it with and the memories you make.  One memorable Thanksgiving I spent the day with a group of college students.  Our mentor, Theresa, invited us to her home for Thanksgiving dinner and we all brought something to contribute.  I’ll be honest with you, I can’t remember what we ate because the lasting memory from that meal is that we laughed so hard our stomachs were sore and we accidentally set the table decorations on fire while passing the dishes family style!


Orange Kuri Squash
While I continue to hold onto some of those lasting traditions, new ideas have crept into the mix from time to time.  Inspired by vegetables or ideas from other people, I’ve learned that Thanksgiving is a celebration of a bountiful harvest and the possibilities for your menu are endless!  Whether you decide to stick to the old traditions, alter them with some updates, or go totally off the deep end and change things up completely, I’d encourage you to have fun along the way.  Embrace the bounty we have to enjoy….14 vegetables in this week’s box alone!  There are so many different things you can make….and that’s what makes the meal interesting and fun to cook in the company of friends and family.


This week's abundant CSA box!
With less than a week remaining to plan your culinary creations for the holiday, we thought it might be fun to highlight a few of our favorite recipes from our own archives utilizing the vegetables and fruits in your shares this week.  Maybe you’ll find some inspiration from these recipes or will give one of them a try this year.  I’ve cited the newsletter where the recipe was originally printed (all were from vegetable newsletters unless otherwise noted).  They can all be found on our website in our newsletter archives or in our searchable recipe database.  We’d love to see what you decide to cook for your Thanksgiving dinner.  If you have a minute to send us your menu, recipes or a picture of your creation, we’d love to have a glimpse into your holiday.
Happy Thanksgiving from all of us at HVF!


Creamy Gratin of Celeriac, Parsnip & Potato (December 20, 2008)
Parsnips with Brown Butter, Pecans & Maple Syrup (April 24, 2014)
Cranberry Maple Butter (November 22, 2014—fruit newsletter)
Cranberry Sauce with Dates & Orange (December 20, 2014—fruit newsletter)
Beauty Heart Radishes with Sour Cream Dressing & Poppy Seeds (January 12, 2013)
Grandma Yoder’s Squash Pie (September 29, 2007)
Ginger-Coconut Sweet Potatoes (November 9, 2013)
Brussels Sprouts with Ginger & Cranberries (October 31, 2014)
Crushed Potatoes with Cream & Garlic (July 18, 2015)
Creamy Horseradish Beets (November 17, 2007)
Celeriac & Apple Salad (September 1, 2007)

Thursday, November 5, 2015

Wrapping Up the Harvest

Jack enjoys the parsnip harvest
Hello Everyone!  This is Captain Jack (The Dog) reporting to you from the passenger’s seat of our mobile “Command Central”, aka Farmer Richard’s truck.  Dad and I have been doing a lot of driving over the past few weeks.   We seldom leave the valley, but we visit a lot of fields in the course of the day.  Fall is a very busy time of the year for us.  Many people think we’re winding down, but we actually still have a lot of work to do!  This has been a great fall for us in many ways.  Dad remembers having 3 feet of snow on October 31 back in 1989 or 1990.  Personally, I like snow and wouldn’t mind that, but the rest of the humans on the farm don’t seem as ready for the winter wonderland as I am.   We have harvested our horseradish, selected seed stock for next year and are almost done planting next year’s crop.  We dug and selected seed for next year’s sunchokes which are also all planted.  Of course, we have also planted our garlic and about half of it has already been mulched to keep it safe during the winter!


Jack in the truck
“Global warming” has been a blessing and a challenge this year.  We’ve had a warm fall with temperatures in September (4°F) and October (3°F) and above normal averages.  We all enjoy being able to feel our fingers as we work, and in that way we’re grateful for the warmer temperatures.  The downside of the warmer days is that crops are coming in ahead of schedule.  Turnips, radishes, etc. are sizing up faster than normal resulting in some things getting too big.  We like to “store” crops in the field and harvest as late as possible, but that just isn’t an option with some of the plantings this year.  While larger roots are entirely edible and of good quality, buyers won’t accept them thus they remain in the field and are unsaleable.

We get pretty nervous this time of year.  In addition to the temperatures, Dad’s also keeping his eye on moisture.  Last week we had 2.3 inches of rain which put a stop to our mechanical harvest.  Thankfully the ground was pretty dry and the 2.3 inches of rain soaked easily into very dry soil.  We were back in the field Monday morning, despite the ground still being a little wet.  We couldn’t wait though…we’re in a race against time with rain forecasted for this Thursday!  That means we have 3 days to maximize the harvest before we might be forced out of the field again.  Our goal is 120 more bins of vegetables this week averaging 600# per bin.  That’s 36 tons of vegetables to harvest in 3 days!  Wait…there’s one other challenge that’s part of this picture.  We’re nearly out of cooler space and bins!  We trim & wash vegetables every day to empty bins and send them back to the fields to get reloaded.  Nonetheless, we’re getting pretty slim on storage space and while Dad’s fretting in the fields, Mom (Andrea) is fretting in the packing shed.  Mom is trained as a chef and was taught to face challenges in the kitchen with no option other than to find a solution.  Sometimes I hear her telling herself “Make it happen Chef.”  Somehow it will work out, but in the meantime there’s an intense game of “Cooler Tetris” going on!  Right now we have our fingers crossed that we’ll get as much harvested as we can before the rain starts again and we’re hoping we don’t get as much as last week.

Captain Jack supervises the celeriac harvest
In looking at the long range forecast (several times a day), we know that the temperatures are going to drop eventually.  Next week they’re forecasting temperatures in the twenties.  Temperatures this low could spell the end for many crops unless we have covers in place!  Double covers with hoops to hold the cover above the plants work well to about 20-25°F.  We have already had some touches of frost and have covers in place for our remaining greens, parsley, etc.  Unfortunately they are a management challenge as they need to be removed on warm and wet days or we risk mildew setting in on the plants.

So, as you can see we are doing a bit of a “song & dance” around weather as we race against time to get everything harvested and tucked away safely in storage before winter sets in.  HVF has long been ahead of the times in supporting and encouraging “seasonal eating” throughout the winter.  Root and storage crops are an important part of our winter diet and are intended to last in storage until spring.  This is the way the settlers ate in the 1800’s and for those who are committed to eating a local Midwestern diet year-round, these late season crops are essential.  According to Mom & Dad’s estimates, we have a lot of food available to our members and customers over the next several months.  In fact, we still have Extended Season Vegetable shares available for our January deliveries.  Our sign-ups for this share are the lowest they’ve been in years, which is a bit concerning for us.  We’re hoping you just forgot to sign up for this share and if that’s the case, please send your order in soon!  If we don’t see better participation for January deliveries we’re going to have to consider discontinuing these deliveries as the economics and realities of running a truck in January just don’t balance out with the value of product on the truck.


Well, it’s Wednesday morning and we have to get our crew plans pulled together for the day.  I have another big day of hauling vegetables with my Dad, Farmer Richard.  I better eat my breakfast and brush my hair so I’m ready to go at 8 am when the crew heads to the field.  I hope you enjoy the bounty of this week’s box!  Captain Jack “The Dog” signing off.

Vegetable Feature: Brussels Sprouts

by Sarah Janes Ugoretz

Let’s face it: a lot of people love to hate Brussels sprouts. Visions of boiled-to-death, pale green, cabbage-like morsels just don’t seem appetizing—and indeed, when prepared that way, they become sulfurous and objectively unpleasant to eat, but it’s not their fault! And so, this week, we’re giving Brussels sprouts the attention they deserve as they are one of our personal farm favorites.

As a member of the cruciferae family, Brussels sprouts are towards the top of the list when it comes to neat ways in which vegetables grow. Their spherical heads cover a long, tall stalk and are produced from the leaf axils starting at the bottom of the stem and running upwards. Large, billowy leaves rise from the top of the stalk and essentially feed the plant to increase the likelihood of a healthy harvest.

At our market stand, we’re often faced with customers eager for the first round of Brussels sprouts each fall. However, it is really Mother Nature who dictates when our first harvest will be. Our sprouts need a good frost or two in order to increase their sugar content and really enhance the flavor—the same is true for the frost-sweetened, overwintered spinach we’ll have when we return to the stand in the spring.

In the kitchen, Brussels sprouts need to be treated with care. Raw, they boast a sweet, mild cabbage-y flavor, but when cooked their sweetness is further concentrated and they take on a wonderful, nutty flavor. Depending on your cravings, you can roast, blanch, sauté or braise your sprouts. The key is to cook them to the point of tenderness, not mushiness! One of the enjoyable culinary traits of Brussels sprouts is their ability to take on bold ingredients. They pair nicely with nuts, balsamic vinegar and bacon. One of my favorite ways to prepare them is to toss halved, roasted sprouts with Dijon mustard and honey. They can, however, be eaten raw. Shredding their tender innards into a hash, salad or pasta dish is a creative and delicious way to prepare them. When you’re ready to prep your Brussels sprouts, remove the dry part of the stem at the base of each sprout. You can also remove some of the loose outer leaves. Now either leave your sprouts whole, halve or quarter them or shred them.

Store your Brussels sprouts in a plastic bag in the refrigerator for up to a week. As they age, your sprouts will lose their sweetness and moisture, so use them in a timely manner. Nutritionally, this delicious vegetable will get you a high dose of vitamins A and C, along with a decent amount of iron.

Shredded Brussels Sprouts & Apples

Serves 2-3 as a main dish or 4 as a side dish
1 large, crisp apple, cut into bite-sized wedges
1 lemon, juice only
4 oz extra-firm tofu cut into tiny-inch cubes
A couple pinches of fine-grain sea salt
A couple splashes of olive oil
2 medium cloves garlic, minced
A Scant Tbsp of maple syrup
⅓ cup pine nuts, toasted and chopped
12 ounces Brussels sprouts, washed and cut into ⅛–inch wide ribbons

  1. Soak the apples in a bowl filled with water and the juice of one lemon.
  2. Cook the tofu in large hot skillet with a bit of salt and a splash of oil.  Sauté until golden, about 4 minutes.  Stir in the garlic, wait a few seconds, now stir in the maple syrup, and cook another 30 seconds or so.  Drain the apples and add them to the skillet, cooking for another minute. Scrape the apple and tofu mixture out onto a plate and set aside while you cook the Brussels sprouts.
  3. In the same pan, add a touch more oil, another pinch of salt and dial the heat up to medium-high.  When the pan is nice and hot stir in the shredded Brussels sprouts.  Cook for 2-3 minutes, stirring a couple times (but not too often) until you get some golden bits and the rest of the sprouts are bright and delicious.  Stir the apple mixture back into the skillet alongside the Brussels sprouts and half of the pine nuts—gently stir to combine.  
  4. Remove from heat and enjoy immediately sprinkled with the remaining pine nuts.  This isn’t a dish you want sitting around, the flavors change dramatically after ten minutes or so, and I think that is part of the reason Brussels sprouts get a bad rap. 


Recipe featured on 101cookbooks.com by Heidi Swanson

Kale & Brussels Sprout Salad

Serves 4-5
2 Tbsp fresh lemon juice
1 Tbsp Dijon mustard
½ Tbsp minced shallot or onions
1 small garlic clove, finely grated
⅛ tsp kosher salt plus more as needed for seasoning
Freshly ground black pepper
1 bunch lacinato kale, center stem discarded, leaves thinly sliced
6 oz Brussels sprouts, trimmed, finely grated or shredded with a knife
¼ cup extra-virgin olive oil, divided
⅓ cup almonds, coarsely chopped
1 cup finely grated Pecorino

  1. Combine lemon juice, Dijon mustard, shallot, garlic, ¼ tsp salt and a pinch of pepper in a small bowl.  Stir to blend; set aside to let flavors meld.  Mix thinly sliced kale and shredded Brussels sprouts in a large bowl.
  2. Measure ¼ cup oil into a cup.  Spoon 1 Tbsp oil from cup into a small skillet; heat oil over medium-high heat.  Add almonds to skillet and stir frequently until gold brown in spots, about 2 minutes.  Transfer nuts to a paper towel-lined plate.  Sprinkle almonds lightly with salt.
  3. Slowly whisk remaining olive oil in cup into lemon-juice mixture.  Season dressing to taste with salt and pepper.
  4. Add dressing and cheese to kale mixture; toss to coat.  Season lightly with salt and pepper.  Garnish with almonds.

Recipe sourced from Bon Appetit magazine, November 2011.