Wednesday, September 8, 2021

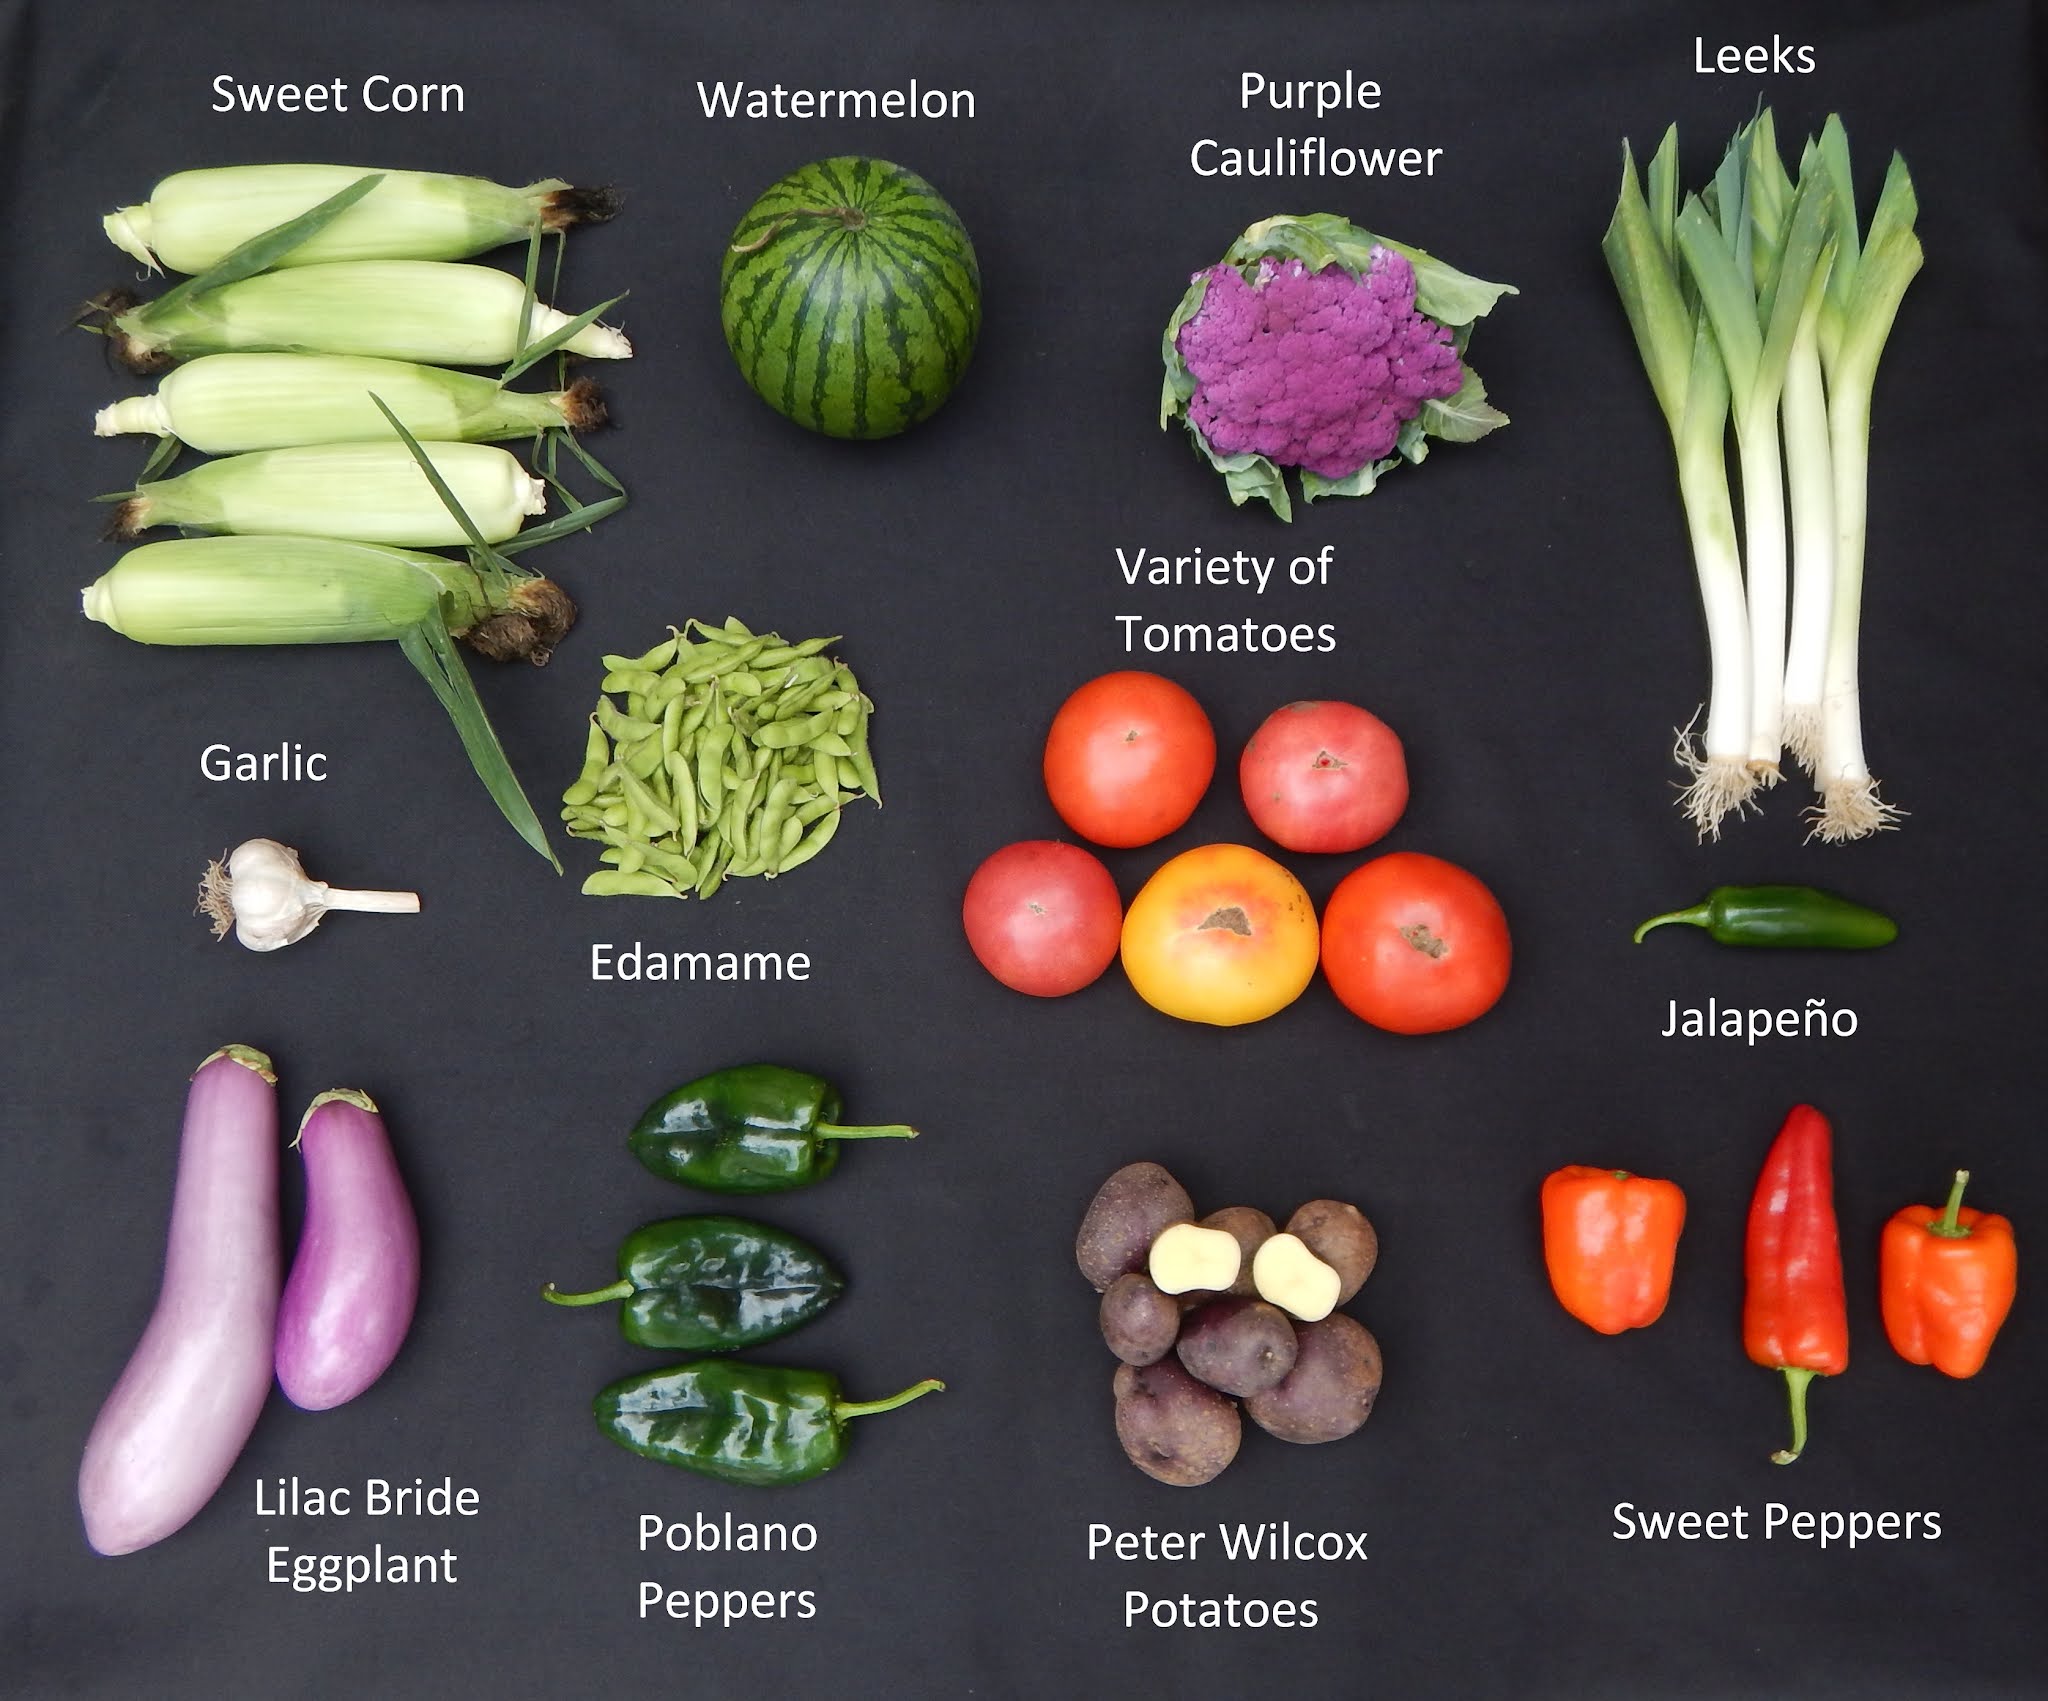
September 9, 2021 - This Week's Box Contents, Featuring Leeks!

Cooking With This Week's Box

Leeks:
Pear and Leek Galette with Goat Cheese and Walnuts (See Below)

Edamame:

“Fantastic” Sweet Corn:

Sweet Peppers:

Jalapeño Pepper:

Variety of Tomatoes:

Watermelon:

White, Purple or Yellow Cauliflower or Broccoli Romanesco:

Peter Wilcox Potatoes:

Purple Dancer or Lilac Bride Eggplant:

Poblano Peppers:

Italian Garlic:

Hello Everyone!

Carbonara with Leeks, Lemon and Bacon
We continue to have trouble fitting everything in your CSA box!  When we make the preliminary CSA box contents list for the week, we often have 2-4 items that literally will not fit in the box!  Thus, we’re faced with prioritizing what will go in the box this week versus what will wait until another week.  This week we wanted to make sure we had enough room for sweet corn and a big bag of tomatoes!! We also decided to make some room for leeks, which is also this week’s featured vegetable.  While Leek and Potato Soup is a traditional way to enjoy leeks, they may be used in a wide variety of applications such as this week’s featured recipe for Pear and Leek Galette with Goat Cheese and Walnuts (See Below).  I’ve also included links to a few other recipes to utilize leeks such as Carbonara with Leeks, Lemon and Bacon; Apple, Leek and Cheddar Quiche; and Roasted Poblano, Sweet Corn and Potato Soup.

Grilled Mexican Street Corn
photo by Megan Keno for simplyrecipes.com
This may be our final week for watermelons, so why not try something different such as Frozen Watermelon Daquiris or Watermelon Barbecue Sauce?! If you do decide to employ the barbecue sauce recipe, consider making a pan of Corn Bread with Fresh Sweet Corn or Grilled Mexican Street Corn to accompany the barbecue!

And just what are you going to do with all those tomatoes!?!  Well, you could keep it super simple and make Homemade Tomato Soup or Marcella Hazen’s Tomato Sauce with Onions and Butter.  If you haven’t tried last week’s recipe for Brown Butter Tomatoes, you have to give it a try—they are so delicious!

I hope you are enjoying the bounty of these late summer boxes brimming with tomatoes, corn, peppers, fresh potatoes, etc.  The first frost may be in our near future, but until then we’re going to continue to harvest as much as we can!  We do have some fall treats coming up pretty soon, such as winter squash and sweet potatoes!  This week we started taking the tops off the Brussels sprouts and Richard keeps bringing me little specimens of sprouts so I can see just how big they are right now.  Have a great week and I’ll see you back again next week!—Chef Andrea

Vegetable Feature: Leeks

By:  Chef Andrea Yoder

Description: We continue our journey through the season with yet another selection from the allium family.  This week leeks are the selection we’ll be enjoying from the allium family!  We plant them from seed in the greenhouse in late February.  We then transplant them in the field early in the season, just after we transplant all of our storage onions.  They need more time to grow than onions, which we harvested about 6 weeks ago.  We typically wait until later in the fall to harvest them.  In fact, leeks can take some frost, but once the temperatures start to get into the twenty’s we risk damaging them.  This year however, we decided to shake it up a bit and move up the harvest so we can enjoy them with some of the late summer vegetables!

It’s important to understand how leeks are grown as it directly affects how you prep them for use in your own kitchen.  Leeks have a long white shank that turns to more of a bluish green color as you reach the top of the leek.  Throughout the growing process, dirt is hilled up on the leeks to cover the shank and block sunlight which keeps it white.  As a result of this process, dirt may get between the many thin layers of the shank, which is the portion of the leek most often used.

Leeks "hilled up" in dirt to keep the shank white.
Preparation & Storage: While you need to take care to carefully clean the entire leek, the upper portion may have a bit more dirt between the layers and may need a little more attention.  I find it easiest to wash the exterior of the leek and then slice them.  Place the chopped leeks in a sink of clean, cold water and swish them around to remove any dirt.  Remove the leeks from the water and place in a colander to drain.  If there isn’t much dirt between the layers, you may also just place the sliced leeks in a colander and rinse them. 

If you’ve never cooked with leeks, it’s important to note that leeks are not “just another onion.”  While the flavor profiles are similar for all alliums, each one has its own distinct characteristics and qualities that set them apart.  Leeks are much different than the chives and ramps we delivered early in the season or the Sierra Blanca white Spanish onions we delivered in early summer.   Leeks are more mild and subtle in flavor.  They are best cooked using more gentle methods such as braising, lightly sautéing or cooking them into soups, sauces and broths.  When cooked using these more gentle methods, the texture of leeks becomes silky and tender.  Leeks have fewer sugars than onions, so they do not caramelize in the same way as an onion.  When you are sautéing leeks, do so at a low to medium temperature just until they are soft.  Do not try to brown them.

Spaghetti Squash and Leek Skillet Gratin
Leeks pair well with many late summer and fall vegetables including tomatoes, peppers, potatoes, celeriac, and other root vegetables such as parsnips and carrots.  They are often incorporated into cream soups, gratins and egg dishes such as quiche.  A traditional use for leeks is to make Leek & Potato Soup, of which there are many variations.  Many recipes utilizing leeks also include complementary ingredients such as white wine, lemon, cream, cheese, apples, walnuts, chicken, bacon, fish and fresh herbs to name just a few ingredients.
  
Storage: Leeks will keep for several weeks if stored in the refrigerator, loosely wrapped in plastic.  We hope you enjoy this delicate allium and appreciate the subtle way it adds flavor to your meals this week!  

Pear and Leek Galette with Goat Cheese and Walnuts


Yield: 8 servings

photo from coleycooks.com
For the Crust:
1 ½ cups all-purpose flour
4 ½ ounces cold unsalted butter, cut into cubes
½ tsp salt
1 large egg
2-3 Tbsp cold water

For the Filling:
1 Tbsp butter
2-3 medium leeks, cleaned and thinly sliced, white and light green parts only (about 3 cups)
Salt and pepper, to taste
1 Tbsp Dijon mustard
½ cup heavy cream
2 tsp minced fresh rosemary, divided
6 ounces fresh goat cheese
1 large pear, thinly sliced 
¼ cup chopped walnuts
1 egg beaten with 1 Tbsp water for egg wash (optional)

Crust:
  1. Mix together flour and salt in a medium bowl.  Add the butter, then use a pastry cutter or a fork to cut the butter into the flour.  Do this until the butter is broken into pea-sized pieces, about two minutes.
  2. Whisk together the egg and two tablespoons cold water, then pour into the flour mixture.  Use a fork to stir until it just comes together, adding one or two additional tablespoons of water until it forms a ball.  Do not knead the dough or mix any further.  Press into a disk then wrap in plastic and refrigerate for at least 30 minutes, or up to 2 days in advance.

Filling & Assembly:
  1. Melt butter in a medium skillet over medium-high heat.  Add the leeks and cook, stirring often, until softened, about 6 minutes.  Season with salt and pepper, then add Dijon mustard, cream and 1 tsp rosemary.  Cook until the cream has reduced by half and the mixture is thick, about 5-8 minutes.  Taste for seasoning and adjust as needed.  Let cool completely.
  2. When ready to assemble the galette, preheat the oven to 375°F and line a sheet pan with parchment paper.  Roll the dough out on a floured surface until it is about ¼ inch thick and 14-16 inches around.  Gently roll the dough up onto the rolling pin and transfer it to the center of the sheet pan.  It should hang off the sides slightly.
  3. Spread the cooled leek mixture evenly around the dough, leaving a 2-inch border on the outside.  Crumble goat cheese on top, then arrange the pears in a circular pattern.  Sprinkle with remaining teaspoon of rosemary, salt, pepper, and chopped walnuts.  
  4. Carefully gather the outer border of dough and fold it up and over the filling to form a 1 to 2 inch crust.  Brush the outer crust with egg wash if desired (this will produce a prettier, more golden brown crust).
  5. Bake for 30-40 minutes or until the crust is golden brown.  Let cool for 30 minutes before slicing.  Serve warm or at room temperature.
Recipe borrowed from coleycooks.com.

Wednesday, September 1, 2021

September 2, 2021 - This Week's Box Contents, Featuring Tomatoes!


Cooking With This Week's Box

Italian Garlic:

Red & Yellow Onions:

Green Beans:

Sweet Corn:

Red Grape, Golden Grape or Chocolate Sprinkles Tomatoes:

Red or Orange Italian Frying Peppers:

Jalapeño Pepper:

Variety of Tomatoes:
Brown Butter Tomatoes (See Below)
Mathilde’s Tomato Tart (See Below)

Red Seedless or Micro Seeded Watermelon:

Purple, Yellow or White Cauliflower or Broccoli:

Red Prairie or Red-Gold Potatoes:

Hello Everyone!

Tomato and Roasted Garlic Pie
photo by Laura Murray for epicurious.com
This week we’re talking tomatoes!  There are so many things you can do with tomatoes, and sometimes less is more!  This week I’ve included a simple recipe for Brown Butter Tomatoes (See Below).  I love pretty much anything with brown butter, which is why this recipe caught my attention!  Serve these with scrambled eggs and it’s a meal!  I also included a recipe that has been circulating in our Facebook Group.  Mathilde’s Tomato Tart (See Below) is originally from smittenkitchen.com.  It’s a simple recipe, but best made when tomatoes are in the peak of their season!  If that tart doesn’t fit your fancy, perhaps you’d prefer this Tomato and Roasted Garlic Pie!

Peppers are also moving into their peak season alongside tomatoes.  There’s one jalapeño tucked away in your box this week, but it’s a big one!  Use it to make Jalapeño Lemonade or Jalapeño Popper Dip.  On the sweet side of things, I included a few of my favorite pepper recipes from past years including Sweet Pepper & Cheddar Clafoutis and Red Pepper, Lentil & Tomato Salad.

Jalapeño Lemonade
photo from sweetcayenne.com
We’re nearing the end of our sweet corn and green bean season, but it looks like we’ll have corn at least one more week and maybe another bag of beans.  Watermelon harvest is starting to slow down, but it’s not done yet!  We’re pretty much done picking melons now, which may leave you wondering “Just what will they put in my CSA box if all these things are ending?!”  Don’t worry, we have more things waiting in the cue including Green Top Celeriac and Leeks!  Over the next month we’re going to experience that overlap between summer and fall.  Sweet potatoes will be coming in later this month along with winter squash.  It truly is a bountiful part of the season and one to celebrate!---Andrea

Vegetable Feature: Tomatoes

By:  Chef Andrea Yoder

Left to right from top left corner:  Japanese Pink, 
Marsalato, Dark Star and Mai Tai Tomatoes
While this isn’t the first week you’re receiving tomatoes, we thought it would be an appropriate week to  bring this summer favorite to the forefront and give it a little more attention!  This week we transitioned from picking tomatoes from our first crop and started harvesting from our second field.  We hope to have several more weeks of tomato harvest, but as with everything in farming, it depends on the weather!

Variety Selection: Choosing tomato varieties is no small deal and it can easily become overwhelming when sifting through hundreds of possibilities!  We try to strike a balance between tomatoes that are interesting, delicious and able to travel in a CSA box, but also ones that have good yields and disease resistance.  We do our best to keep our fields healthy and productive, but in hot, humid and rainy years disease can quickly take hold of a crop and result in a rapid end to the season.  This is also why we plant 2 crops in hopes of extending our season. This year we grew four varieties of small tomatoes, three romas, and fifteen other varieties including gold and red slicers, Japanese pink and a few that fit into our category of “black” tomatoes.

Marsalato Tomato
Many people look to heirloom varieties for the best flavor.  Unfortunately, many lack the disease resistance and yields we need.  In more recent years seed breeders have developed a class of tomatoes they are calling “hybrid heirlooms,” or “heritage” tomatoes.  I reached out to Rebecca Morse who is our seed rep with Osborne Seed in Washington.  She visited our farm earlier this summer and was a wealth of information about tomatoes!  Here’s what she had to say about these ‘Hybrid Heirlooms:’  “Consumers love the look and flavor of heirloom tomatoes, but these old varieties rarely have any disease resistance, often produce only a couple fruit per plant, and don’t hold up to handling.  Breeding companies are working on creating these new hybrid varieties to have the look and flavor of the heirlooms that people want, and the comprehensive  disease package and commercial productivity that growers need.  We have been seeing more gorgeous colors, stripes, sizes, and shapes in development, so expect to see new commercial introductions every year!”

Mai Tai Tomato
So what is “Good Tomato Flavor?”  Well, that’s up to each person to a certain extent, but in general it’s a balance of acidity and sweetness.  As Rebecca says “I think that tasty tomatoes have a balance of acid and sugar.  Without the acid, they don’t taste as sweet.  Without enough sugars, they taste bland.”  You may also notice flavor of tomatoes is enhanced when you serve them with just a bit of salt or vinegar, both of which can wake up the taste buds and help to bring the sweetness or acidity to the forefront.

Preparation & Use: Tomatoes are delicious eaten both raw and cooked.  Variety can be a factor in deciding which tomatoes are better eaten raw versus those whose flavor and characteristics may be enhanced with cooking.  Some varieties are more “fleshy,” meaning there is more flesh and less juice.  These tomatoes are often better choices for cooking down to make sauce and soup as they result in a thicker finished product.  If you’re serving tomatoes raw, aesthetics may come into play as well.

Dark Star Tomato
Tomatoes are also a popular selection to preserve for use year round and there are a variety of ways you can preserve them.  You could do something such as tomato jam or make salsa and can it.  Of course you can also can tomato juice, diced tomatoes or make tomato sauce and can or freeze that as well.  I often don’t have a lot of time during tomato season for complicated preservation, so I tend to go the route of either freezing tomatoes whole or freezing tomato puree.  If you want to freeze tomatoes whole, simply wash them and cut out the core.  Pop them into a freezer bag and put them in the freezer.  When you thaw them, they will collapse and be juicy, but that makes them perfect for using in soups, chili, sauces, etc.  You can choose to either pull the skins off before you use them or I usually just blend them into the sauce.  For my quick method frozen sauce, I just chop up any extra tomatoes I have, skins and all, and cook them down on the stovetop in a wide pan.  Once they have cooked down, I cool them and puree them in the blender.  Pour the puree into freezer bags and lay them flat to freeze into “pillows.”  In the winter, when I have more time, I pull out the puree and turn it into spaghetti sauce, etc.

Storage: The ideal storage temperature for tomatoes is about 50-55°F.  If held at temperatures less than this for extended periods of time, tomatoes will suffer chill injury that affects the texture of the skin and flesh as well as robbing the tomato of its flavor.  You may receive some tomatoes that are still a little on the green side.  It’s best to ripen these on your kitchen counter at room temperature and eat them or preserve them as soon as they are ready.  We do not recommend storing tomatoes in the refrigerator for more than a few days at most.

Mathilde's Tomato Tart


photo from smittenkitchen.com
Yield: 8 servings

For the crust (pâte brisée):
1 ¾ cups all-purpose flour
½ tsp granulated sugar
½ tsp coarse or kosher salt
½ cup cold unsalted butter, cut into 1-inch pieces
1 large egg
1 Tbsp water

For the filling:
3 large very ripe tomatoes, sliced crosswise ¼-inch thick (about 1.5 pounds)
Coarse or kosher salt
1 small garlic clove
1 cup basil leaves, loosely packed
2 cups parsley leaves, loosely packed
2 Tbsp olive oil, plus more for brushing
1 Tbsp smooth Dijon mustard (double it if you like mustard; skip if you don’t)
2 oz hard cheese, thinly sliced of coarsely grated (provolone, gruyere, cheddar, etc)
Freshly ground black pepper
  1. Make the dough: Place flour, sugar, salt, and butter in a food processor.  Pulse until mixture resembles coarse crumbs.  Add egg and water to the food processor, pulsing to incorporate.  Pulse until dough comes together.  Turn out dough onto a sheet of parchment and shape into a disk.  Place another sheet of parchment on top and roll out to an 11-inch disk.  Slide onto a plate or tray and freeze for 10 minutes, until firm but not so hard that it will crack when bent.  Line a 9.5-inch tart pan, preferably one with a removable bottom, with the dough.  (A pie dish or cake pan lined with parchment could work as well, just keep the sides 1-inch high.)  Trim excess dough (reserve in the fridge for patching) and prick the bottom with a fork.  Freeze for 20 minutes, until solid.
  2. Bake shell: Preheat the oven to 375°F with rack in center.  Place the tart pan on a rimmed baking sheet.  Weigh the crust down with parchment paper and pie weights, dried beans, or rice (that you don’t plan on using for anything else).  Bake crust for 20 minutes.  Remove parchment and weights.  If there are any cracks or breaks, you can patch with the remaining dough.  Bake for 5 minutes more.  Remove from oven and let cool.
  3. Make the filling: Meanwhile, place tomato slices on a rimmed baking sheet and lightly sprinkle with salt.
  4. Combine garlic, parsley, basil, and ½ tsp salt in a food processor.  Pulse until finely chopped.  Add olive oil and pulse until a spreadable paste forms.  You might need to scrape down the sides of the food processor a few times.  If making the herb mixture in advance, store in the refrigerator with plastic wrap pressed against its surface.
  5. Blot tomatoes with paper towels to remove excess liquid.
  6. Using a small spoon or offset spatula, spread Dijon mustard evenly on the bottom of the crust.  Evenly distribute cheese on top.  Dollop with herb mixture and gently spread to cover in a thin layer.  Top with tomatoes, overlapping.  Cut smaller pieces of tomatoes to fill gaps.  The tomatoes shrink while roasting, so keep them sung and the tart pan full.  Lightly brush tomatoes with olive oil and sprinkle with freshly ground pepper.
  7. Bake the tart until tomatoes are softened and the crust is golden, about 50 minutes and up to 1 hour.  The tomatoes should be deeply roasted.  Allow to cool slightly then serve warm or at room temperature.
NOTE: You can make the dough a few days in advance and refrigerate.  You can also bake the crust one day and make and bake the filling another, as I did.  Leave at room temperature; no need to wrap.  Leftovers of the finished tart keep in the fridge for 4 to 5 days.

This recipe was recommended by a member in our Facebook group.  Several other members tried the recipe and have given positive reviews, so we thought it was one worth sharing with everyone!  You can view this recipe with the full commentary at SmittenKitchen.com.

Brown Butter Tomatoes


photo by Joseph Deleo for food52.com
Yield: 4 servings as an appetizer, 2 servings as a light lunch

2 large or 3 small ripe beefsteak tomatoes
6 Tbsp unsalted butter
Flaky sea salt, like Maldon
Coarsely ground black pepper
Baguette or other country bread, for mopping up the butter
  1. Core the tomatoes and slice them ⅓ in thick.  Divide the tomato slices among 4 plates, overlapping the slices just a little.
  2. Place the butter in a small heavy-bottomed saucepan and set over medium low heat.  Let the butter melt completely.  It will begin bubbling.  Let the butter simmer away, cooking off its water, until it begins to smell nutty and brown.  Swirl the pan every 30 seconds or so.  When the butter turns the color of a hazelnut, remove it from the heat.  Use a soup spoon to ladle it over the tomatoes.  They’ll sizzle!  You want to dress the tomatoes with the butter as if you were pouring ganache over a cake—be generous!
  3. Season the tomatoes with salt and pepper, then rush the plates to the table so everyone can taste the tomatoes while the butter is hot!  Mop up the butter and tomato juices with good bread.  Toast to summer!
Recipe by Amanda Hesser for Food52.com.

Wednesday, August 25, 2021

August 26, 2021 - This Week's Box Contents, Featuring Watermelons!

Cooking With This Week's Box

Red Seedless or Red Microseeded Watermelon:
Watermelon, Mint & Feta Salad (See Below)
Watermelon with Lime Salt (See Below)

Sweet Sarah, Amy or Sugar Cube Melons:

Italian Garlic:

Red & Yellow Onions:

Zucchini:

Green Beans:

Edamame:

Sweet Corn:

Sun Orange, Red Grape or Chocolate Sprinkles Tomatoes:

Orange Italian Frying Peppers or Green Bell Pepper:

Jalapeño Pepper:

Variety of Tomatoes:

Amaranth:

Poblano Peppers:

Red Prairie Potatoes:

Hello All—

This has been a heck of a watermelon harvest week, so it’s very fitting that watermelons are the featured item in this week’s box!  I have never received so many watermelons from the field as I have in the past week!  It’s crazy to think that there are literally thousands of watermelons in the cooler right now and more in the field that will be picked later this week or early next week!  Our watermelons are small, but hopefully we’ve done a good job picking them and you’ll find they are tasty, sweet and delicious!  This week I’ve included two very simple recipes using watermelons.  The first is a Watermelon, Mint & Feta Salad (See Below) and the second is Watermelon with Lime Salt (See Below).  I have to admit, the first time I saw watermelon and feta paired together I wasn't so sure about the combo.  However, after I tried it I had to admit it’s a pretty good match!  As for salt and watermelon—that's another one I was not so sure about .  My grandpa used to salt big wedges of watermelon and I never understood why he would do that when the watermelon was supposed to be sweet!  Now I can appreciate how salt can actually help to bring out the sweetness and the addition of lime is an added bonus!

Summer Succotash Salad with Orzo
Simplicity is the key to all meals in our household this time of the year.  Thankfully, summer food is very accommodating to simplicity.  Recipes like Crushed Potatoes with Cream & Garlic or Amaranth and Corn Saute are very basic preparations that come together quickly and give all the credit to good ingredients.  This week I included links to some of the recipes we’ve featured in our newsletters in the past that have been well-received and are ones I like to repeat each year.  Hopefully you’ll find a few in this week’s list of recommendations that resonate with your likes as well!

I’m going to keep it short this week and let the recipes speak for themselves.  Just remember to keep it simple so you can enjoy the fresh flavors of summer produce.  You may not even need a recipe to put a tasty, nourishing dinner on the table in short order.  We’ve been known to make a dinner out of boiled corn on the cob, steamed green beans, roasted potatoes and slices of watermelon or melon.

Enjoy the final week of August and I’ll see you in September.  If you are curious what’s coming up next in the boxes, I can tell you we’ll be enjoying more tomatoes, another crop of corn, more sweet peppers and when there's room in the box we'll start sending purple and yellow  cauliflower!
Have a good week!—

Chef Andrea

Vegetable Feature (I mean Fruit): Watermelons!

By:  Chef Andrea Yoder


Preparation & Use:
  Watermelon is one of summer’s most glorious treats.  From a culinary perspective, it’s best to keep it simple.  Chill it, cut it, eat it.  That may be the simplest recipe I give you all season!  That being said, watermelon does make a nice pairing with some other summer foods including melons, tomatoes, sweet peppers, mint, basil, limes, salty cheese and chili peppers.  We most often think of watermelon in terms of a great item to snack on in the heat of the afternoon sun or maybe it serves as “dessert” at the end of a cookout.  Watermelon can also be turned into savory creations such as the Watermelon, Mint and Feta Salad featured this week, but also things like a chilled Watermelon Gazpacho or Watermelon Salsa!  You can also blend the flesh and turn it into refreshing beverages and summer cocktails.  Don’t forget, the rind is edible too!  Most often watermelon rind is pickled, but it can also be stir-fried or candied!

Watermelon growing on reflective plastic mulch.
Growing Information:  Growing and harvesting seedless watermelons is one part science and one part artistry and skill.  You see, growing watermelons without seeds takes a bit of skill and investment.   Of course, Richard is always up to a good challenge and figured out how to grow them many years ago!  For starters, seedless watermelon seeds are quite expensive—go figure!  Thus, we do everything we can to ensure we get a high germination rate when we plant them in the greenhouse.  Once the transplants are ready to go to the field, we plant them on reflective plastic mulch for both heat gain, but also to help deter cucumber beetles and other pests that may introduce disease to the plant.  Speaking of pests, we aren’t the only ones who enjoy a sweet, tasty watermelon.  If word gets out that the watermelons are ready, the critters may start to move in.  Raccoons are the most common, but we’ve also seen turkeys, and crows.  We watch carefully and some years we put up an electrical fence around the field to deter the critters.

One of the tricky things about seedless watermelons is pollinating the blossoms as the plants are sterile.  The way we deal with this is to plant a different variety amongst the seedless plants that will provide pollen.  We actually use a ratio of one pollinator plant for every three seedless plants.  The pollinator variety may be a seeded melon, or there are specific “pollinator” varieties that do a very good job of providing pollen to the seedless plants.  Since we only grow small watermelon varieties, we are limited on the seeded varieties available to us for use as a pollinator.  We’ve also found that many of these varieties are very brittle and split easily.  Historically we’ve used the varieties whose specific purpose is pollination.  The downside of these varieties is they produce inedible melons.  This year one of our seed companies offered a new pollinator variety that was described as having edible, small melons.  We gave it a try and have found they are some of the best tasting watermelons!  They do have seeds in them, but they are micro seeds.  Watermelon seeds are actually edible and these micro seeds are small enough that we’ve found they are just fine to eat.  You can pick them out if you wish, but it really isn’t necessary.  Now that we’re harvesting both the seedless and pollinator watermelons, our harvests are significantly higher than in past years!

Watermelons on the harvest belt.
When it’s time to pick, we face another challenge and this is where a lot of the skill and expertise comes into play.  Richard is in the field nearly every time the crew picks watermelons, working with them to continue to hone their picking skills.  There are several signs the pickers look for to guide them in making the decision to pick or leave the watermelon to further ripen.  The first thing they look for is three dry tendrils on the vine where the stem is attached.  As long as the vine is healthy and free of disease, this is a good indication of ripeness.  When the vines start to die back or if there’s any disease on the vines, this can cause the tendrils to dry down prematurely making this a difficult indicator of ripeness. The second thing they do is pick up the watermelon and look for a yellow bottom.  If the watermelon has remained in the same place since it’s birth, it will develop a yellow bottom in the area where it rests on the ground.  If the watermelon has been moved for any reason (such as when weeding), it may not develop that color change and we can’t use that as an indication of ripeness.  The third indicator they look for is the sound of “The Thump.”  As the melon matures the thump goes from a high pitched “Ping” to the lower note of “Dohm.”  It takes a trained ear, and a quiet field, to listen for these subtle changes in sound.  As you can see, picking watermelons is no easy task!  Our pickers do the best they can to make quick decisions in the field and we think they do a pretty good job! Of course it would be much easier if we could look inside each one, but that’s not an option.  

Storage:  Store your watermelon in the refrigerator and eat it within a few days of receiving it.  While we wash the watermelons after harvest, we always recommend you give it a quick rinse before you cut into it. 

Watermelon Wedges with Lime Salt


Yield:  Makes enough salt for 24 wedges

2 Tbsp Maldon sea salt or other coarse sea salt
Zest of 3 limes, removed with a Microplane or fine zester
1 watermelon
  1. In a small bowl, combine the salt and lime zest.  Using your fingers, pinch it roughly to combine and slightly crush.  The idea is to “bruise” the zest to release the flavor, but also preserve the nice flaky texture of the salt.  
  2. Slice the watermelon into rind-on wedges.  Chill the wedges thoroughly because warm watermelon is a letdown.  
  3. Just before serving, remove them from the fridge and sprinkle one side with the salt.  Serve immediately.
Recipe borrowed from Deep Run Roots by Chef Vivian Howard.

Watermelon, Mint, and Feta Salad


“There are few food partnerships so simple yet so successful as that of sweet watermelon with salty feta and fresh mint……make sure you chill your fruit in the fridge for a good couple of hours before you put this together.  It makes all the difference.  And please treat the measurements as a guide only;  you should add as little or as much mint and feta as you fancy.”

Yield:  4 as a starter

1 ½ pounds watermelon
¾ cup feta
A large handful of mint leaves
2 Tbsp extra-virgin olive oil
Black pepper, to taste
  1. Slice the watermelon flesh into large triangular chunks and arrange them on a serving plate or in a bowl.
  2. Roughly chop the feta into cubes and sprinkle them over the fruit. 
  3. Add a large handful of mint, drizzle over the olive oil, and season with some freshly ground black pepper.  Serve immediately.
Recipe borrowed from Yasmin Khan’s book The Saffron Tales.  

Late August Field & Farm Update

By Richard and Andrea

Can you believe we’re at the end of August already?!  We’re quickly approaching that transition point in the season where summer and fall vegetables overlap, the days are busy, the harvests are bountiful and the meals you get to prepare with all these vegetables are colorful and delicious!  The week’s have been flying by for us and there’s no shortage of tasks to keep us on our toes.  First it was garlic harvest, then a push to get the onions out of the field.  Last weekend we harvested about half of our potato crop and this week we’ve stayed busy harvesting thousands (literally) of watermelons!  The next big harvests coming up will be winter squash followed by sweet potatoes and that will bring us up to fall root crop harvest and our final big harvest push before we close out the season.  Ok, now that we’ve laid it all out, lets back up and talk through some of the details.

Farmer Richard inspecting a
pheromone trap in the sweet corn field.
While fall will officially be here before we know it, we still have a lot of summer to enjoy!  We hope you’ve been enjoying this year’s sweet corn, which has turned out better than we had anticipated.  Some of the sweet corn blew over in the storms we had back in July, but thankfully the crops have come through despite that and the corn has been very good!  After this week we’ll have one crop remaining to harvest.  This is the time of the year when we have to watch out for corn earworm, a pest that starts as a moth which lays its eggs on the silks of the corn.  When the egg hatches a little worm makes its way down the silks and into the ear.  It’s a harmless, but annoying little creature.  We’ve been monitoring its activity, first through reports from University extension who reported sightings in Coon Valley, which is not far from us.  Those reports coincided with the first moths we caught in our pheromone traps.  We’ve been using an organically approved spray to treat this pest and try to prevent the worms from being a problem.  So far it looks like our tactics have been effective, but you may still find a worm or two in this late season corn.  If you do, just trim the tip off the ear as the remainder of the corn is still wholesome and delicious!

Mini Sweet Pepper Field
As we move into the latter part of summer we are also reaping the benefits of sweet peppers, tomatoes, and watermelons!  This has been one of the most productive watermelon crops we’ve ever had!  Between watermelons, melons, tomatoes and corn, it’s been a challenge to get everything in the boxes!  We are just starting to pick tomatoes from our second planting, so there will hopefully be several more bountiful weeks of tomatoes.  The sweet peppers are just starting to change colors, so look forward to a variety of orange Ukraine, Orange and Red Italian Frying peppers and of course, mini sweet peppers!  If you’re finding the quantity of food you’re receiving is quite a lot for your household during this peak part of the season, consider how you can tuck away some of these vegetables through simple preservation methods so you can enjoy them throughout the winter and they don’t go to waste!  If you have extra tomatoes, chop them up and cook them down, then either freeze the coarse “sauce” or puree it.  If you don’t have time for the cooking part, just freeze your tomatoes.  If you have freezer space, all you have to do is wash them and cut out the core.  Put the whole tomatoes in a freezer bag and put them in the freezer.  When you take them out you can cook them down into a soup or sauce.  Peppers are also easy to freeze as you can freeze them raw.  I (Andrea) will include some of these preservation tips from week to week in the newsletter, so look to this resource for some guidance.

Looking ahead to some of our fall crops, we are happy to report that the sweet potatoes and winter squash crops both look very good at this point!  Richard dug some sweet potatoes just to see what was happening underground and they look great!  The butternut squash are so thick you can barely walk in between the rows in the field.  We’ll likely start harvesting them within the next few weeks, which means we need to get the rest of the onions and shallots trimmed, cleaned and into the cooler!

An established cover crop is
important to prevent erosion over the winter!

Last week we put out the last of our transplants with our fall lettuce crop and a crop of escarole and radicchio that we hope to harvest in November.  We’ve completed all of our main season plantings including our fall storage turnips and radishes.  We still have several weeks of plantings to complete for the crops we plant weekly including radishes, cilantro, bok choi and our fall spinach and salad mix.  Aside from this small lineup, we’re turning our attention to planting cover crops!  This past week we received over 7,000# of cover crop seed and we plan to plant it all!  Cover crops are an essential part of our system and we rely upon them to hold our soil in place over the winter as well as for the nutrients and organic matter they build in our soils.  Of course there’s also the benefit they offer to the planet as they sequester carbon.  It’s an investment in time and money, but one we feel more than pays for itself in returns!

Steam rolls off the compost pile
as it is turned with the compost turner

As we “put our fields to bed for the winter,” we’ll also be spreading minerals and compost to put fertility back into the soils for next year.  Silvestre has made some nice windrows of compost and it’s heating very nicely!  After the last turn it heated to 160°F overnight!  In order to be compliant with the NOP (National Organic Program), it needs to be maintained at 140°F for a minimum of 15 days and we will turn it to stir it up and incorporate more oxygen a minimum of 5 times during that period.  This process not only turns the raw materials into actual compost, but the time it’s held at these temperatures also kills weed seeds and any pathogens.  By the time it’s finished it will look like “black gold!”

Benchmark for the water level is in place
(lower left) & the permit is posted!
We usually start our conversations by somehow talking about the weather, so we’d better circle back and cover that topic!  Despite receiving rain over the past few weeks, we’re still pretty dry!   Our irrigation crew continues to work hard to keep up with the moisture losses we see simply based on evaporation and transpiration.  Now that the plants we’re watering are more mature, they lose more moisture every day as they “breathe,” but we also see greater moisture loss when it’s windy and hot.  On the topic of irrigation, we’re happy to report that we did receive our irrigation permit that was pending for one of the properties we lease.  We shared about this application process and our irrigation practices in an article we published last month.  We are grateful for the support of the DNR in issuing this permit, but also for the positive feedback we received from some of the community members who initially had expressed concern about this application.  We will continue to do the best we can to manage our irrigation practices responsibly.  Last week Richard and Luis put in the benchmark for the new permit, posted the permit and we’re hoping to start irrigating soon.

Cows grazing on green pastures
In the pastures, we’re happy to report both the cows and pigs are content, thriving and doing well.  The cows continue to enjoy their pasture grass and we have a good supply of hay put up for their winter feed.  The pigs have also been eating well and are starting to enjoy hickory nuts falling in their pasture.  Hopefully they’ll have a few acorns to snack on this fall too!  While we are sold out of pork for this fall’s deliveries, we do still have beef available.  If you are interested in stocking up for the winter, you might want to consider purchasing a custom half beef.  It’s our most economical offering and you get to choose how you want it processed!  Just email Andrea, our meat lady, if you are interested.

Well, there are many other crops and farm activities we haven’t even touched on, including the gorgeous purple and yellow cauliflower that we’re harvesting this week!  We still have a lot of work ahead of us to finish out the second half of our CSA season.  Pretty soon we’ll also start laying the groundwork for next year’s CSA program and start pre-booking seeds and supplies for next year.  The cycle keeps going and we continue to be grateful for your support of our farm.  Enjoy the final weeks of summer and we’ll meet you back here later this fall for another update!