Thursday, July 28, 2022

Garlic Harvest 2022: The Full Farmer Report

2022 Porcelain Garlic Drying in the Greenhouse

by Richard de Wilde

We finished our garlic harvest with 48,000 bulbs of medium to large size garlic.  The harvest actually went quite smoothly this year with only one interruption due to rain.  We initiated harvest a little bit ahead of schedule knowing there were chances of rain in the forecast, so we had a little buffer and could pause harvest for a few days without it causing a setback.  In most years we have to hurry and hustle to get it all harvested before a rain, in between rains, after a rain for fear that the longer we leave it the greater the chance of rot.  But this year we just paced ourselves over several days without a crazy rush!  Our harvest is drying in the greenhouses right now and before the end of this week we’ll start the process of topping the garlic and then sorting and crating to put it into storage.  The smallest bulbs, including some that were extra from our green garlic planting, will be used for next year’s green garlic, planted 1-2 inches apart.  Most of the largest premium bulbs, about 15,000 total, will be set aside and saved to plant next year’s main garlic crop.  We’ll tuck it away in the cooler to keep it safe and dry until mid-October when we pull out these beautiful bulbs and “crack” them to separate the cloves for planting.  

Garlic sprouts poking through the 
thick straw mulch in March

Once planted, we’ll cover the beds with a layer of rye straw mulch to insulate the garlic over the winter and will hold the mulch in place by covering the entire field with a huge row cover secured with sand bags to keep it from blowing away over the winter.  We’ll also put up a deer fence to deter our deer friends from tromping and digging in the field over the winter.    

Many people think farmers are crazy to take the best garlic they can produce, forfeit a sale to receive a premium payment and instead break it up and stick it in the ground with fingers crossed that it will actually survive and produce something of value the following year.  Well, let me offer a little perspective.  You can buy certified organic seed garlic at very high prices, as much as $20/pound, but it comes with only a “promise” that it is “disease free.”  So after many years of buying seed, we decided it behooves us to save our own and for the last 25 years we have maintained our own seed stock of two basic varieties.   By doing this, we decrease the chances of introducing disease onto our farm and maybe we save some money on the cost of seed in the end, or at least break even!

Our main two varieties of garlic are Red Italian and Porcelain.  Both of these varieties are classified as hardneck garlic, which means the plant will produce a garlic scape.  There is also a classification of garlic called softneck.  This type does not produce a garlic scape and is the variety required for making garlic braids.  While softneck garlic looks quite beautiful woven into a braid, from a practical culinary standpoint it is a bit more cumbersome to use.  It produces many small cloves that are a challenge to peel at times.  Some of you who have been with our farm for many years may remember the beautiful garlic braids we made with red chili peppers, dried sage and oregano flowers.  After many years of maintaining seed stock for this softneck garlic, we decided to stop growing it when the quality of the garlic started to diminish.  Now we focus our efforts on the hard neck garlic as it is what really feeds us!  

Red Italian garlic, freshly washed right out 
of the field!

The Red Italian is our most dependable garlic and is characterized by a reddish tint to the skin and an average of 7-8 large cloves per bulb.  Our other variety, Porcelain, is also known as continental and has only 3-5 larger cloves on a bulb that is mostly white in color.   For most garlic lovers, the Porcelain types with only 3-5 large cloves to peel is preferred.  From a grower perspective, Porcelain is a huge investment in “seed stock” to produce at best a one to four increase from seed to harvested bulb given there are fewer cloves on each bulb.  In contrast, the Red Italian produces 7-8 cloves per bulb which will then produce as much as 8 bulbs from 1 seed bulb!  

Planting the 2022 crop in October 2021

Growing garlic in Wisconsin is not a way to “pay off the farm,” but rather is one of our “making friends” crops.  It is fraught with weather-related challenges and seed stock problems!  As an example, for this year’s crop we had very nice seed stock that was selected from a very good 2021 harvest.  It was carefully planted right on time on October 15, mulched and covered with beautiful, clean rye straw harvested from our rye cover crop.  Before the snow started to fly it was covered and fenced from deer.  We did everything we could to give it the greatest potential, but then we had a record setting warm fall.  The above normal temperatures caused the garlic (especially the porcelain varieties) to produce more than the expected roots.  The sprouts actually grew up and pushed through the straw late last fall only to be frozen off over the winter.  When spring came late this year, the plants failed to produce new growth and they were officially deemed “duds.”  The survival rate for the Red Italian was better, but our overall harvest was down 40% from a “good” harvest!  

Our 2021 Garlic piled high and filling the 
greenhouse.  Possibly our best crop ever!

While 48,000 bulbs is a lot, we had a much higher potential last fall.  This is why we always plan for abundance and plant more than we estimate we’ll need.  When factors out of our control affect a crop, we still have enough usable product so that on the receiving end a reduced crop is not a noticeable failure.  Well, there you have it.  I just let the cat out of the bag and now you know that while we’re very pleased with the quality of this year’s crop, I’m also a little disappointed with the losses.  On the bright side, we have enough large, disease free stock to save for our 2023 crop and have enough for the remaining CSA boxes as well.  Once it’s all clean and tucked away in the cooler, we’ll be able to assess whether or not we have enough garlic to also offer it as a “Produce Plus” option later this year as we know there are some of you who would like to head into winter with a hearty supply to keep you well until spring rolls around again!  

Richard & Rafael discussing farming while
surrounded by this year's garlic crop
There you have it, another garlic harvest on the books!  Andrea asked me how many garlic harvests I’ve done or managed over the course of my farming career.  Wow, I have no idea the exact number, but I think it’s over 40!  Despite my years of experience, I continue to learn more with each year’s crop and look forward to doing it all again for 2023!  I hope you enjoy the garlic we’ve grown for you this year and appreciate and enjoy it in your meals with an occasional thought of gratitude for our hardworking farm crew that worked diligently to make it happen for you!


Wednesday, July 27, 2022

July 28, 2022 - This Week's Box Contents Featuring Eggplant


Cooking With This Week's Box

Eggplant:  
Grilled Eggplant & Quinoa Salad with Dates & Almonds (See below)
See below for a list of additional recipes at the end of this week’s feature article about Eggplant!  

Photo from evaminette.net
Sierra Blanca Onions: 

White Cauliflower:  

Orange Carrots:  

Zucchini and/or Sunburst Scallopini Squash:  

Green/Silver Slicer Cucumbers or Sun Jewel Melon (Most boxes this week):  

Red New Potatoes:  

Fresh Italian Garlic:  

Small or Large Tomatoes:  

Broccoli:  

Green Beans:  

Sweetness Sweet Corn:

Hello!

We’re wrapping up the month of July and I have to say this box is kind of representative of transition.  We’re making some shifts in harvest as we head into August.  We’re wrapping up our first round of cauliflower and our first planting of cucumbers are tapering off.  We’re just starting to pick sweet corn, tomatoes, and melons with peppers not far behind!  We’ll be harvesting onions to put into storage pretty soon and Richard is ordering cover crop seeds.  Fall and winter are still months away, but we’re definitely feeling some shifts right now!

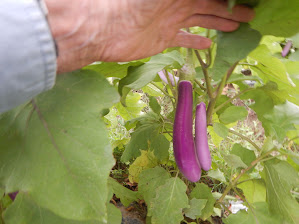
This week we’re featuring a unique summer vegetable, eggplant!  Eggplant is such a striking vegetable, especially if you could see it in the field!  Unfortunately, many people are a bit intimidated by it and/or underwhelmed when they taste it.  But the beauty of eggplant is more in its texture and how it complements other ingredients.  With a different perspective, I hope everyone can learn to appreciate the beauty of eggplant and find ways to enjoy it during the summer months.  I had trouble selecting a recipe this week as there were many ideas that sounded really good.  I settled on this Grilled Eggplant & Quinoa Salad with Dates & Almonds (See Below).  I like this salad because it’s easy to make and only requires one bowl!  It also travels well which makes it a good candidate for lunch at the office and it is a good source of protein so it can stand alone as the main attraction for the meal.  I used a pretty large eggplant when I made this and had extra grilled eggplant leftover, which is great because now I have it available to add to our eggs for breakfast or I might toss it into another vegetable salad later this week.  Make sure you take a moment to read the feature article about eggplant (see below) this week and check out the list of recipe ideas at the end as well!

We’re having another hearty week of zucchini harvest and I have to say I’m kind of stuck on repeat when it comes to cooking zucchini.  We’ve been enjoying grilled zucchini this summer and can’t seem to get enough of it!  Sometimes I add some fresh herbs or a splash of lemon juice, but mostly we’re just using oil, salt, and pepper.  If you haven’t tossed any on the grill yet, here’s a recipe for Perfect Grilled Zucchini.  While you have the grill going, you might want to make Grilled Bone-In Pork Chops with Garlic Butter to go with the zucchini!  

I hope those of you who received a box last week have had a chance to enjoy the new potatoes.  Several members in the Facebook Group tried the Summer Farmer Skillet over the past week and had positive reports.  This week you could add sweet corn to this recipe, which never disappoints alongside new potatoes!  You could also try these Crispy Potato, Egg & Cheese Tacos which could really work for any meal of the day!

You know I like to work vegetables into breakfast and this week I’m focusing on carrots. Check out these two breakfast-ready recipes for Carrot Cake Breakfast Bowl and Carrot Banana Smoothie.  Of course, if you have other ideas for incorporating vegetables into breakfast, please let me know or post your ideas in our private Facebook group! 

Well, I could talk cooking all day, but it’s time for me to mosey back down to the packing shed.  Before I go, I wanted to let you know I accidentally purchased another cookbook which just arrived this week!  I hope to share more about In Praise of Veg, by Alice Zaslavsky, in the upcoming weeks.  My preliminary assessment of the book though is that it is not only beautiful, but is packed with a lot of great recipes, guidance and ideas to make cooking vegetables very simple.   The book was just released, so I’m not sure how likely it is to find it in your local bookstore.  If you do run across a copy of it, I highly recommend it!

Ok, that’s a wrap for this week.  Have a great week of cooking and I’ll see you next week!

--Chef Andrea 


Vegetable Feature: Eggplant

by Andrea Yoder

Eggplant is a member of the nightshade family, along with potatoes and tomatoes.  It is one of the most beautiful crops we grow, and, in their peak, the plants can be loaded with beautiful glossy fruit hanging heavy on the plant.  There are many varieties of eggplant ranging in size from small round eggplant the size of a golf ball to large globe eggplant weighing several pounds.  They also come in a variety of colors ranging from various shades of purple to black, green, lavender, white and orange.  While there are many varieties to choose from, we have narrowed our lineup of eggplant to our four favorite varieties including Lilac Bride, Purple Dancer, Listada and the traditional Black eggplant.  Each variety has slightly different characteristics which may impact your decision as to how you want to prepare them.  If you’re not familiar with the different varieties, I’ve included a brief description of each one below.  I encourage you to refer to these descriptions each week to help you identify which eggplant you receive as this information will also help you choose the most fitting recipe for what you have received!


Black Globe Eggplant: This is the most familiar variety of eggplant. It is characterized by a dark purple skin that looks black. It is best used in dishes like Eggplant Parmesan, lasagna or to make dips, etc. This variety will also hold up on the grill or if roasted.

Lilac Bride Eggplant: Lilac bride eggplant is long and slender with lavender to dark purple skin and white flesh. It is best used in Thai curry dishes, stews, or any other preparation where you want the eggplant to hold its shape better. The skin is tender enough you don’t need to peel it.

Listada Eggplant: Listada is characterized by a small globe shape with dark purple/ magenta skin streaked with white stripes. It is characterized by dense “meaty” flesh that holds up very well with grilling or roasting. 

Purple Dancer Eggplant: This superb variety is characterized by an elongated tear drop shape and a bright purple skin. Purple Dancer eggplant is an all-purpose eggplant that has creamy, white flesh. It is firm enough that it keeps its shape if you grill it or use it in curries, soups, or stews. The flesh is also soft enough when cooked to use in dips, etc.

Eggplant is grown all around the world and is a part of the cuisine in many different cultures.  As such, there are many different options for how you may choose to prepare it.  It is important to note that eggplant should be cooked before eating it.  In fact, while I’m typically standing on a soapbox preaching with a pointed finger to not overcook vegetables, this is one vegetable that you may want to slightly overcook to ensure the flesh is very soft and silky as this is when it is the best.  Eggplant has a mild flavor and soft, silky texture when cooked, which is what makes it unique.  The more it smooshes, the better!  While eggplant doesn’t have a striking flavor, its texture is what makes it a sponge that is able to absorb other flavors.  Eggplant pairs well with other vegetables including tomatoes, onions, garlic, peppers, zucchini, potatoes, lentils, and chickpeas.  It also goes well with flavorful olive oil, tahini, herbs such as basil, parsley and mint, and spices including cumin, coriander, sumac, and cinnamon.  It is a friend to dairy products including yogurt, cheese (feta, Parmesan and mozzarella), and cream and fruits including lemons and pomegranate.

Eggplant can be prepared using a variety of cooking methods including pan-frying, baking, grilling, and roasting.  Many resources will tell you to salt eggplant before cooking it to remove bitterness.  While some older varieties were bitter, the new varieties we grow have been selected because they are not bitter, thus you can skip the salting step for that reason.  You may still choose to salt eggplant to soften the flesh, so it doesn’t absorb too much oil.  Most of our varieties of eggplant have skin that is tender enough to eat, thus you do not need to peel them.

Since eggplant is part of so many cultures, there are a lot of ways you can use eggplant in your cooking.  It is often incorporated into curry and stir-fry dishes in Indian, Thai, and Chinese cuisine.  Sicilians are famous for eggplant caponata and Pasta alla Norma while Middle Eastern dishes include baba ghanoush and moussaka.  The French put their mark on eggplant with the traditional Provencal dish, ratatouille.  When you are reading recipes, you’ll find they often refer to “1 medium eggplant.”  Well, eggplant grows in a wide range of sizes.  This week we packed a variety of different kinds in boxes including some large black eggplant ranging from 1.5-2 pounds each!  So how do you know what “1 medium eggplant” is actually referring to?  Well, the best guideline I can offer you is that most recipes are likely referring to about one pound of raw eggplant.  If you have a larger eggplant than you need to use at the time, I encourage you to cook it all (if possible) at one time and then store any remaining unused portion.  If you have some extra grilled eggplant, you can add it into a vegetable wrap, scramble it into your morning eggs or add it as a pizza topping.  If you choose to roast eggplant and puree the flesh, you can store any unused pureed portion for another use or you can freeze it.  When you are ready to use it, just pull it out of the freezer, thaw it and it’s ready to turn into a dip, soup or even a chocolate dessert!  That’s right, eggplant puree can be used in baked goods similarly to how we use mashed bananas!  If you don’t believe me, refer to this decadent recipe for Chocolate Eggplant Torte.

Eggplant does not store terribly well and is best stored at a temperature of about 45-50°F.  This is warmer than your home refrigerator should be set at, thus we recommend storing your eggplant on the kitchen counter and use it within 2-4 days.  If it starts to get a little soft or dehydrated looking, it’s still good, however we recommend you use it as soon as possible.

Of course, I am not going to leave you without suggesting some recipe ideas!  In addition to the recipes, we’ve published in past years which are available in the archives on our website and on our blog, I was able to find a few more that look pretty good!  Hopefully you’ll find some inspiration for ways to put this unique, gorgeous, and interesting vegetable (or rather fruit, excuse me) to use!

EGGPLANT RECIPE SUGGESTIONS TO GET YOU STARTED!
  

Grilled Eggplant & Quinoa Salad with Dates & Almonds

Yield:  4 servings as a side dish or 2-3 as a main dish

½ cup dry quinoa
½- ¾ cup Extra-virgin olive oil, divided
1 garlic clove, minced finely
1-2 Tbsp lemon juice
Zest from one lemon
¼ cup diced Medjool dates
Red Pepper flakes, a few pinches
Sea salt, to taste
Freshly ground black pepper, to taste
1-2 medium eggplants, sliced into ¼-inch thick rounds
½ cup finely chopped parsley
¼ cup chopped or sliced almonds, toasted
¼ cup mint leaves, thinly sliced (optional)
  1. Cook the quinoa according to package instructions in salted water.  Once cooked, fluff the hot quinoa with a fork and allow the steam to dissipate.  Transfer to a medium bowl.  
  2. Add 1 tsp olive oil, minced garlic, 1 Tbsp lemon juice, lemon zest, dates, and red pepper flakes.  Season with salt and black pepper.  Set aside.  
  3. Grill the eggplant.  Heat a grill to medium-high heat or use a grill pan on a stove top.  Using a pastry brush, lightly brush each slice of eggplant with olive oil on both sides and season with a touch of salt and black pepper.  Grill 2 to 3 minutes per side, or until there are distinct grill marks.  You want the eggplant to be very soft and tender.  Thus, if it needs to cook a little longer, you may need to move the slices to a cooler part of the grill to finish cooking, or finish cooking them in a 350°F oven.  If you do not have a grill or a grill pan, you can also cook the eggplant using the broiler in your oven.  
  4. Once the eggplant is fully cooked, cut the slices into bite-sized diced pieces.  You want about 1 ½ cups of eggplant for this salad.  If your eggplant yielded more than that, save it and store in the refrigerator for another use.
  5. Add the grilled eggplant to the bowl with the quinoa.  At this time you can also add the parsley, almonds and mint (if using) to the bowl.  Stir gently to combine all the ingredients and take a moment to taste the salad.  Add additional lemon juice, salt and/or olive oil as needed.  
  6. Serve at room temperature.  
Optional Add-Ins:  This salad is delicious just as written, but you can also adapt it to your liking.  If you’re eating this as a main dish salad, you may want to add some cooked chickpeas or diced cooked chicken.  A crumbling of feta may also be a nice addition.  

Recipe inspired by a recipe for “Grilled Eggplant” published by loveandlemons.com.

Wednesday, July 20, 2022

July 21, 2022 - This Week's Box Contents Featuring New Potatoes


Cooking With This Week's Box

Red New Potatoes:  

White Cauliflower:  

Orange Carrots:  


Summer Squash (Zucchini and/or Sunburst Scallopini Squash):  

Green and/or Silver Slicer Cucumbers:  

Thai Basil:  
Fresh Italian Garlic:  

Broccoli:  

Green Beans:  

Green Curly Kale:  

Red Cabbage:  
Cauliflower Po’ Boy with Cabbage Slaw 

Hello Friends—

This week’s box is what summer is all about!  Freshly dug new potatoes, carrots, beans, zucchini…..so many delicious vegetables that really need very little to be so tasty.  Plus, we’ll continue to build on this week’s selections with sweet corn coming in likely next week along with fresh tomatoes!  This week I’m featuring a favored farm recipe that I created and shared back in 2017.  Many members have made this recipe and offered positive feedback, so I wanted to give it a little attention this week for the benefit of our newer members.  This recipe for Summer Farmer Skillet Dinner (See Below) came about because this is what Richard and I eat a lot during the summer.  The recipe is the guide, but within that guide you can adapt it to whatever vegetables you have available.  Potatoes and carrots will make a good vegetable base this week and then it’s up to you to add green beans, zucchini, or whatever is in your refrigerator that needs to be used up!  Another key part of this recipe is topping it off with a cooking green.  You could use the green curly kale in this week’s box, or if you have some green cabbage from a previous week that would work as well.  Really, it’s a very forgiving recipe!  I also included links to two other previously published recipes that I turn to every year during the summer when we have fresh potatoes.  New Potatoes with Garlic & Butter and Summertime Pan-Braised Chicken with New Potatoes & Greens are very simple recipes, but I think you’ll find both to be satisfying and delicious!

Throughout this week’s list of recipe ideas you’ll find several summer pizza recipes including Charred Kale and Garlic Pizza and Garden Greens Goddess Pizza.  I was on a roll with cucumber recipe ideas, and you may notice there is a “rolled” theme to this week’s recipe suggestions.  What can I say, sometimes in life and cooking you just have to “roll” with it!

Alright, I’m going to wrap it up here.  There is a lot of great potential in this week’s box, so I hope you’re able to find some tasty ways to use this week’s vegetables!  If you haven’t been paying attention to our private Facebook Page, I encourage you to check it out.  There have been some great recipe suggestions and ideas recently.  Thank you to everyone who is participating!  Have a great week and I’ll see you back here next week, hopefully along with sweet corn and tomatoes!

---Chef Andrea 


Vegetable Feature: New Potatoes

by Andrea Yoder

Potatoes are a vegetable everyone’s familiar with, but not all are created equally and this week’s potatoes are, in our opinion, very special.  If you’ve been with us for previous CSA seasons you know we draw attention to this point every year because frankly, we just don’t want you to miss out on this experience!  There is a short period of time early in the summer when we have the opportunity to eat “New Potatoes.”  New potatoes are not a variety, but rather a term used to describe potatoes that are harvested off of a plant that still has green leaves on it.  Our usual practice is to mow down the potato vines about a week in advance of harvest.  In the week between mowing down the vines and actually harvesting the potatoes, changes take place in the plant that help to set the skins and make them easier to handle without damaging the skin.  It also gives them a more durable skin to protect the flesh and make them better for storage.  These potatoes were dug this past Saturday from plants with green vines.  Freshly dug new potatoes have a flavor and texture unlike other potatoes throughout the season.  It is a fresh, pure potato flavor and the skin is tender and delicate.  When you cut them you’ll notice they are very crispy and sometimes a little brittle because they have retained all their juiciness!  Once cooked, the flesh is moist, creamy and smooth with a distinctive flavor that’s hard to describe.  Trust me, when you taste it you’ll know what I mean!  

The new potatoes in your box this week are a variety called Red Norland.  They are an early, red-skinned potato with creamy white flesh.  They need to be handled with care so as not to disturb the skin and expose the flesh.  This year our potato field is in a location where the soil is a bit more sandy.  Despite having rain the day before harvest, these potatoes came out of the ground very easily and are probably the nicest new potatoes I’ve ever seen!  

We’ve given them the “white glove treatment” through the harvest and washing processes to preserve the integrity of their skins, but we encourage you to handle them with care as well.  Wash them just before use and give them a gentle scrub if needed. There is no need to peel them, so my recommendation is to just skip that step.

I encourage you to slow down and really savor the flavor of these new potatoes as these first few weeks will be the only time during the season you’ll be able to have this taste experience of freshly dug potatoes.  You really don’t need to do much to them and, in fact, I’d encourage you to do as little as possible!  Honestly, most often I simply boil or roast them with fresh garlic and top them off with butter, salt, pepper and sometimes fresh herbs.    

Potatoes should be stored in a cool, dark place, but not in the refrigerator.  We store our potatoes in a warmer cooler at about 48-50°F which is most ideal.  If potatoes are stored in colder temperatures (such as your home refrigerator), the starches will convert to sugars which is not what we want in a potato (save that characteristic for sweet potatoes!)  So in a home setting, it’s best to store them in a cool, dry location outside of the refrigerator where they will not be exposed to light which can cause the potatoes to turn green and bitter.  If the potatoes have set their skins, in general they will store for a few weeks at room temperature in a brown paper bag (never in a plastic bag).  However, because new potatoes are so fresh and we have not allowed them to set their skins, they will not store as well and are best eaten within one week. 


Summer Farmer Skillet Dinner


by Chef Andrea 


Yield:  4 to 6 servings

1 pound ground pork or beef
1 cup chopped onion
2 to 3 cloves garlic, minced
⅓ cup white wine
2 cups potatoes, skin on, cut into bite-sized pieces
1 cup carrots, medium dice
1 cup zucchini, medium dice
2 cups green or yellow beans, cut into bite-sized pieces
1 cup cream, divided
½ cup coarsely chopped fresh herbs (thyme, parsley, savory, oregano, rosemary etc.)
4 cups greens (kale, cabbage, amaranth, chard, beet greens, or any other seasonal cooking green), washed and chopped into bite-sized pieces or shredded
2 cups shredded cheddar cheese
Salt and freshly ground black pepper, to taste

  1. If you have a broiler in your oven, position the rack in the middle of the oven and preheat the broiler.  If you do not have a broiler, preheat the oven to 400°F.  
  2. Heat an 11-12 inch oven proof skillet on the stove top at medium-high heat.  Add the ground pork or beef and cook until browned.  Add the onion and garlic and continue to cook for a few more minutes.  Season with salt and pepper.
  3. Add the white wine to the pan and then layer the potatoes and carrots on top of the meat mixture.  Season again with salt and pepper. Cover the pan and simmer for 5-8 minutes or until the potatoes and carrots have started to soften but are not all the way cooked.  
  4. Add the zucchini, green beans and ½ cup of the cream to the pan.  Season this layer with salt and pepper.  Cover the pan again and simmer for another 5-6 minutes. 
  5. Remove the cover and sprinkle the herbs on top.  Spread the greens on top, and season with salt and pepper.  Pour the remaining ½ cup of cream around the edge of the pan.  Cover the pan again and simmer for about 5 minutes or until the greens are wilted.  Remove the cover and simmer on the stovetop for an additional 5-6 minutes or until the cream is reduced by about half.  
  6. Spread the shredded cheese on top of the greens.  Remove the pan from the stovetop and put it in the oven under the broiler or in the hot oven.  Bake just until the cheese is melted, bubbly and starting to brown.  
  7. Serve hot.  If you have any leftovers, they will reheat well for another meal or they are delicious served with toast and eggs for breakfast.  
This is a basic recipe that can be altered to use any seasonal vegetables you have available.  Add the vegetables that will take the longest to cook to the pan first and finish with the quick cooking greens on top.  And the best part is…you only dirty one pan!  This has become one of our favorite, simple ways to make a hearty meal using seasonal vegetables without a lot of fuss and enough leftovers for the next day!  Perfect Farmer food at the end of a long summer day!


Wednesday, July 13, 2022

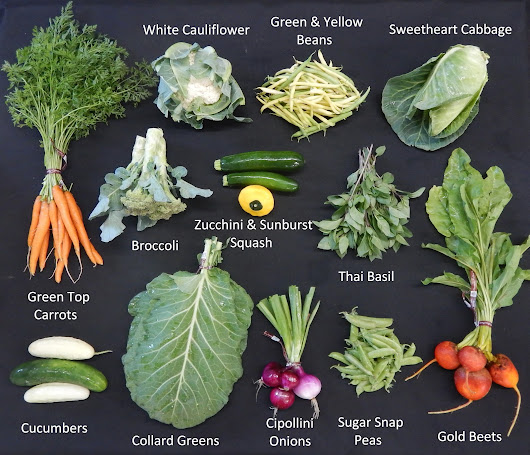
July 14, 2022 - This Week's Box Contents Featuring Collards


Cooking With This Week's Box

Desert Sunrise Cipollini Onions:

Broccoli:

White Cauliflower:

Green Top Carrots:

Zucchini and/or Sunburst Squash:

Green and/or Silver Slicer Cucumbers:

Thai Basil:

Collards:
See Below for a list of additional recipes at the end of this week’s feature article about Collards!
Pasta with Bacony Collard Greens & Cannellini Beans (See Below) & Check Out the Video at Food52! 
Sugar Snap or Snow Peas:

Green Top Gold or Chioggia Beets:

Sweetheart or Tiara Cabbage:

Green/Yellow Beans:

Hello!

I hope your July is off to a great start. Things are really growing and we’re finding plenty to occupy our days! If you’ve been wondering where the garlic has been the past few weeks, rest assured it will be back in the box next week! We’re starting garlic harvest this week, so you’ll have a taste of fresh garlic very soon! We had hoped to dig potatoes this week, but they were just a little too small. The shop crew is getting the digger ready though as we do plan to harvest them this Saturday! Oh, I almost forgot to mention I picked a handful of SunOrange tomatoes last Sunday! That’s about all that were ready, but hopefully by the end of this week or early next week we’ll be seeing more color in that row!

So now that you have a glimpse into next week, lets draw our attention back to this week and all the tasty things in the box! When you open your box this week, you’re going to see collard greens covering the top layer. Check out this week’s article about Collard Greens (see below) to learn more about what to do with them. I also curated a list of recipes for you to consider trying, so be sure to check that out in the article below. In the meantime, I do have a feature recipe to share with you that is pretty darn tasty if I do say so myself! This recipe for Pasta with Bacony Collard Greens & Cannellini Beans (See Below) is a one-pot wonder that I found at Food52.com. This is one of those recipes to tuck away in the “Greens Recipes” file as it is easily adaptable to a wide variety of “greens” you’ll receive in your box over the season. I made it with one bunch of collard greens and the carrot tops from one bunch of carrots. The other cool thing about this recipe is you can watch a cooking video about how to make it over at Food52! Before I go on, I do want to mention that Food52 has an awesome collection of cooking videos on their website. I have watched some of their videos before, but never realized there was a whole page of archived videos covering a wide range of recipes and cooking techniques. I’d encourage you to go check it out, especially if you are relatively new to the cooking scene and are still building your skill set!

I am excited to share Thai Basil with you in this week’s box.  I’ve been dreaming about making a pitcher of Thai Basil Lemonade.  If you do not know what to do with Thai Basil and don’t have time to find a recipe, just make this lemonade, kick back and enjoy it.  It is seriously so delicious.  Throughout the list of recipe links this week I included a few other recipe ideas for dishes where Thai basil will shine.  I hope you will find something fun to make with this tasty & unique basil!

We are having a run on salad cabbage this year and I’ve been loving having it in my refrigerator to turn into quick slaws and salads.  The beauty of salad cabbage over lettuce is that you can put the salad totally together, dressing and all, without it getting all soggy.  This is great for quick lunches and dinners.  If you didn’t try last week’s recipe for Chicken, Cabbage & Snow Pea Grain Bowl with Coconut-Peanut Sauce, check it out and give it a try before the peas are done for the year!  I also like this Vietnamese Chicken & Cabbage Salad that is fresh and light, the perfect summer meal!

Ok, I got a little weird with the cauliflower recipes this week.  I couldn’t help myself, these recipes were so intriguing!  If anyone tries Cauliflower Banana Bundt Cake with Cinnamon Icing or the Cheesy Cauliflower Breadsticks, please post in our Facebook Group and let us know how they are!  

Speaking of the Facebook Group, you guys have been posting some really great meals and culinary creations!  I love seeing what you’re making and selected a few of the recommended recipes for this week’s list.  This is exactly what this group is for, to create community and share great ideas!

Ok, it’s time for me to sign off for this week.  Get a stick of butter and some good salt ready for the New Potatoes coming next week!  Eat well, be well, and don’t forget to have some fun with cooking!


-Chef Andrea 

Vegetable Feature: Collards

by Andrea Yoder

Collard greens are a rather humble, quiet vegetable that I would liken more to a staple of the working class than something eye-catching that shows up on a fancy restaurant menu such as squash blossoms or brightly colored heirloom tomatoes.  Nonetheless, I have come to appreciate collard greens more over the past few years and am realizing there are some pretty tasty ways to enjoy collard greens!  So, I am challenging myself this year to incorporate them into our meals in more ways.  Hopefully you will come to appreciate them as well and will try some of the recipe suggestions I have included later in this article!  

For starters, collard greens are part of the brassica’s family.  The paddle-shaped leaves bear a resemblance to cabbage leaves, but in general they tend to be more flat and open, and the plants do not make a head.  The leaves are thick and more durable and hearty than other greens, such as rainbow chard.  However, they may be softened to a silky texture with heat, liquid, and time or by marinating or massaging them when they are raw with oil or vinaigrette. While many assume collards are strong in flavor, they are very mild flavored.  Collard greens are available from late June through October or early November.  The flavor of collards, as well as other vegetables in this family, changes and becomes sweeter once they’ve been through a few cold nights.  Take note of the flavor now so you can compare it to the collard greens you may eat later in the fall.  Collard greens are packed with nutrients including Vitamins A, C, E, K and B6 as well as riboflavin, calcium, iron, manganese, thiamin, niacin, magnesium, and potassium.  With a powerhouse nutrient profile like this, we must find more ways to incorporate them into our diets!

In this country, many associate collard greens with southern cooking where this green is considered more of a regional staple ingredient.  In southern cuisine, collards are often cooked with some sort of pork cut such as salt pork or a ham hock.  The meat is the flavoring agent used to cook the greens, which are cooked for quite a while until they become dark olive green and very soft.  The remaining liquid is called pot likker and is seldom discarded.  Rather it is soaked up with a biscuit or cornbread, used to cook beans, or some may even drink it.  Collard greens are thought to have originated in Asia, a descendant of a wild cabbage.  This vegetable then spread to other parts of the world and likely made it to America by way of ship and European settlers.  Collard greens are now eaten in many other parts of the world including India, Brazil and throughout Europe.  

As mentioned earlier, collard greens have a thicker leaf which requires a longer cooking time to become soft and tender.  While collards do require a little more cooking, you don’t have to cook them until they are super soft to enjoy them.  You can also stir-fry or lightly sauté them just until bright green.  They’ll have more texture to them and not be quite as soft but are still quite delicious.  Because of the broad leaf, collards may also be steamed or blanched and then the leaf can be used as a wrap to hold a filling.  This has become a popular use for collard leaves in the paleo community as an alternative to tortillas.  

Collard greens obviously pair well with all salty, fatty pork products.  They also go well with garlic, ginger, chiles, sesame, coconut and spices including coriander, cardamom, turmeric, and black pepper.  Of course, they also pair well with black-eyed peas, white beans, black beans, tomatoes, corn, sweet potatoes, potatoes, and roasted peanuts.  Use them raw in salads, cook them into flavorful bean soups, use them to make wraps or burritos, or cook them in more of a traditional southern way.  

I perused the internet looking for some tasty, creative recipes using collard greens and found a few I think are worth mentioning.  Hopefully you’ll find some inspiration within this list or try this week’s featured recipe!  Enjoy!  


Pasta with Bacony Collards & Cannellini Beans


Yield:  4 servings

5 ounces (1 ½ cups) short dry pasta (orecchiette, penne or macaroni)
4 cups chicken or vegetable stock or water, divided
4 slices (6 oz) thick-cut bacon, cut into ½ -inch pieces
3 cloves garlic
1 bunch collard greens (See Note Below)
Carrot Tops from 1 bunch of carrots (See Note Below)
1 can (15.5 oz) can cannellini beans, drained and rinsed
¼ to ½ tsp red pepper flakes
Salt and freshly ground black pepper, to taste
1 oz Parmesan or pecorino cheese, finely grated (about 1 cup), plus more to serve
1 Tbsp butter

  1. Put the pasta in a small bowl and cover with 1 ½ cups of chicken stock or water, stirring occasionally to make sure the pasta isn’t clumping together.  Set aside to soak for at least 15 minutes.
  2. Add the bacon to a medium Dutch oven along with 2 Tbsp of water.  Place over medium heat and cook, stirring occasionally, until the fat melts out o the bacon and the bacon becomes brown and crisp, 12 to 15 minutes.  
  3. Meanwhile, smash, peel, and finely chop the garlic.  Strip the collard leaves from the stems.  Stack the leaves and cut lengthwise into four long sections.  Stack the pieces and cut crosswise into ¼-inch thick strips.  Strip the lacey greens from the coarse stems on the carrot tops.  Finely chop the lacey greens and discard the stems.  With the carrot tops and collards combined, you should have a total of about 6 cups of greens.
  4. Using a slotted spoon, scoop the bacon from the Dutch oven and transfer to a plate, leaving the fat behind.  Add the garlic and cook until tender and aromatic, 1 to 2 minutes.  Add the red pepper flakes and cook until aromatic, about 30 seconds.
  5. Add the collards and carrot tops, the remaining 2 ½ cups of chicken stock or water, and a big pinch of salt and black pepper.  Increase the heat to high and bring to a boil, then reduce the heat to maintain an active simmer.  Add the beans and cook, partially covered, until the liquid has reduced to about 1 cup and the greens are tender and silky, approximately 35 to 45 minutes.  Taste the greens and add more salt and black pepper if needed.  (You want it to be very well seasoned at this point, so the liquid and greens can season the pasta.)
  6. Add the pasta along with the soaking liquid and simmer, stirring constantly, for 3 to 5 minutes or until the pasta is al dente.  Remove from heat, add the cheese, butter, and reserved bacon, and stir well to combine.  Taste and adjust the seasoning to your liking with additional salt, pepper and/or red pepper flakes.
  7. Divide the greens & beans creation among 4 bowls and garnish with more cheese if desired.  

This recipe was sourced from Food52.com and was developed by Sohla El-Waylly.  Sohla actually made a video of this recipe which you may view online!  

Note from Chef Andrea:  The beauty of this recipe is that it is very adaptable to other greens aside from or in combination with collard greens.  The author of this recipe says “Use any hearty green here, like kale, escarole or carrot tops.”  As long as the greens have a similar texture, they’ll cook similarly.  You could also use more tender cooking greens in this recipe such as chard, spinach, nettles, radish tops, fennel tops, beet greens. These greens benefit from cooking to make them soft and silky, but they don’t need quite as long as hearty greens like collards.  The author does not recommend mixing hearty greens with more tender greens as the tender greens will be overcooked by the time the hearty greens are ready.  If you do want to mix greens, just give the hearty ones a head start and add the more tender ones a little later.