Wednesday, May 29, 2024

May 30, 2024 - This Week's Box Contents Featuring Baby Bok Choi


What's In The Box

Baby Bok Choi: Read more about this week’s featured vegetable on our blog. Enjoy baby bok choi either raw in salads or lightly cooked. Wash it well before use, especially the base where the leaves attach as there may be dirt in the lower ribs.


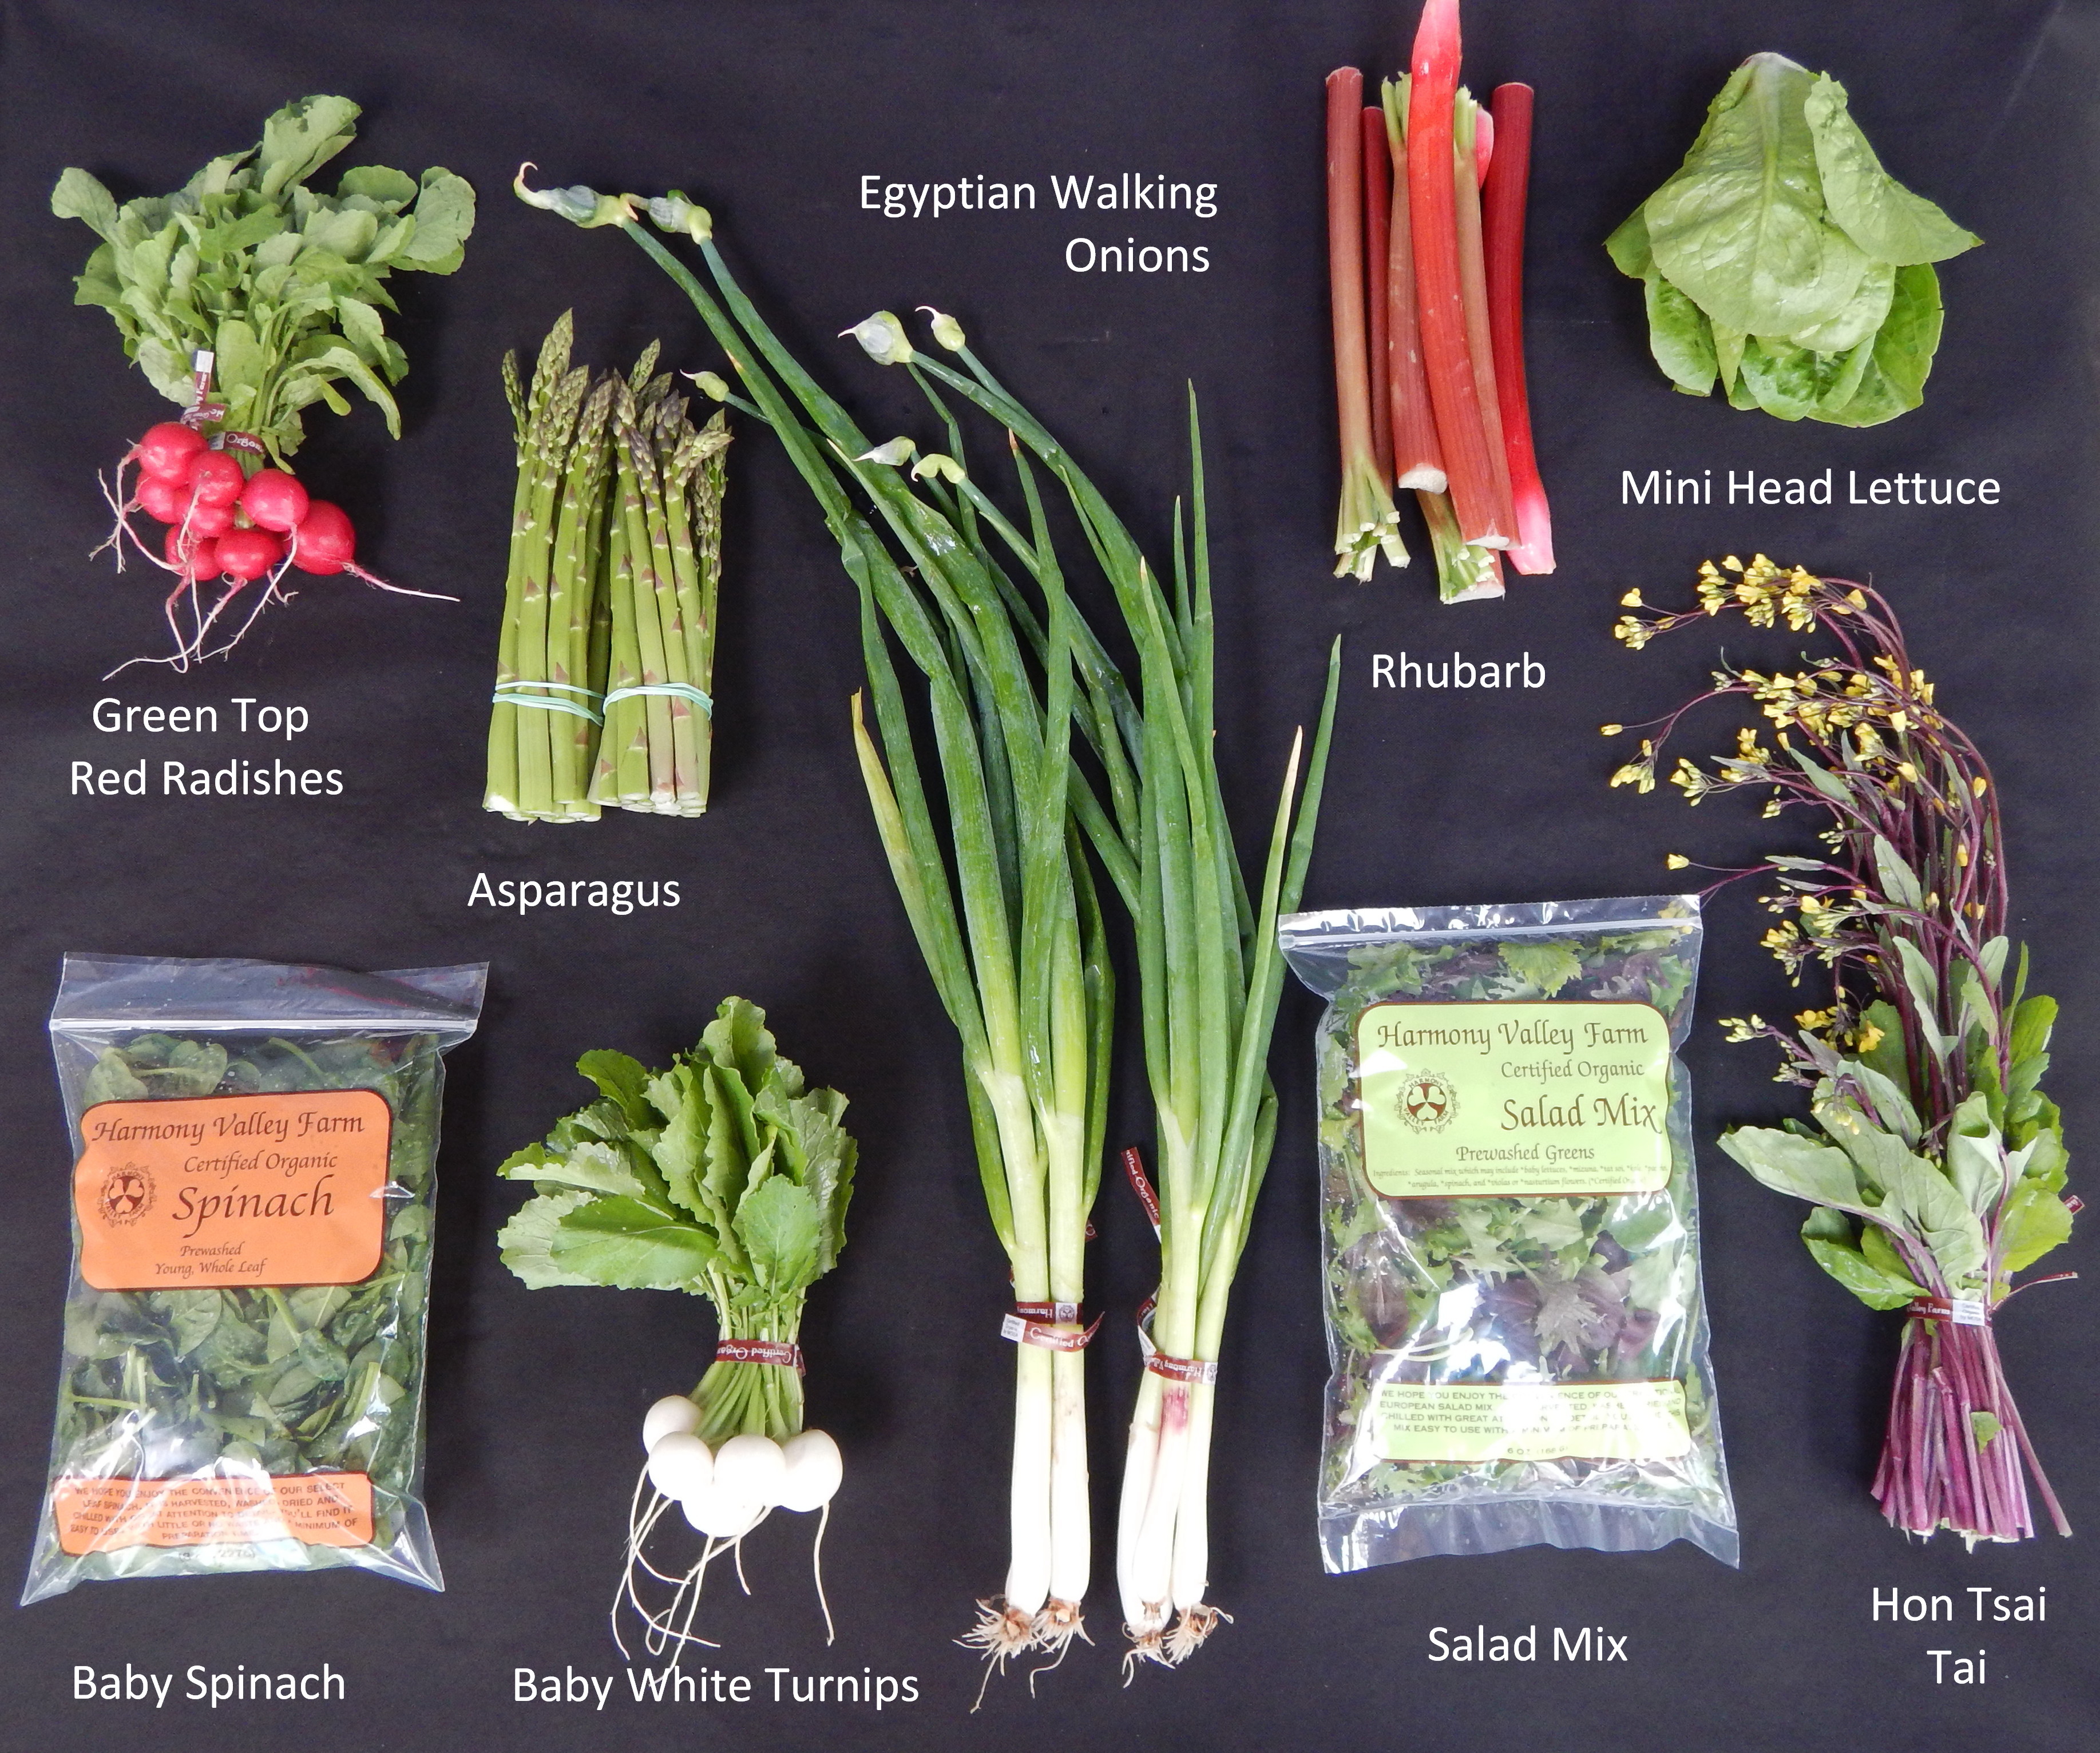
Asparagus: We are nearly finished with asparagus for the season. We’re hoping for one more week of harvest, but no guarantees. The lower portion of the stems can be tough and “woody,” but this part still has flavor! Save these pieces to make vegetable broth!


Rhubarb: Pies, cakes, cookies, and desserts are the typical “go-to” for rhubarb. But don’t forget rhubarb is a vegetable and may also be used in soups and stews, chutney and sauces. Plus, rhubarb may be cooked down and incorporated into a variety of beverages!


Salad Mix AND Baby Arugula OR Baby Spinach: All of these delicate baby greens have had a bit of stress given the amount of rain they’ve experienced over the past two weeks. As such, the shelf life on these items may not be as long as usual. We encourage you to keep these bags in the refrigerator as the cold will prolong their life. However, it may be best to prioritize using these items within a few days of receiving for optimal outcomes.


Hon Tsai Tai: We are harvesting our second and final crop. This week’s bunches are a little younger than what we were harvesting last week thus the stems should be more tender. You may eat this green raw or cooked and it may be used interchangeably with bok choi or other cooking greens in many recipes. Don’t forget to eat the flowers too!


Baby White Salad Turnips: These tender, sweet turnips do not need to be peeled and require minimal cooking time. The greens are also edible, so don’t throw them away! Rinse them well, pat dry, then rough chop them and add them to pasta dishes or soup.


Pea Vine: Pea vine is a pea plant that is harvested while young and before it starts to blossom. The leaves and tender stems may be used in salads, sauteed or stir-fried, incorporated into soup, or blended into cream cheese or pesto. Sometimes the lower to middle part of the stem can become tough. If you find this to be true, remove the tender leaves and use the stem to flavor soups, stews, and broth.


Cilantro: This is the first of our spring-planted cilantro. Cilantro is not only flavorful, but it also serves as a powerful detoxifier for the body. Enjoy it in salads, blend into smoothies and juices, turn it into a dressing, or use it as a garnish for curries and dishes from other cultures.


Garlic Scapes: Scapes grow out of the top of a hard neck garlic plant as nature’s way of propagating a new plant. We remove them to encourage the plant to shunt its energy into making a bulb of garlic. You’ll find Scapes to be nearly entirely usable, up to the bulbil on the end which can be tough. They may be eaten raw, sautéed, grilled, roasted, or stir-fried.


Mini Bibb Head Lettuce: These little heads of lettuce have endured several inches of rainfall over the past few weeks; thus, they are more delicate and should be used sooner than later. You may notice some rust-colored blemishes on the bottom of the head. Just trim off this portion and use the rest. Wash the leaves well in a sink of cold water. Pat or spin off excess water before using.


CHOICE: Herb Packs—This week we have sent one herb pack per vegetable share. See below for more information!


Recipe Suggestions & Inspiration For This Week’s Box Contents

Bok Choi Salad with Sesame-Almond Crunch

Asparagus Mimosa

Greek Asparagus Salad

Tortellini Pasta with Asparagus, Spinach & Ham

Canal House Shaved Asparagus-Arugula Salad

Chana Saag (Chickpeas & Spinach Cooked with Warm Spices

Cilantro Lime Dressing

Citrus Cilantro Smoothie with Spinach

Hon Tsai Tai & Shiitake Potstickers

Cashew Chicken Lettuce Wraps

Garlic Scape & Cilantro Pesto

Garlic Scape Hummus

Stir Fried Garlic Scapes with Eggs

Creamy Turnips, Grits & Greens

Turnip Greens Pesto Pizza

Rhubarb Soda

Rhubarb Cordial

Salty Rhubarb Almond Crisp

Pea Vine Cream Cheese

Pea Vine Pesto Pasta Salad

Fettucine with Pea Vine Cream Sauce


Vegetable Feature: Baby Bok Choi


Originating in China, Bok choi is a member of the Brassica, or cabbage family. It is sometimes referred to as “Chinese Cabbage.” Bok Choi does have a hint of a cabbage-like flavor, but the vegetable itself bears no resemblance to cabbage. Its thick, white stems and dark, green leaves are all edible.


Preparation & Usage
Bok Choi in the Field
Before using the Bok choi you will need to take a moment to clean it. Fill a sink with cold water and trim the base of the Bok choi to allow the leaves to separate from the main stem. Swish the leaves in the water, and then check the base of each leaf. You may need to wash a little dirt off the base of the stem. If you are cooking the Bok choi, remove the greens from the water and shake off excess water. If you are going to use the Bok choi in a salad, you’ll want to dry them a little more in a salad spinner or put them in a kitchen towel and carefully shake them to remove excess moisture.

Baby Bok choi is tender enough to be eaten both raw in salads and cooked.  It is one of nature’s fast foods as it only takes a few minutes at most to stir-fry, sauté or steam it. I usually slice the stems of baby Bok choi separate from the leaves. If cooking, I give them a few additional minutes of cooking time before adding the leaves. Bok choi may be added to seasonal stir-fries, lightly steamed or sautéed and eaten alongside steamed rice and fish, or even cut in half and lightly cooked on a hot grill. If you’d prefer to eat Bok choi raw in a salad, simply dress the greens with a light vinaigrette.
Freshly Washed Bok Choi

Storage Tips
Store baby Bok choi loosely wrapped in a plastic bag in the crisper drawer of your refrigerator until ready for use.

Additional Fun Facts 
We added baby Bok choi to our repertoire of vegetables several years ago and it quickly became one of our “staple” crops that we now plant every week for as many as 20 weeks during our growing season.


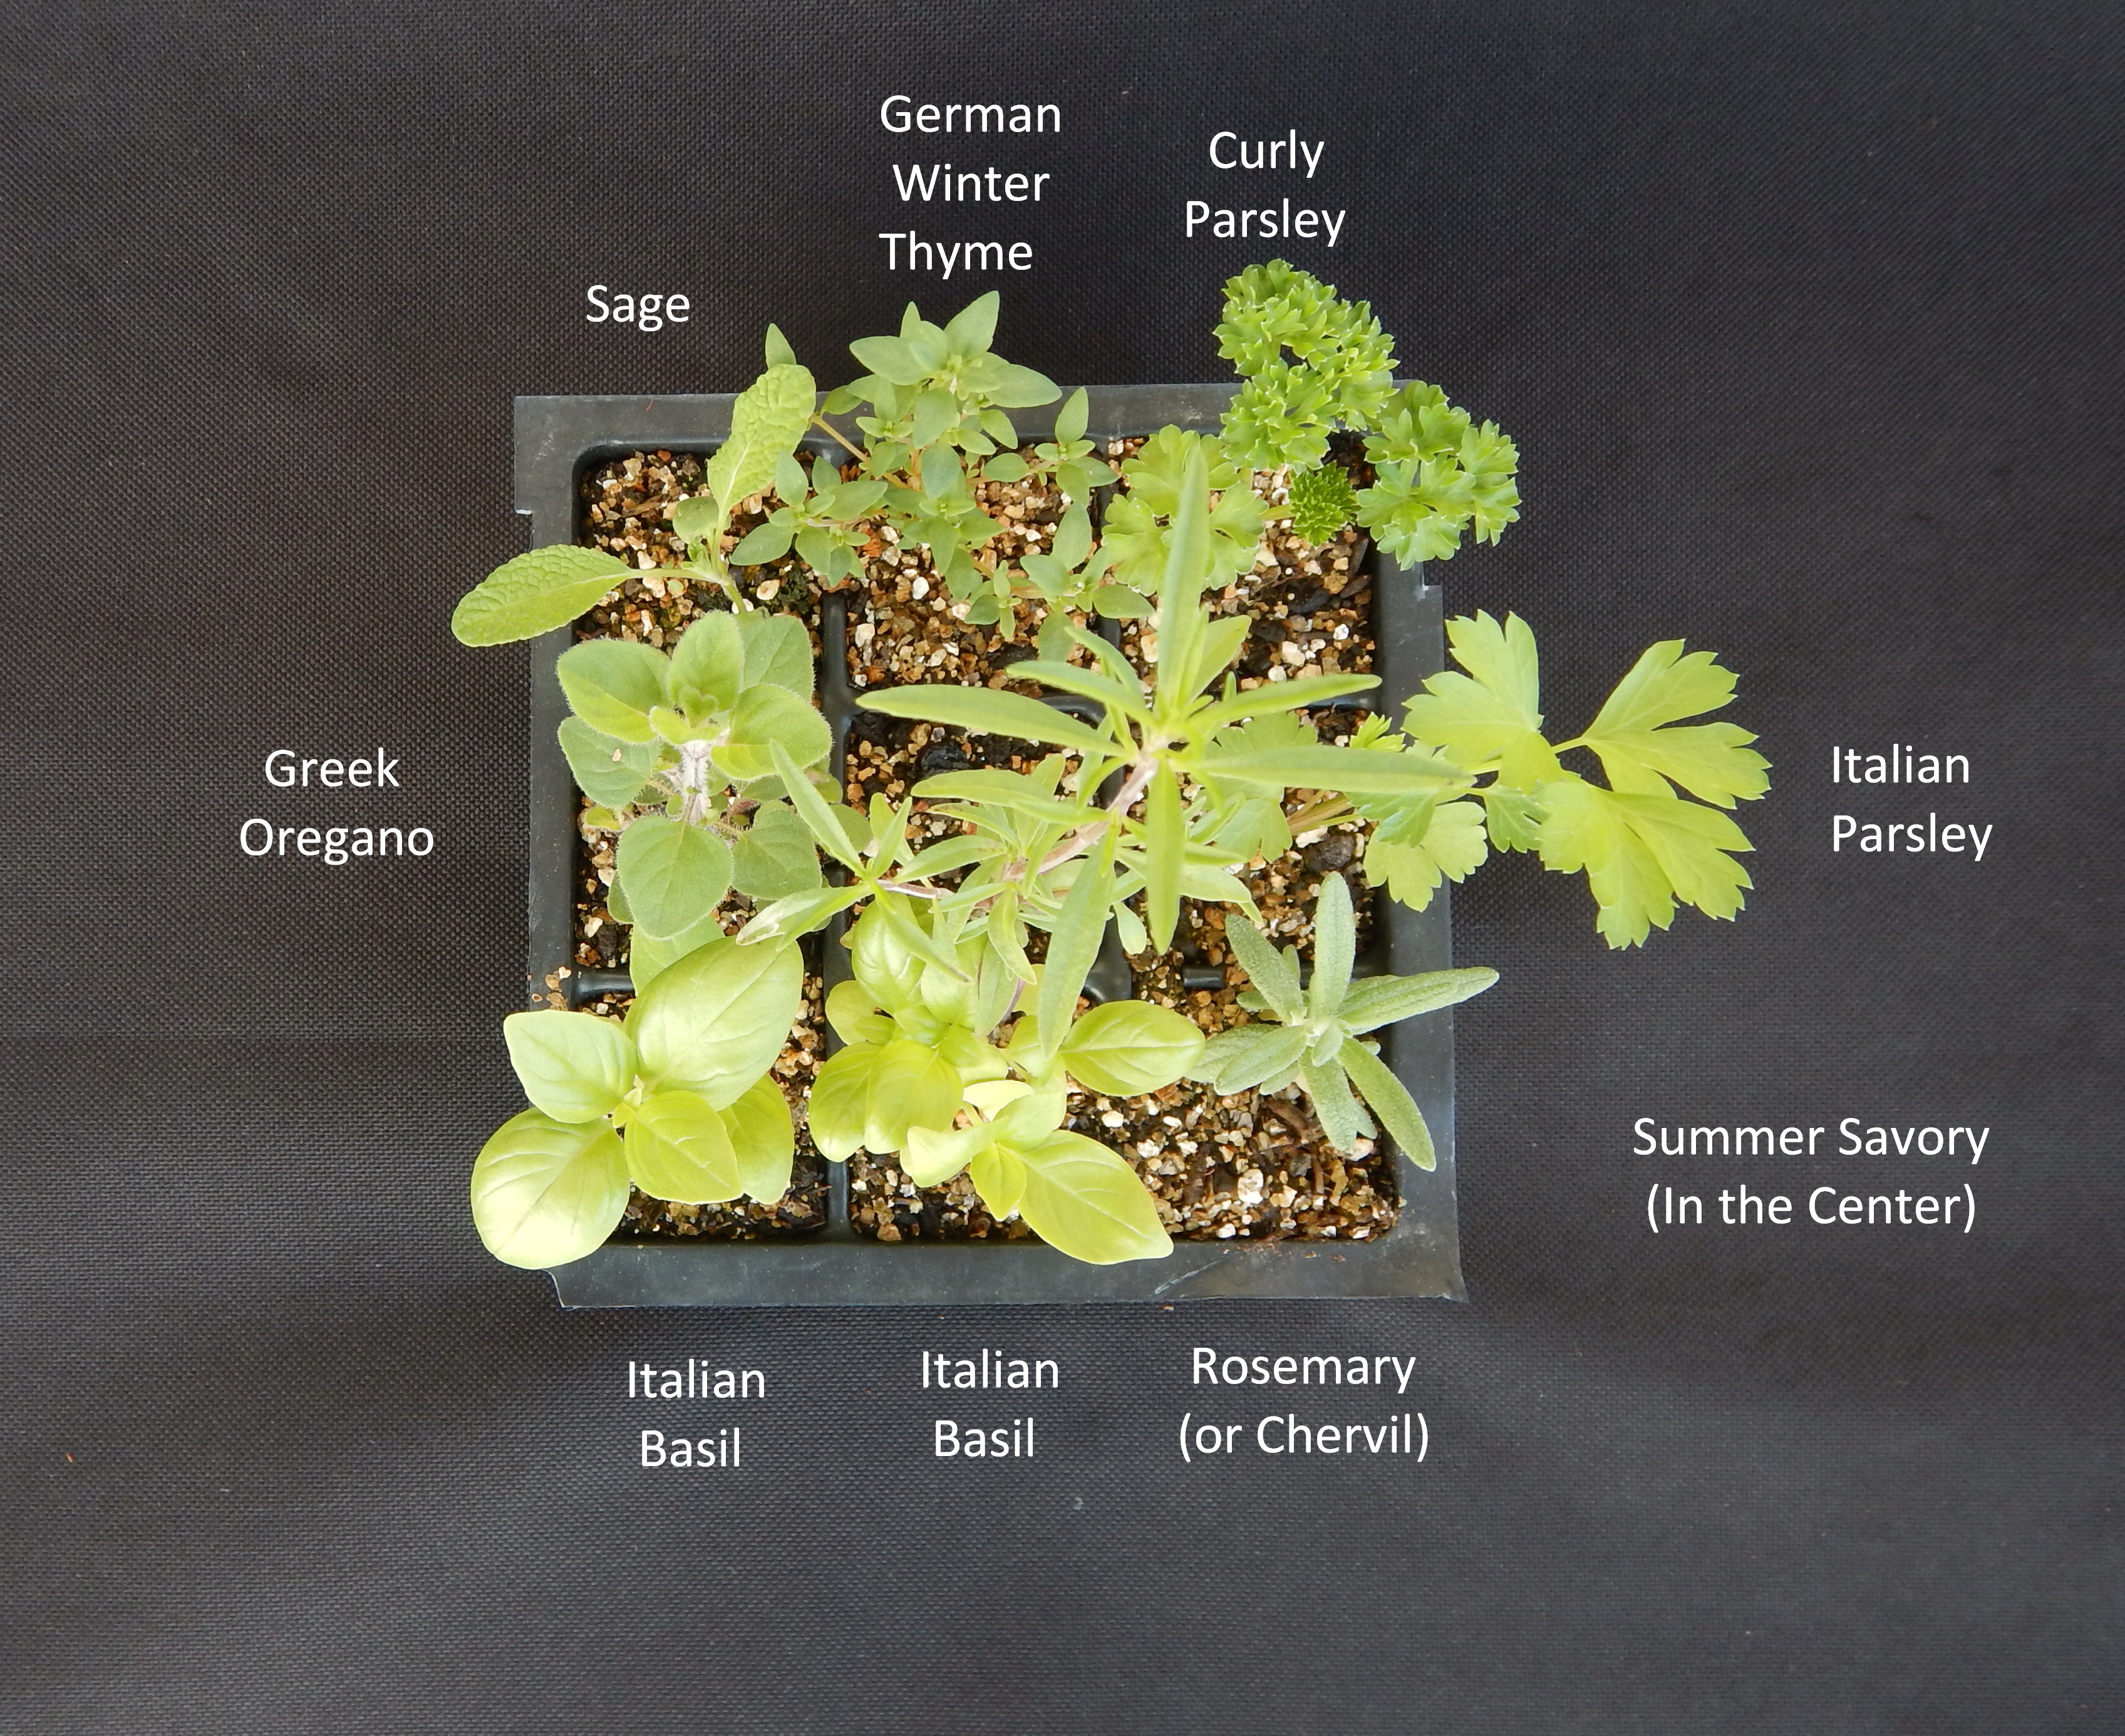
Herb Pack Information


There are four perennial herbs in your pack:  Greek Oregano, Sage, German Winter Thyme & Rosemary (please note some packs may receive chervil in place of rosemary)Oregano, sage and thyme are more cold hardy and have a pretty good chance of surviving our cold winters.  Consider where you would like to establish these herbs in your garden as they will likely come back year after year.  Sage and oregano will get quite large, so it is best to give them about 2 square feet of space in the area you plant them in.  Thyme is a bit smaller and only needs about 1 square foot of space.  While rosemary is a perennial herb, it is not quite as cold hardy.  To ensure it survives into the next year, it is best to bring it indoors in the fall. If you have planted it in the ground, you can dig it up and put it in a pot to keep inside over the winter. 

Oregano


Sage


German Winter Thyme


Rosemary


The remaining plants in your pack are annuals and include Italian Basil, Italian Parsley, Curly Parsley, Summer Savory, and Chervil (included in some packs in place of Rosemary).  Annuals will only produce for this season and will not survive the winter outdoors. Italian basil needs to be cut back regularly to delay flower and seed formation, so they continue to produce usable leaves.  If you see even the earliest sign of flowering in either of these plants, cut them back to keep them vegetative. Parsley will continue to produce throughout the season, so don’t be afraid to cut these plants back too.  If you can’t use your herbs as fast as they are growing, cut the extra herbs anyway and preserve them.  When harvesting your herbs, use a sharp knife or scissors so you can make a clean cut.

Italian Basil


Italian Parsley

Curly Parsley


Summer Savory


Grilled Bok Choi with Peanut Sauce

Bok Choi is a vegetable most commonly associated with Asian cuisine, but within the broad region of Asia it may be used in many different ways depending upon the cuisine.  This week’s recipe is not necessarily indigenous to any particular country, but it is reminiscent of flavors from Thai and Vietnamese cuisine.  The thing I like about this recipe is just how simple it is to prepare, but very flavorful and tasty!

Yield:  3-4 servings

4 small-medium baby bok choi, split length wise (about 1 pound)
¾ cup vegetable stock or water
 cup peanut butter
1 Tbsp oyster sauce
1 Tbsp soy sauce
1 tsp rice wine vinegar
¼ cup raw or roasted peanuts
Salt & Black Pepper, to taste
1 tsp finely sliced fresh red chili OR ¼-1/2 tsp dried red chili flakes
2 Tbsp crispy fried shallots (optional, when in season)
Freshly chopped cilantro, for garnishing (optional)
Fresh lime wedges (optional)

  1. Heat a grill pan or outdoor grill until smoking. (Alternatively, you can use a large cast iron frying pan)
  2. Meanwhile, soak the bok choi in a big bowl of water, agitating to help dislodge any grit, paying particular attention to the outer layers. Run under cold water, using your thumbs to push the leaves apart for one more gander, but try to leave the stems attached to the base if possible.  If you can’t remove all the dirt in this way, it’s ok to take the outer leaves off and just grill them individually.  Cut each head of bok choi into halves or quarters, allowing the base to hold all of the stems together. 
  3. Once the pan or grill is hot, shake excess water off the bok choi and press each piece face down into the pan. Leave over medium-high heat for about 10 minutes, then flip face-side-up for another 3 minutes or so, until the stalks are mildly translucent.
  4.  Meanwhile, combine the stock/water, peanut butter, oyster sauce, soy sauce and vinegar in a saucepan and mix to combine. If you are using dried red chili flakes, add them to the sauce now. If you are using fresh chilis, you may wish to add them as a garnish just before serving. Place the sauce mixture over medium heat and bring to a simmer, stirring, and adding more stock of the sauce needs to be thinned slightly. Season with salt and black pepper to your liking.
  5. If using raw peanuts, toast these in a pan until golden, then roughly chop.
  6. Arrange the bok choi across a platter. Pour over plenty of the sauce, then garnish with the peanuts, and seasonal garnishes as desired.
  7. Serve as a side dish all on its own, or pair it with steamed rice or noodles and a protein of your choosing (e.g., grilled steak or chicken, tofu) to make a complete meal. Give it a squeeze of fresh lime just before serving if desired.

NOTE:  If you do not have Oyster Sauce, you may substitute it with fish sauce, hoisin sauce or just add additional soy sauce.

Recipe borrowed and adapted from In Praise of Veg:  The Ultimate Cookbook for Vegetable Lovers by Alice Zaslavsky.

Wednesday, May 22, 2024

May 23, 2024 - This Week's Box Contents Featuring Baby White Turnips


What's In The Box

Baby White Turnips:  These little turnips are also known as “salad” or “hakurei” turnips. Read more about this, our featured vegetable, in this week’s vegetable feature article. You’ll find them to be tender, sweet and do not need to be peeled.  The greens are also edible and may be used in salads or wilted down in soups, stir-fry, soup, etc.

Egyptian Walking Onions:  This week you will receive 2 bunches of this overwintered spring onion.  Use the green tops and white bottoms in any recipe calling for green onions or scallions.  Take note that you may have an onion that is starting to form a top set. The green stalk/leaf that this grows out of may become rigid and tough as the top set matures. If you find this to be the case, discard that portion of the onion or use it to flavor a soup, stock, or broth. Aside from this scenario, the greens are edible.

Asparagus:  This week your box will contain two bunches of asparagus, approximately 0.75# per bunch. We are coming up to the end of asparagus season with maybe one or two more deliveries after this one.

Green Top Red Radishes:  To get the most out of this bunch of radishes, eat the green tops and the roots! The tops maybe made into pesto, stir-fried, added to soup and eaten in a salad.

Little Gem Head Lettuce:  These little mini heads of lettuce are compact varieties that may be grown in small spaces, such as our tunnel greenhouse!  Use this lettuce to make a salad or use them as a “scoop” for other dips and fillings.  

Rhubarb:  These bright red stalks are often used as a “fruit” in desserts and baked goods, but rhubarb is really a vegetable! Take advantage of its sour/tangy flavor where it shines in savory dishes, such as last week’s featured recipe for Persian Rhubarb Stew.

Salad Mix: This is a mix of baby lettuce varieties and greens including tat soi and red Russian kale. Take advantage of the convenience of this item to put together a spring salad very quickly! Use a vinaigrette or light creamy dressing to dress these greens. The key to longer shelf life is to keep this product cold, so return any remaining portion to the refrigerator as soon as possible!

Baby Arugula or Baby Spinach:  Both of these items make a great base for a salad, but both may also be used in other ways aside from salads. Use the arugula as a topping for pizza or pasta.  Blend the spinach into soup or pasta dishes, such as are listed below!

Hon Tsai Tai:  This is a unique spring green that is in a class of vegetables known as a “flowering brassica.”  It is characterized by green leaves, purple stems, and beautiful yellow flowers. You may enjoy this green either raw or cooked. The stems are mostly edible when they are young and tender and the flowers are edible as well!  

Recipe Suggestions & Inspiration For This Week’s Box Contents

Sesame-Soy Hon Tsai Tai Chicken Salad (See Below)

Vegetable Feature: Baby White Turnips

Freshly washed Baby White Turnips
Baby white turnips are a classy little vegetable we often describe as being “pristine.” They are classified as a salad turnip and are tender with a sweet, mild flavor. Both the roots and the green tops are edible and may be eaten raw or lightly cooked. Compared to the common purple top turnip or other storage turnips we grow in the fall, salad turnips are much more mild and subtle in both flavor and texture. So if you think you don’t like turnips, at least give these a try!

Preparation & Usage:
To prepare baby white turnips for use, separate the roots from the greens and wash both well to remove any dirt. Salad turnips have such a thin exterior layer, they do not need to be peeled. They are delicious eaten raw in a salad, or just munch on them with dip or hummus. You can also cook these turnips, but remember to keep the cooking time short as it doesn’t take much to cook them to fork tender. You can simply sauté them in butter, stir-fry or roast them. The greens may be added to raw salads, or lightly sauté or wilt them in a little butter.

Storage Tips:
To prolong the shelf life, separate the greens from the roots with a knife and store separately in plastic bags in your refrigerator.

Growing Information:  
Baby White Turnips in the field
We plant baby white turnips for harvest early in the spring and again in the fall when the growing conditions are cooler.  We harvest them while they are still small and tender, when the sweet flavor matches their delicate appearance.  The other turnips we grow in the fall are meant for storage purposes and have a thicker skin compared to the thin skin of a salad turnip. Baby white turnips also mature much faster than beets, carrots and fennel, etc. so they are a very important part of our spring menus until the other root vegetables are ready for harvest.


Sesame-Soy Hon Tsai Tai Salad with Turnips & Chicken

Hon Tsai Tai
This week’s recipe comes from the Harmony Valley Farm archives. It’s the perfect recipe for this week’s box and over the years has been a favorite amongst members for this time of the season.  This is an entrée type salad that can be served as a meal on its own. This is a recipe you can do all the prep for in advance and then assemble it just before eating. It is best to dress the greens just before serving, so if you are not going to eat it all in one meal, separate the portion you need and only put dressing on this portion.  This recipe makes more dressing than you will likely need for the quantities of vegetables.  Save any extra dressing and use it to make a quick salad to accompany another meal using some of the other greens in your box. You can also repurpose any extra dressing and use it as a marinade for steak or mushrooms. Enjoy!

Yield:  2-4 as an entrée

2 Tbsp soy sauce
4 Tbsp rice vinegar
2 Tbsp honey
3 Tbsp toasted sesame oil
4 Tbsp sunflower oil
2-4 green onions and/or green garlic
1 Tbsp fresh ginger, minced
Black pepper, to taste
½ tsp salt, plus more to taste
½-1 bunch hon tsai tai
4-5 baby white salad turnips, with greens
3-4 red radishes, with greens
1 ½ cups cooked chicken, small dice
1 Tbsp sesame seeds, toasted
  1. In a small mixing bowl, combine the soy sauce, rice vinegar, honey, and sesame oil. Stir well to combine and incorporate the honey. Stir in the sunflower oil.
  2. Thinly slice the lower white portion of the green onions/green garlic. Add the white portion to the bowl containing the dressing mixture. Set aside the green tops. Stir in the onions/garlic, as well as the minced ginger and ½ tsp salt. Set the mixture aside until you are ready to use it.
  3. Prepare the vegetables. Start by removing the leaves from the hon tsai tai stems. Cut or tear the leaves into bite-sized pieces and put them in a mixing bowl. Mince or thinly slice the remaining tender stems and flowers. You can use the entire stem except for the lower 1-2 inches and/or any stems that may be more mature and feel tough. Put the minced stem and flowers in a separate medium sized bowl.
  4. Cut the green tops off of both the turnips and the radishes.  Wash and dry well. Cut or tear both of the greens into bite-sized pieces and add them to the bowl with the hon tsai tai greens.  
  5. Cut the turnips and radishes into quarters and then thinly slice them and add them to the bowl with the hon tsai tai stems. Thinly slice the remining green onion/garlic tops and add them to this bowl as well. Stir to combine all the vegetables.
  6. Add the chicken and half of the dressing to the bowl with the hon tsai tai stems, turnips, and radishes. Stir to combine.
  7. Drizzle some of the remaining dressing over the greens, using just enough to lightly coat the greens. Divide the greens onto 2-4 plates.  Top with the chicken and vegetable mixture. Finish each plate by sprinkling them with toasted sesame seeds.
Recipe by Andrea Yoder, originally published in June 2014.

Wednesday, May 15, 2024

May 16, 2024 - This Week's Box Contents Featuring Rhubarb


What's In The Box

Rhubarb:  Read more about how to use, prepare and store this week’s featured vegetable in our feature article. Store rhubarb in a plastic bag in the refrigerator to keep it hydrated until you’re ready to use it.  Use it in sweet desserts or take advantage of its sourness in savory dishes!

Ramps:  This is our final delivery of ramps. We harvested these at the end of last week as we were seeing signs indicating the end of harvest season. Prioritize using these ramps sooner than later as they may not store as long as with other deliveries. 

Watercress:  This green is in the “cress” family and has a peppery, spicy flavor. We have washed it, but suggest you give it a final washing in a sink of clean, cold water before you use it. Watercress may be eaten raw in salads or lightly wilted down or blended into soup. If you eat a piece on its own, you may find its pungency to be a bit too much. However, if paired with fat & acidity, the pungency mellows and the flavor is more balanced.  

Chives:  This is our last week for chives and yours may have some purple buds/blossoms. The flowers and/or buds are also edible and have a nice onion flavor. As the flower becomes more open, its stem may become more rigid and tough. If you notice this, use the rigid stem to flavor sauces and stocks, or compost it.

Green Garlic:  Green garlic resembles a scallion or green onion, but you can tell the difference by looking at the green tops.  Green garlic has flat leaves/green tops while green onions or scallions have round tops. Use green garlic, white base, and green tops, in any recipe calling for garlic and/or onions.

Egyptian Walking Onions:  This is an overwintered multiplier onion. It’s called a “walking” onion because it forms a “set” on top that makes the green top so heavy it falls over, thereby propagating itself and “walking,” like an Egyptian I suppose.  This is a flavorful onion, so be sure to use all of it from the base to the green tops.

Asparagus:  There are two bunches in your box this week totaling about 1.5#. Steam it, roast it, sauté it, or shave it and eat it as a raw salad! Wrap it in bacon or prosciutto, drizzle it with brown butter or hollandaise. Eat it with your eggs for breakfast, layer it in a grilled cheese sandwich for lunch, roast it and serve with grilled flank steak for dinner. Don’t forget to keep the base of the stems moist with a towel or stored upright in a glass of water to keep the spears crisp, not floppy.

Overwintered Parsnips: Stored in the field over the winter and dug this spring, these parsnips are sweet and delicious! You may notice some rusty blemishes on the exterior. This is something we see sometimes in the spring. It usually only affects the surface and may be cut or peeled away. 

Gold Potatoes or Russet Potatoes:  These potatoes are from last fall’s harvest and have been held in cold storage, but they are at a point in their lifecycle where they want to start sprouting. We recommend you use these potatoes within a week of receiving them. If you do have some that start to sprout, cut out the sprout and use the remainder of the potato as soon as possible.

Green Top Red Radishes:  This is one of our favorite times of the year to eat fresh radishes as the flavor is most balanced in the cool of the spring and fall. Eat them with a bit of salt and butter or add them to a salad. And those green tops, don’t throw those away—they are edible and contain valuable nutrients!  Use them to make pesto, blend them into a green drink, or sauté with other greens.

Little Gem Head Lettuce:  We grew these compact heads of lettuce in one of our tunnel greenhouses. Separate the leaves from the core at the base of the head and wash well before using. Pat dry with a towel or dry them in a salad spinner. Turn them into a salad or use the leaves as a carrier for fillings or dipping!

Sorrel or Stinging Nettles: 
Sorrel:  Sorrel is a perennial green that is related to rhubarb. It is light green with arrow shaped leaves that are tangy and have a lemon-citrus flavor. Sorrel may be eaten raw or cooked in soups and sauces where it melts into the hot liquid. Please note, we have not prewashed the sorrel. You should wash this sorrel in clean, cold water before using it.  Pat it dry with a clean towel or dry it in a salad spinner.

Nettles:  Now before you go and put the nettles in the swap box, check out some of the suggested recipes below that are tried and true crowd pleasers! If you aren’t sure how to handle them so you don’t get stung by the little prickers on the stems and leaves, visit our nettle blog post from several years ago which includes handling suggestions and pictures.  Once the nettles have been blanched in boiling water, they can be handled with bare hands.  


Recipe Suggestions & Inspiration For This Week’s Box Contents:

Nettle & Mushroom Pizza with Ramp Cream

Persian Rhubarb Stew (See Below)  


Vegetable Feature: Rhubarb

Rhubarb is an interesting vegetable that is often thought of as a fruit. It is part of the knotweed family of plants that also includes sorrel and buckwheat. Both rhubarb and sorrel are perennial crops that we rely on to fill the gap in our diet between stored winter vegetables and spring planted crops. These vegetables are high in oxalates which is what gives them that sour, tangy flavor. In the case of rhubarb, the stalk is the edible part of the plant and the leaves are discarded.

Preparation & Usage:
Rhubarb may be eaten raw, however it is pretty sour in the raw state so most individuals prefer to cook it first. While the tart, sour flavor of rhubarb is often masked or covered with copious amounts of sugar and sweeteners, it doesn’t have to be that way. Instead of masking the characteristic flavors of rhubarb, why not use those innate qualities to your advantage?! Rhubarb pairs well with fatty meats such as duck, pork, chicken thighs and salmon. The tartness of the rhubarb helps to balance the fattiness of the meat as well as eggs and dairy products such as cheese & cream. It also helps to wake up your taste buds which makes it easier for you to experience other flavors in a dish. The flavor of rhubarb can stand up to bolder spices such as curries, cardamom, peppercorns, cinnamon and ginger. Rhubarb can be used as a stir-fry vegetable, added towards the end of cooking so it just starts to soften, but still holds its shape. It can also be used to create a flavorful braising liquid and then sauce for pork and other meats. It also makes a delicious compote or chutney to eat alongside Indian food, spoon over grilled or roasted meats, or simply eat as a snack with cream cheese and crackers!

Of course, you’ll never go wrong with enjoying rhubarb in sweet preparations as well.  Muffins, cakes, cobbler, fruit crisps and beverages are all excellent ways to use rhubarb.  Rhubarb pairs well with fruits including strawberries, raspberries, blueberries, lemon, oranges and apples.  Finally, sugar is not the only sweetener for rhubarb; the flavors of honey and maple syrup are also nice accompaniments.

Storage Tips:
Rhubarb should be stored in a plastic bag in the refrigerator to keep it fresh and firm until you’re ready to use it. If it gets a little floppy or dehydrated, don’t throw it away as it can still be used in dishes where you’re cooking the rhubarb. Rhubarb can also be frozen for later use. If you want to freeze rhubarb, simply wash the stalks, cut into smaller pieces (size is up to you) and put it in the freezer in a freezer bag. You do not need to cook rhubarb before freezing it, you can freeze it raw.

Growing Information:  Rhubarb is a perennial plant that grows from a gnarly root base referred to as a “crown.” Once a plant is established it can continue to produce for many years. The first several years are very important for the plant to make sure the crown develops and has enough energy to become established. For the first two years of the plant’s life, we don’t harvest any rhubarb from the plant. In the third year, we start harvesting stalks.

Additional Points of Interest: 
Rhubarb is thought to have originated in the areas of China, Mongolia and Russia.  Before it was used as a food, rhubarb root was traditionally used as a medicine to treat a wide range of ailments, including detoxification, liver & blood cleansing.  Its culinary use also started in the east where it was used in drinks and meat stews before later spreading to Europe and finally the United States at the end of the 18th century.  It now holds a special spring time slot in our Midwestern diets.


Persian Rhubarb Stew (Khoresh Rivas)

This week’s recipe comes from Persia, an area in the Middle East that is present day Iran. The word “khoresh” comes from Farsi (Persian language) meaning “to eat” and is used to refer to stews.  I believe the word “Rivas” refers to rhubarb.  This recipe requires some time for cooking but is otherwise very easy to assemble and results in a flavorful dish that really highlights the innate qualities of rhubarb.  This stew is traditionally made with lamb, which is very fitting for spring. However, it has been adapted to be prepared with beef or dark meat chicken as well. As you’re making this stew, you may feel the urge to add more liquid (I did!).  Trust the recipe. You’ll be surprised, but this will result in a stew that is thick enough to spoon over rice, but it is not supposed to be watery or have a lot of excess liquid.  And if you think the amount of mint will be overpowering, it’s really not.  Again, trust the recipe! Enjoy!

Yield:  4 servings

4 Tbsp olive oil
1-1 ¼ cup thinly sliced spring onions/scallions and/or green garlic (base only)  
½ tsp turmeric, ground
1 pound stewing meat (beef, lamb, chicken thighs)
2 ½-3 cups water or stock (vegetable, beef or chicken)
1 ½ tsp salt, plus more to taste
½ tsp ground black pepper
1 pound rhubarb (Approximately 2 cups), cut into ¾-1 inch chunks

Sabzi (Herbs)
4 Tbsp olive oil
3 cups finely chopped fresh parsley 
1 cup finely chopped fresh mint 
  1. In a medium-large pot, heat the olive oil and sauté the onions over medium heat for about 8-10 minutes. 
  2. Add the turmeric and stir to combine before adding the beef pieces. Add the beef and sauté until the beef starts to brown a bit, stirring periodically to make sure the onions do not get too brown.
  3. Add 2 ½ cups of water or stock, bring to a rapid simmer, cover and simmer over low heat for about 40-60 minutes or until the meat is just starting to get tender.  The cooking time for this step will vary depending on the cut of meat you use.
  4. Meanwhile, in a large frying pan, add 4 Tbsp olive oil and sauté the chopped fresh parsley and mint over medium heat for 8-10 minutes. You may need to add another ½ cup of liquid at this step if the amount of liquid in your stew has reduced greatly.
  5. Lower the heat towards the end to prevent the herbs from burning. Remove from the heat and set aside. 
  6. After the meat has cooked for 40-60 minutes, add the salt, pepper and sauteed herbs. Cover and continue to cook for 10-15 minutes over medium-low heat. At this point, the stew should be very fragrant with the herbs and meat fork tender. The consistency of the stew should be dense and not at all watery. In the next step you will add the rhubarb which will release some liquid, so if you feel like it needs more liquid hold off until the rhubarb has cooked down a bit. 
  7. Add the rhubarb pieces to the stew, gently mix, cover, and cook until the rhubarb has softened, about 8-10 minutes. You want the rhubarb to be tender, but to still hold its shape. Thus, take care not to overcook it (and if you do, it will still be delicious it will just have less chunkiness). 
  8. Serve the stew with steamed basmati rice and, if you wish, a side of plain yogurt.
Recipe adapted from Omid Roustaei, The Caspian Chef.

Wednesday, May 8, 2024

May 9, 2024 - This Week's Box Contents Featuring Ramps


What's In The Box

Watercress:  This green is in the “cress” family and has a peppery, spicy flavor, similar to arugula.  It may be eaten raw in salads or lightly wilted down or blended into soup.  Fat & acidity help to balance the pungency of this green, such as dressing watercress with a vinaigrette or serving it as an accompaniment to fatty fish or roasted meat.  We have washed it for you, but we suggest you give it a final washing in a sink of clean, cold water before you use it.

Chives:  This week’s chives may have a purple bud or blossom, which is also edible!  The bright flavor of chives makes them a nice garnish for soup, scrambled eggs, casseroles, chive oil, and so much more!  You may also choose to blend them into chive cream cheese, chive compound butter, or with oil to make your own chive oil!

Ramps:  This week you will find two bunches of ramps in your box!  Both the leaf, stems and bulbous base are edible.  We are nearing the end of the season and had to harvest around the rainstorms, so the leaves in particular may be more delicate and should be eaten within a week.  Enjoy ramps lightly sauteed or raw in egg and pasta dishes, risotto, salads, etc.

Asparagus:  Store asparagus in the refrigerator with a moist cloth or paper towel wrapped around the base of the stalks to keep them crisp and firm.  While you can eat asparagus raw, it is most commonly cooked.  It may be roasted, sauteed, grilled, and stir-fried.  

Overwintered Cilantro:  We gambled a bit and planted this cilantro late last fall, hoping it would be ready before winter set in.  While we weren’t able to harvest it last year, this crop survived the winter due to the mild temperatures we had!  Cilantro is a great vegetable to incorporate into spring dishes as it helps the body cleanse and detoxify.

Overwintered Parsnips: We stored these parsnips over the winter in the field and dug them this spring.  They are sweet and delicious, almost like candy, especially when roasted!  You may notice some rusty blemishes on the exterior.  This is something we see sometimes in the spring.  It usually only affects the surface and may be cut away.  

Overwintered Sunchokes:  This is another root vegetable that we overwintered in the field and dug this spring.  They are a tuber that grows on a plant that resembles a sunflower.  They contain a nondigestible fiber called inulin which is considered a prebiotic and feeds our gut bacteria to help keep them healthy.  The unfortunate side effect is that some individuals experience digestive discomfort when eating them.  We’ve found it’s dose-dependent, so eat sunchokes in small amounts until you know what your threshold is!  Sunchokes may be eaten raw or cooked.  If cooked, you can prepare sunchokes in similar ways to how you’d use a potato.

Carola Gold Potatoes:  We squirreled away a few bins of potatoes from last fall’s abundant harvest.  They have stored pretty well in cold storage, but they are at a point in their lifecycle where they want to start sprouting.  Thus, we recommend you use these potatoes within a week of receiving them.  If you do have some that start to sprout, cut out the sprout and use the remainder of the potato as soon as possible.

Stinging Nettles: This green is named as such because it has “stingers” on the stems that can cause skin irritation if handled before cooked.  Once nettles are cooked, the sting goes away and you can touch them with bare skin.  For this reason, we recommend that you cook them and do not eat them raw.  For ease of handling, we have packed the nettles in a clear plastic bag.  If this is your first time, we encourage you to read our previous blog post from 2018 prior to opening the bag.  This blog post includes important information about how to handle and prepare nettles.   Use nettles in any way you would use cooked spinach, such as soups.

Overwintered Spinach:  Due to the early onset of spring this year, our overwintered spinach crop came in well ahead of schedule!  The crop is well past the “baby leaf” stage of growth, which is usually when we harvest it.  We let it grow to a larger leaf and have bunched it for you.  You’ll find this to be some of the most flavorful spinach of the year, but it is a more mature leaf.  At this stage we find it is best when cooked as it softens the leaf, making it silky and smooth.  


Vegetable Feature: Ramps

Ramps, sometimes referred to as “wild leeks,” are one of the first signs of spring we see emerging on the wooded hillsides of our valley. They have a very short season which is typically only 3-4 weeks. The flavor of ramps is similar to onions or garlic, but they really have a unique flavor that is best described as “rampy!” Ramps resemble a green onion, except they have tender, delicate, lily-like leaves and the base of the ramp becomes more bulb-like as it matures.

Ramps as far and wide as one can see!
Preparation & Usage:
Ramps may be eaten raw or cooked and can be used in ways, similar to a green onion. When raw, they can be quite pungent, however the flavor mellows with cooking. You can eat both the leaves and the lower bulb, just trim away the roots. Ramps pair well with cream, cheese, bacon and other spring vegetables including mushrooms, asparagus, nettles and spinach. Ramps also pair well with eggs in scrambles, frittatas and quiche and are often incorporated into pasta and rice dishes. Ramp pesto and ramp butter are simple preparations that may be used fresh or can also be frozen as a way to preserve that delicious spring flavor!

Storage Tips:
The leaves on ramps are delicate and the most perishable portion of the plant. Ramps that are more mature and harvested under wet conditions often have a shorter shelf life. Thus, we encourage you to eat them within a few days of receiving them. Store ramps in a plastic bag in the refrigerator.  If you are going to keep ramps for several days, it’s a good idea to wrap the leaves with a damp paper towel.  The bulb portion of the ramp will store longer than the leaves, so some may choose to separate the bulb from the leaves and store them separate.

Growing Information:  
Ramps grow wild in the woods on north-facing hillsides early in the spring.  While they can be replanted in woodland areas that are conducive to supporting ramp populations, it takes awhile for them to multiply and spread.

Additional Points of Interest:  We have been wild-harvesting ramps in our valley since the mid-80’s.  Many individuals are concerned about the sustainability of harvesting ramps.  Of course, we want our ramp populations to remain sustainable as well, thus we carefully manage our harvests.  We harvest from private land which allows us to rotate harvest areas. 

Additionally, ramps grow in clumps and we’re careful to only take about half of a clump while leaving the other half undisturbed.  We’ve been implementing this practice since the very beginning and our ramp populations remain strong and healthy!  With the future in mind, we have been planting ramps in a few wooded areas on our land over the past few years.  It will be awhile until we can harvest from these areas, but they are well-established and we’re hopeful they’ll thrive into the future!


Spring Tambuli with Ramps and Greens

Yield:  4-5 servings

Tambuli is a saucy Indian side dish based on leafy greens, spices and buttermilk or yogurt.  It is often served cold or at room temperature with steamed rice as a side dish or first course.   I (Chef Andrea) am still learning about Indian food, so I realize my adaptation of this recipe may not be the “traditional” way this dish is made in India.  However, the fun part of cooking is using food to explore other cultures, different ingredients, flavor combinations and cooking techniques.  This dish is very simple to make, but very flavorful.  You can enjoy it served simply with rice as a side dish in a meal or add protein to the dish (e.g. cooked chickpeas or chicken) and enjoy it as a main item.  This saucy preparation may also be served over cooked potatoes or with eggs, or use as a dip for pita, papadum or anything else! In my research, I also found that this dish is very adaptable to whatever ingredients you have in season.  So, if you like this recipe, don’t be afraid to experiment with different greens and onion varieties throughout the season.  And lastly, if anyone in our membership is from India or Indian descent and has anything they’d like to share with us about this dish, I’d love to learn and share more with other members!


4 cups lightly packed fresh greens such as spinach, nettles and/or watercress
1 bunch ramps, bulb and leaves separated
1 Tbsp ghee, coconut oil or vegetable oil
1 tsp cumin seeds
4 whole black peppercorns
2-3 pieces fresh or dried curry leaves (Optional)
1 cup yogurt or buttermilk
3 Tbsp coconut flakes
Sea Salt, to taste
Steamed Rice, for serving
For Finishing (Tempering):
2 tsp ghee, coconut oil or vegetable oil
1 tsp mustard seeds
1 dried red chile (crumbled) or a pinch of red chili flakes (to taste)
  1. Prepare the leafy greens by washing them well, shaking off excess water, then separate the leaves from the stems.  Roughly chop the leaves and any tender stems, set aside.  
  2. Finely chop the bulbous base of the ramps and set aside.  Cut the ramp leaves into thin strips and add them to the pile of chopped greens.
  3. Heat the ghee, coconut oil or vegetable oil over medium-high heat in a medium sauté pan.  When the oil is hot, add the chopped ramp bulbs, cumin seeds, black peppercorns, and curry leaves (if using).  Sauté, stirring frequently, until the ramps are tender, and the spices are aromatic.  Add the leafy greens to the pan and season with a few pinches of salt.  Cover and let the greens steam for a minute or so to wilt down.  Remove the cover and stir to combine.  When the greens are soft, remove the pan from the heat.
  4. Add the greens mixture to a food processor or blender along with the yogurt or buttermilk and coconut.  Blend until it becomes a fairly smooth paste.  Add a little water if it is too thick.  It should be thick enough to coat the back of a spoon, kind of like a thin yogurt.  Taste and add additional salt as needed.  Transfer to a serving dish.
  5. The finishing touch on this dish is called “tempering.”  For this step, heat another 2 tsp ghee, coconut oil or vegetable oil in the same sauté pan you used for the greens.  Heat the oil over medium high heat.  You may want to carefully tilt the pan slightly so all the oil pools on one side.  When the oil is hot, add the mustard seeds and chili pepper.  Fry them until they are fragrant, moving them back and forth in the oil with a spatula or spoon as they cook.  When the mustard seeds start to pop, remove the pan from the heat and carefully pour the oil mixture with the chiles and mustard seeds into the yogurt and vegetable mixture.  It should sizzle when the two mixtures come in contact, releasing flavors into each other.  Stir to combine.  It is ready to serve at room temperature.  Store any leftovers in the refrigerator.
Recipe adapted by Andrea Yoder from one entitled “Tambuli with Stinging Nettles or Spinach” found at Food52.com.